
Overview
Citywide Portal is a self-serve desktop and mobile application that allows the public to create, track and update applications within Citywide Permits and to create Maintenance Service Requests.
Citywide Portal is the successor to ePermits/CRP, and includes improvements to both the user interface and its functionality. Most importantly, with Citywide Portal, applicants and service requestors have the ability to follow up on their applications and requests and view a history of both, whereas ePermits/CRP involved one-way, non-interactive messaging. Whereas Citywide Portal displays a history of application and service requests and their statuses, each ePermits/CRP application was treated independently and involved a simple email acknowledgement for each.
Portal Activation and Access Levels
Citywide Portal must be activated by PSDCitywide Implementation or IT personnel (those referred to in the table below with “Super User” accounts). Once activated, anyone with the Portal URL will be able to access the Portal and register as a Portal Applicant user. Any registered Applicant user can then be elevated to Portal Administrator by a Citywide Super Admin. From that point on, the Portal Administrator will administer the day-to-day operations and various settings of the Portal.
In addition to registered Applicant users, a Guest Applicant user is able to create permit applications and service requests without registering as a user. The differences between these two access levels and those of all the other user types are outlined in the following table:
| Role | Guest Applicant User |
Registered Applicant User | Portal Administrator |
Super Admin (Citywide) |
|---|---|---|---|---|
| Description | Permit or service request applicant | Permit or service request applicant | Administration of one or more Portal sites | Administers all Portal sites |
| Role Initiation | Self or Portal Admin | Self or Portal Admin | Super Admin. Must first be set up as a common applicant | N/A |
| Can . . . | Create Applications and Service Requests | Create Applications and Service Requests and follow up interactively on their status |
|
|
| Cannot . . . | Follow up on entered Applications and Service Requests | No other operations |
|
|
| Supplemental Notes |
|
|||
Portal URL and Login
To access the Citywide Portal, enter the applicable URL below:
-
A Client Portal Admin email address and password must be set up as a registered user first and ensure that the email address is verified. Click here to follow the instructions on setting up a registered user email address and password.
- Once the email address is verified, please reach out to your implementation advisor or client success representative for assistance to update the permissions of that user to 'client admin' accordingly.
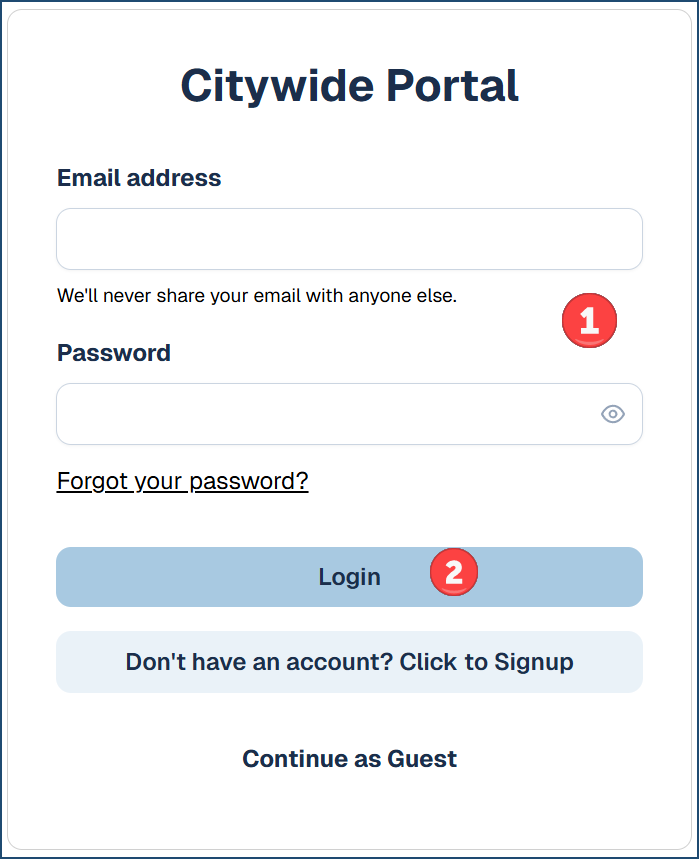
- After the client admin permissions are set, login to the Citywide portal with your email and password ❶.
- Then click Login ❷.
- Client Portal Admin users’ home options screen will look like this:
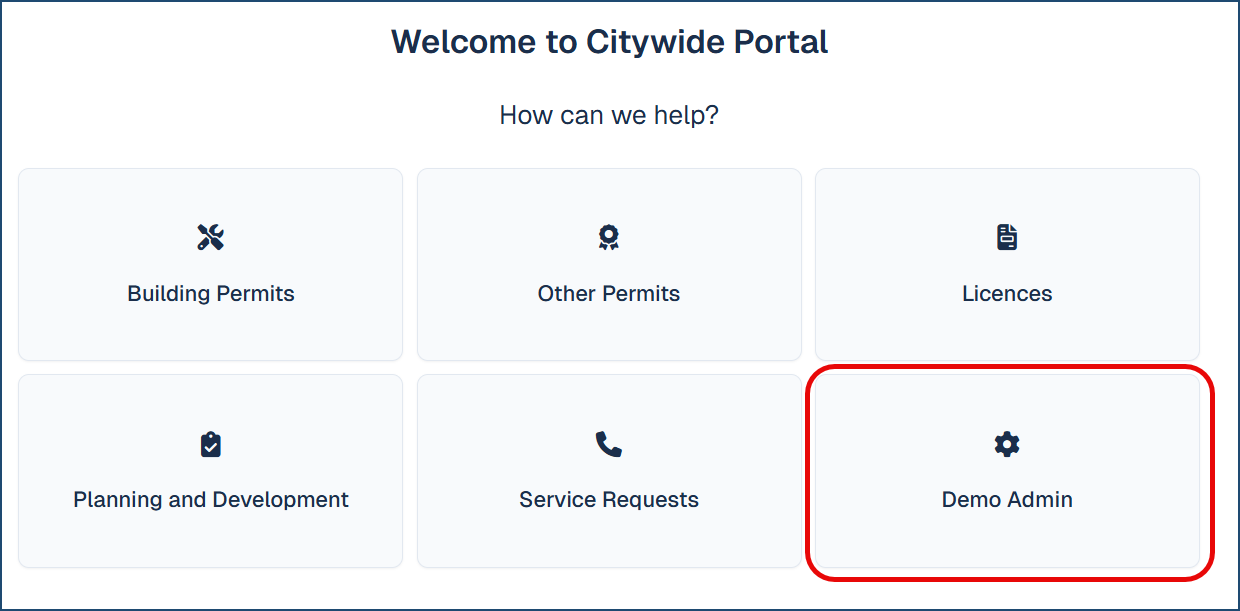 However upon login, the client admin will be directed to the Admin Dashboard:
Setting up the Client Portal Administrator Account
Setting up the Client Portal Administrator account involves elevating a registered Portal user account to Portal Administrator status. Hence, a prospective Client Portal Admin user must first be a registered Portal user.
The elevation to Client Portal Admin status is accomplished following a request to Citywide Implementation or Support staff who have “Super Admin” status in the system.
Client Portal Administrator accounts are distinct from Citywide Administrator accounts. That is, a Citywide Administrator does not automatically assume Portal Administrator status. The status is not transferable. Hence, Portal Admin accounts can only be created from registered Portal user accounts, and any registered Portal user can be elevated to Portal Admin status.
Once Portal Admin status has been conferred, the Portal Administrator will have access to the administrative functions, accessible from the Admin option in the Navigation Pane.
Portal Administration
Admin Screen Navigation
This is the Administrator interface ❶, which defaults to the Dashboard function. All the other functions are accessible by clicking on the menu items on the left side of the screen ❷:
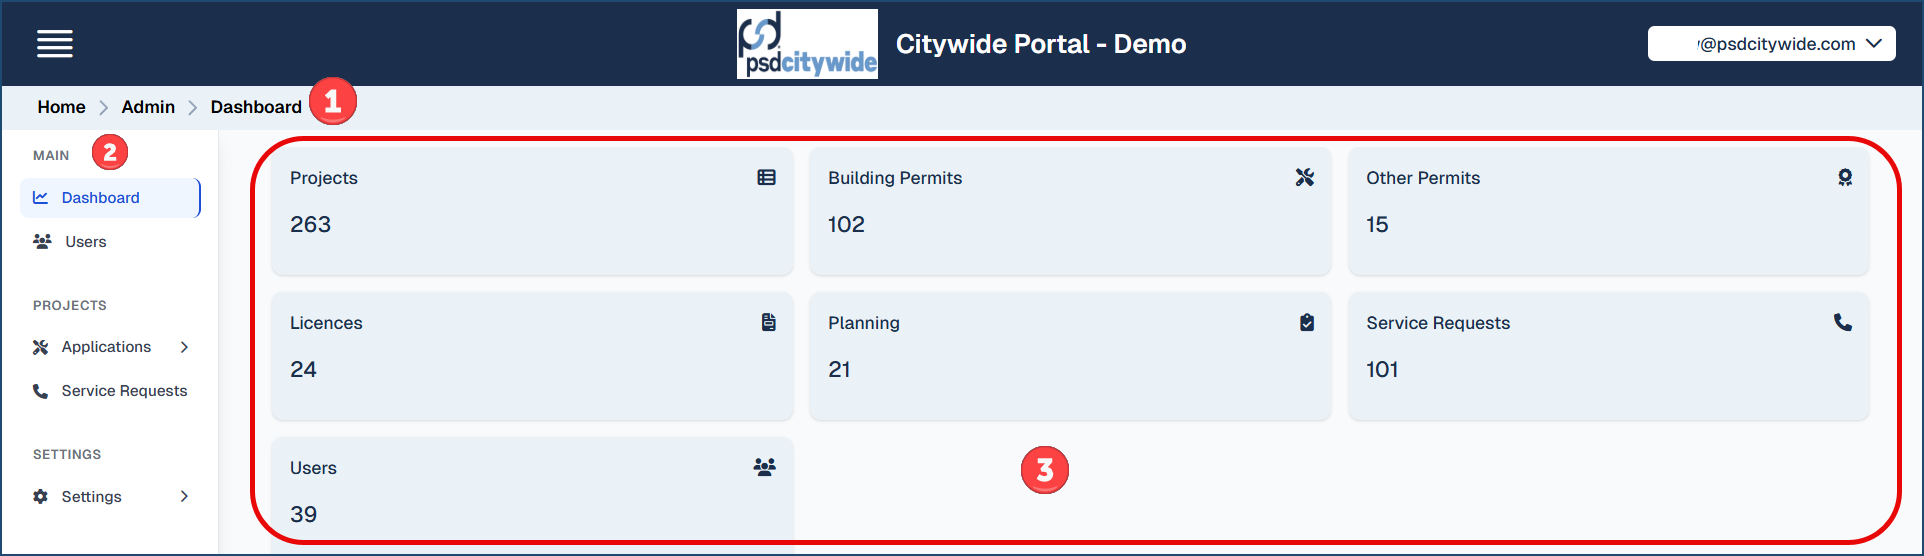
Cycling through the options in the menu bar will produce corresponding changes in the navigation panel ❸.
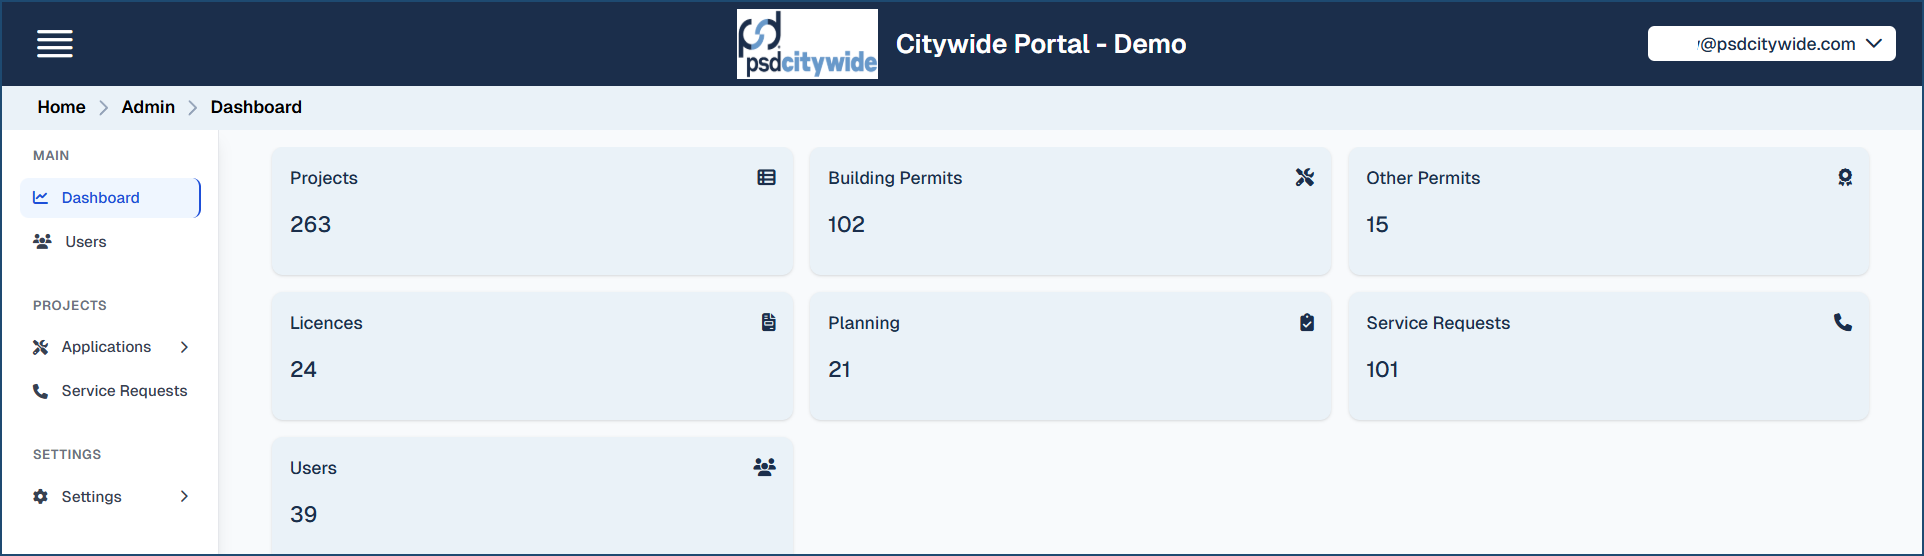
The Dashboard screen (displayed in the above screenshot) displays statistical data concerning the various options that your system is configured for. (The above screenshot shows all possible options.) The Dashboard is a display-only screen; clicking on any of the options does nothing.
Users
The User screen lists all registered users in the system ❶.
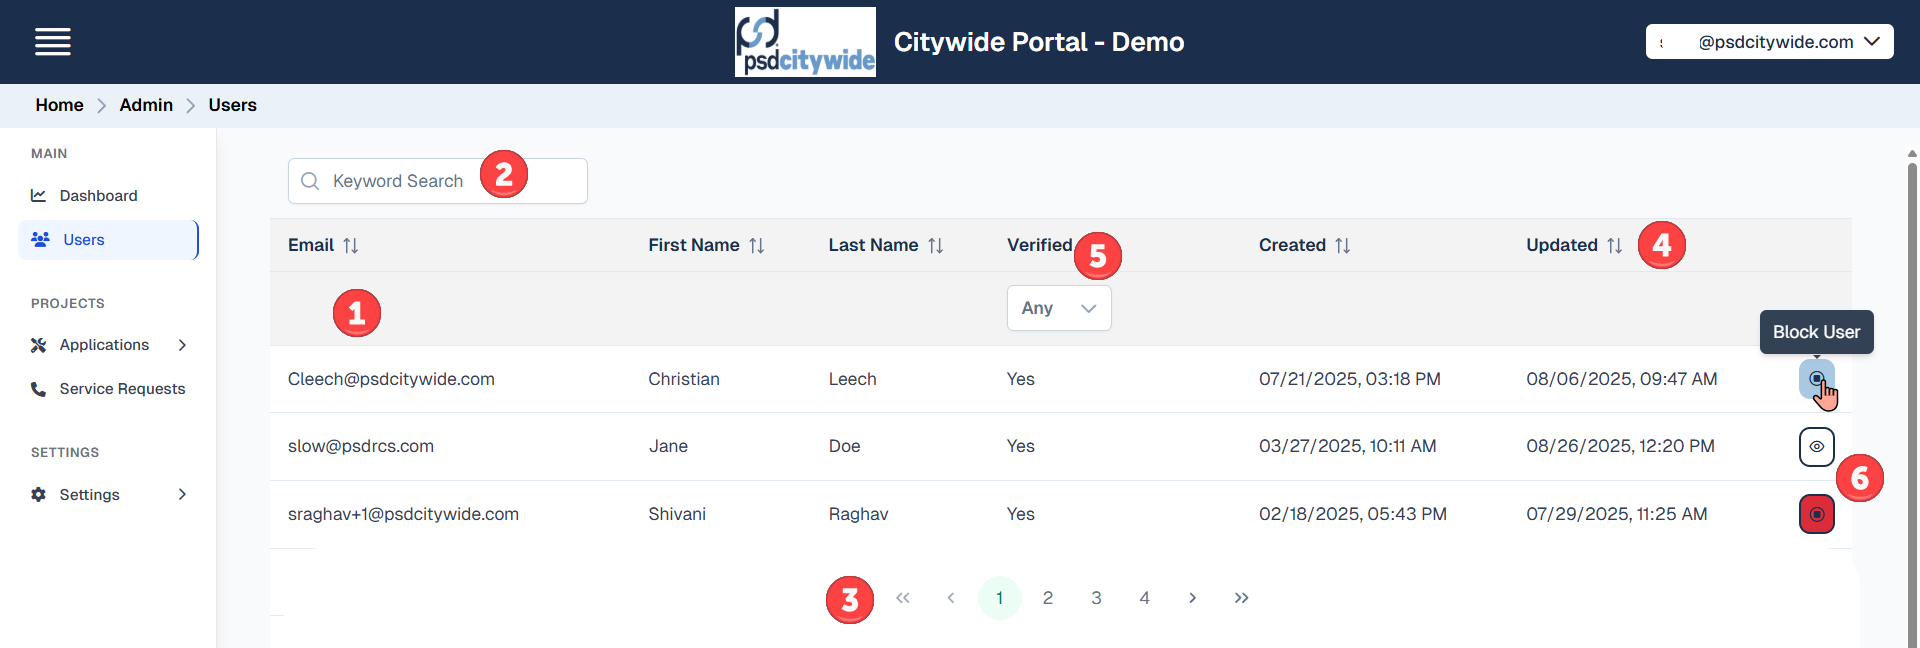
You can search for an individual or set of users that comply with the search criterion you enter in the Search bar ❷, or you can scroll through the pages that comprise the user list ❸.
Most of the columns in the list are self-explanatory. The “Created” column shows the date and time the user registered their account, and the “Updated” column shows the date and time of its update.
Clicking on the dual arrows next to any of the column headings will sort the list on that column. Clicking on it a second time will toggle it from an ascending order to a descending order, and vice versa ❹.
The Verified column ❺ displays whether the user has replied to the validation email sent to them during the registration process; the dropdown in the Verified column header allows you to filter the listing on Verified Yes/No statuses.
Finally, hovering over the “bull’s eye” ❻ at the end of a user line will produce the “Block User” prompt. Click on it will block the user, and the “bull’s eye” will change to a “clear eye” image. Restoring a blocked user involves clicking on the clear eye icon to "Restore User”.
Applications
The Applications pull down on the left side shows the various application modules applied to your database. This may vary depending on your municipality's database - in the example below, Building Permits, Other Permits, Licences and Planning applications are enabled. Once the application type is selected, a history of all the applications created using the Portal and their various details pertaining to each of them will show.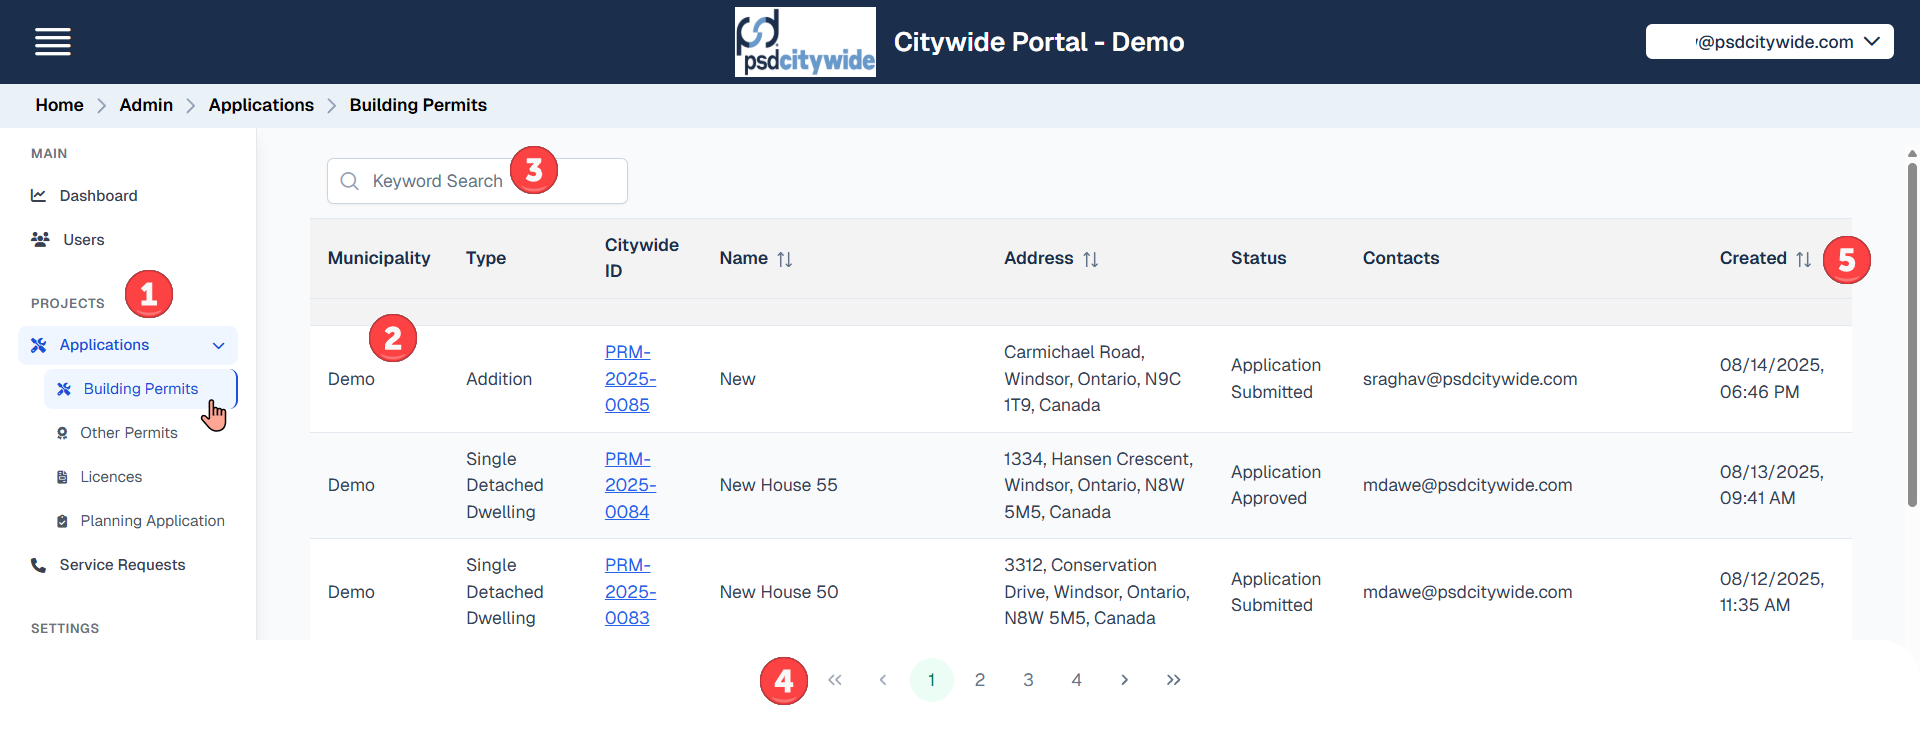
The navigation pane shows the various Permit Types ❶. The list ❷ on the main panel displays the items corresponding to the chosen permit type (e.g. Building Permit applications in the above screenshot).
You can search for an individual item that complies with the search criterion you enter in the Search bar ❸, or you can scroll through the pages that comprise the list ❹.
Clicking on the dual arrows next to any of the column headings will sort the list on that column. Clicking on it a second time will toggle it from an ascending order to a descending order, and vice versa ❺ .
The columns across all the applications are the same:
- Municipality: displays the municipality the application is being made within.
- Type: the application type. Application types are defined by Citywide Administrators, and they constitute the list of types that appear to users when they create an application.
- Citywide ID: displays a link to the Citywide record for the current application. Clicking on the link will open the record in Citywide where all the details pertaining to the application can be examined.
- Name: the name given to the application by the Applicant.
- Address: the address of the property that the application pertains to.
- Status: the current status of the application.
- Contact: the email address(es) of the contact(s)
- Created: the date and time the application was created.
The Service Requests shows all the same columns with the same functionality as seen above for the various Permitting Applications.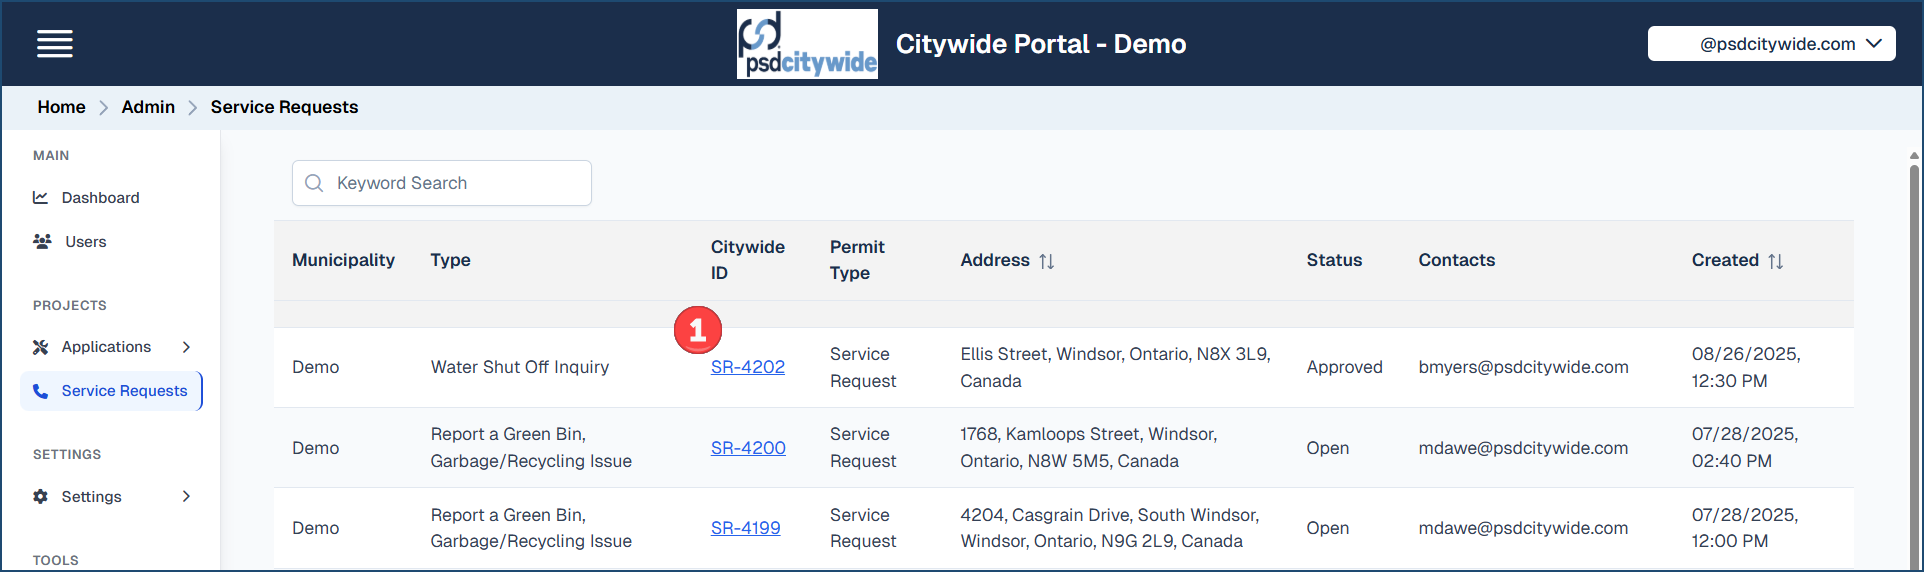
The sole difference is that the items in the Citywide ID column refer to Service Requests ❶.
Admin Settings
This is the place where you set up the unique features and characteristics of your Citywide Portal interface. The Settings Navigation Pane shows Preferences, Labels and Branding ❶:
- Preferences allows client admins to customize and set portal preferences such as hide fields or make required fields mandatory to complete when submitting a permit application(s) or service request(s) via the portal.
- Labels refers to field or module names, where you can rename the field or module names that better suits your municipality's requirements. It is also where you set up characteristics of the Home page.
- Branding allows you to brand your Portal with your logo and favicon.
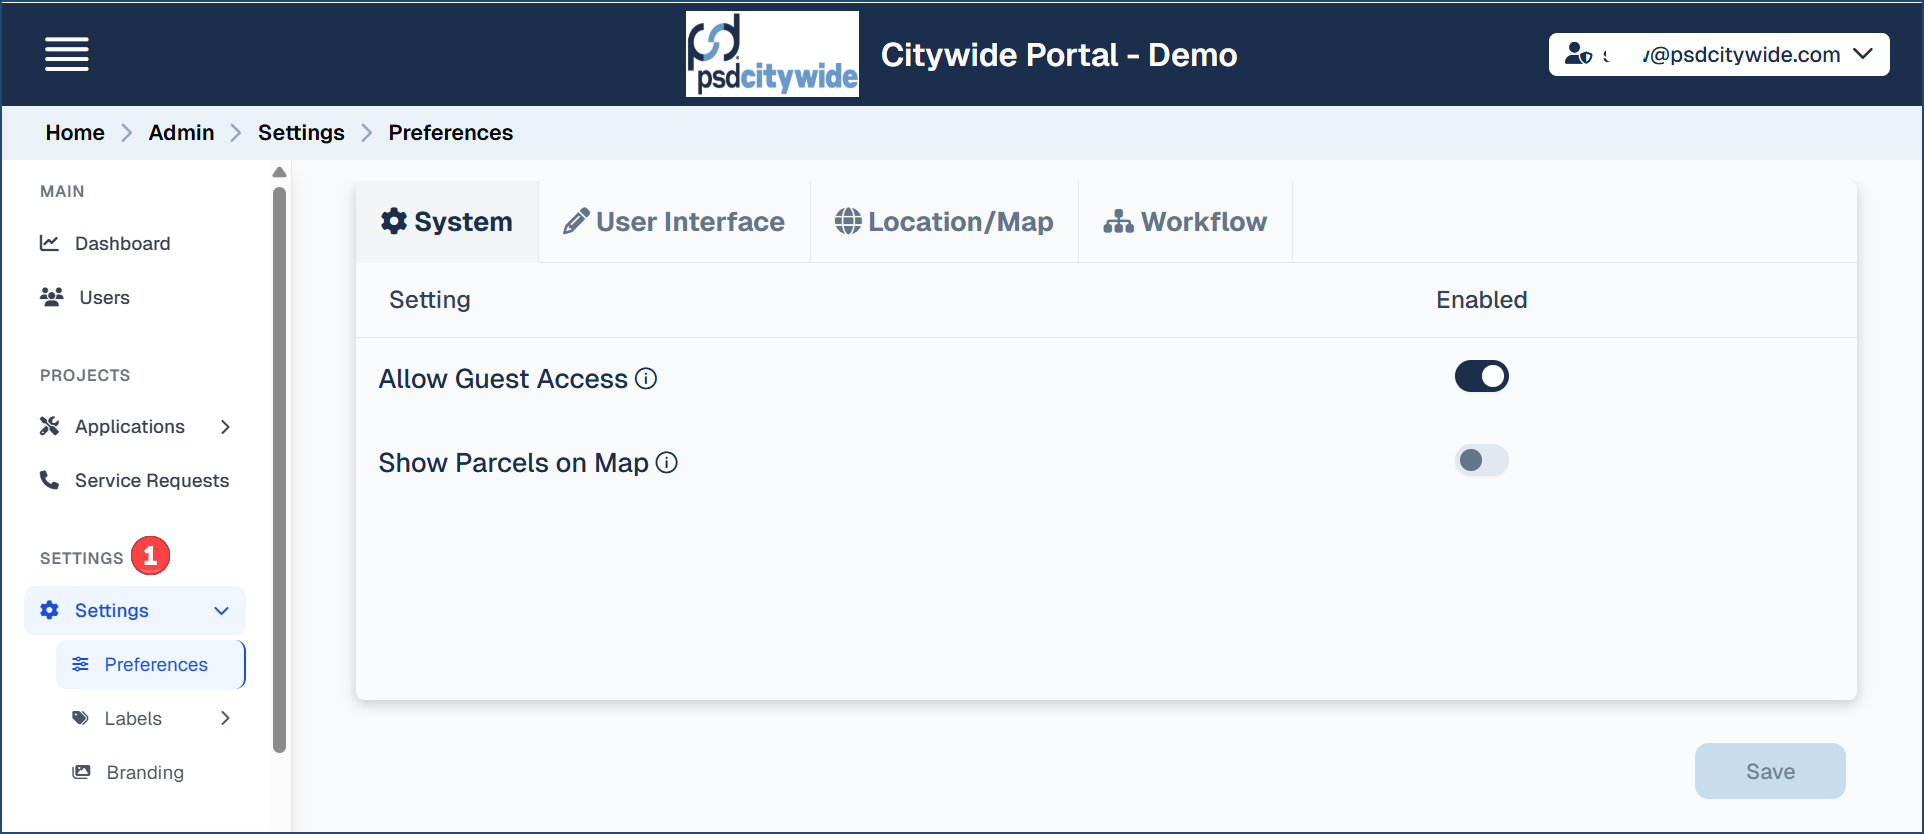
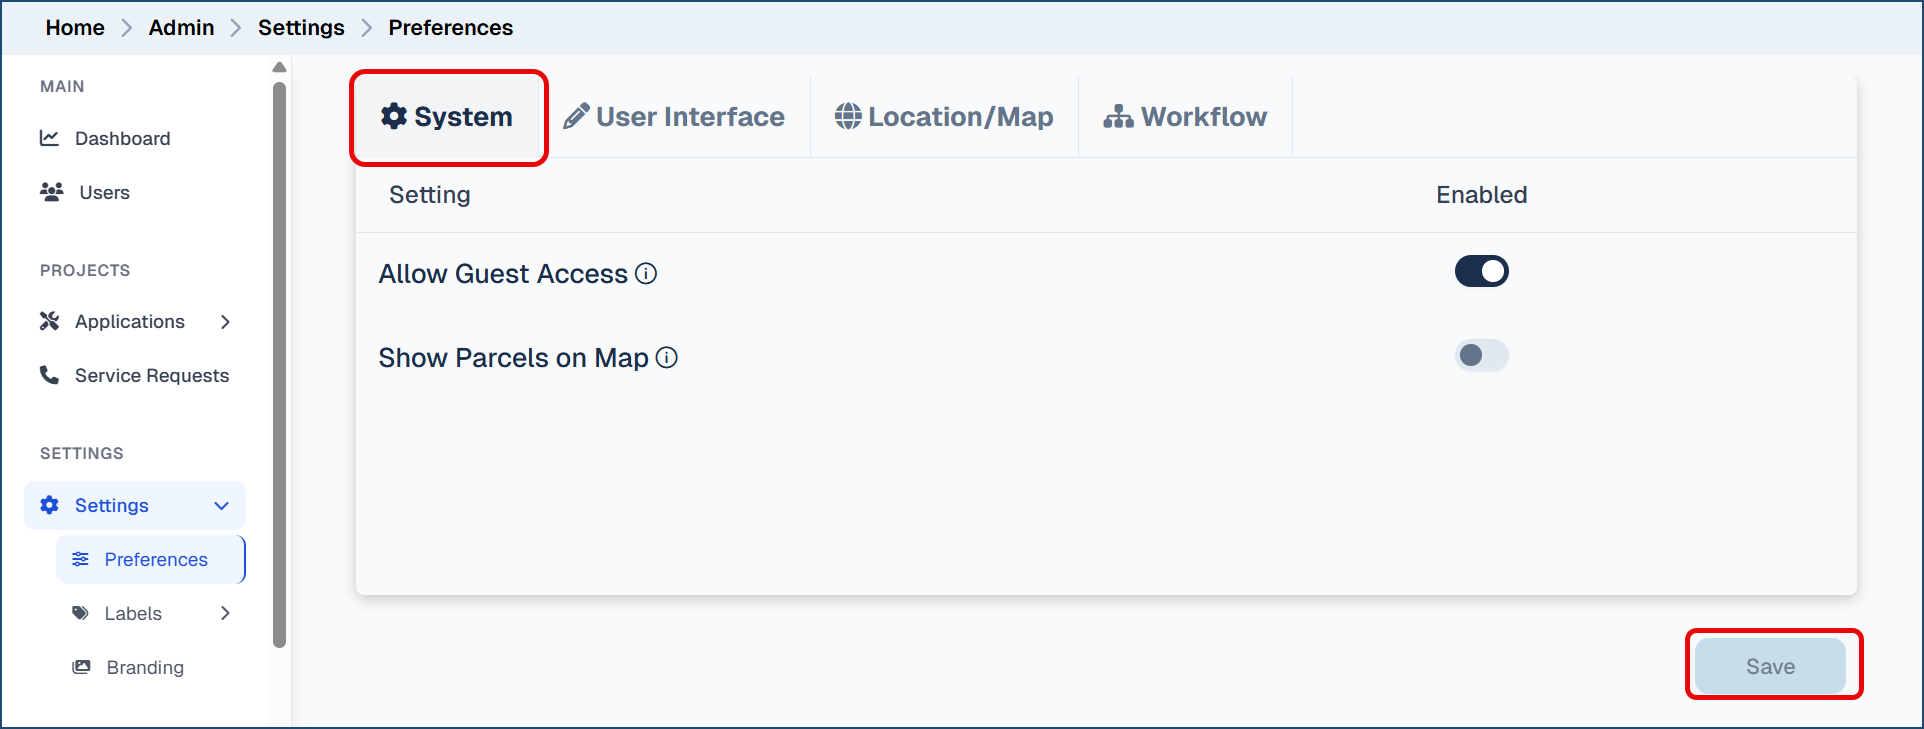
Preferences
Options available to customize and enable on the portal:
System
- Allow Guest access. Enable or disable the ability for users to submit applications without registering as a user.
- Show Parcels on Map (if applicable). If you have applied a parcel GIS layer to your muncipality's database, then this option can be enabled or disabled on the Portal.
- Then, click Save
User Interface
- Permits tab

- Select which module from the drop down to apply the setting to (ie. Building Permit)
- Check the applicable box(es) to 'Hide' or make a field 'Mandatory' to complete when submitting the application either as a registered 'User' or a 'Guest' (if enabled).
- Repeat steps for the various Citywide modules in the drop down (Licence, Other Permit, Planning Application)
- Custom Address: This allows the ability to free type an address.
- Click Save
- Service Requests tab
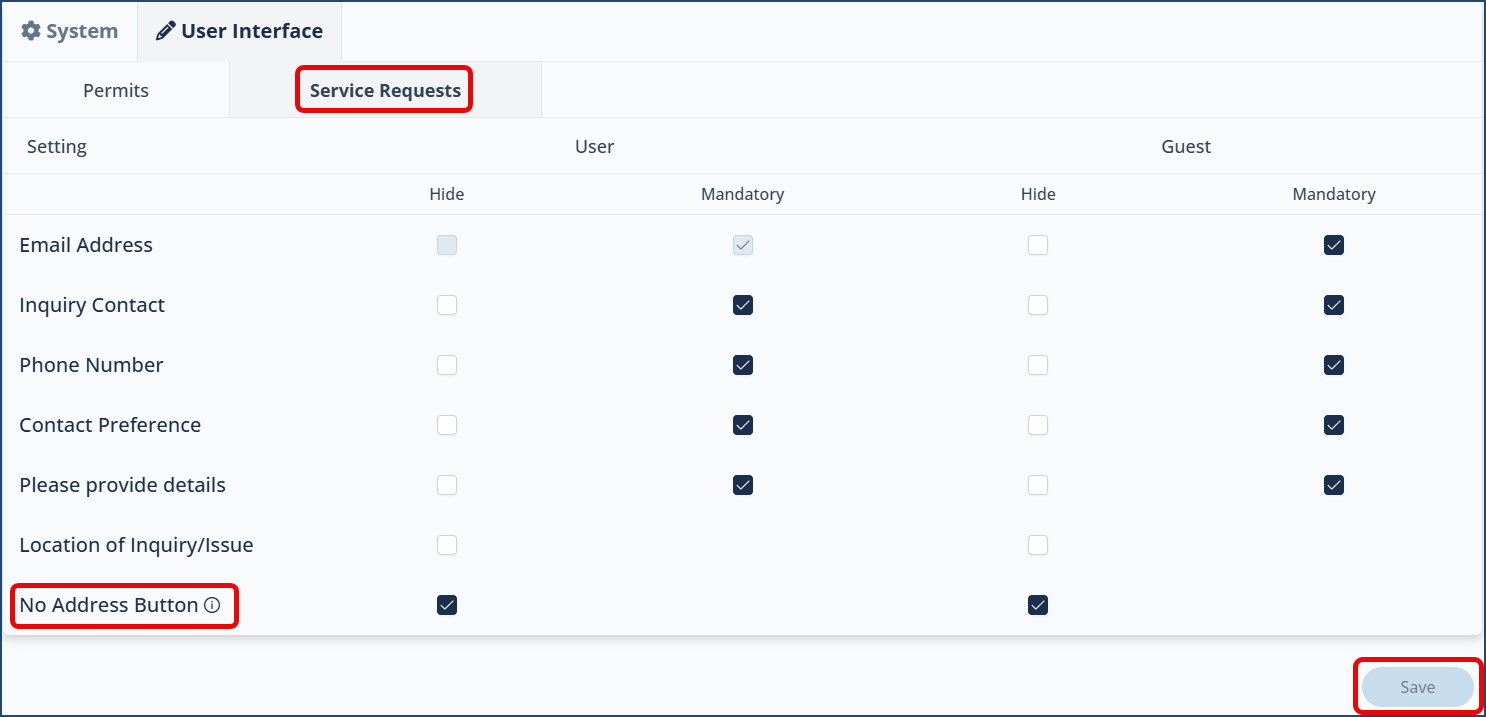
- Check the applicable box(es) to 'Hide' or make a field 'Mandatory' to complete when submitting the service request either as a registered 'User' or a 'Guest' (if enabled).
- No Address button: Select or unselect the 'Hide' checkbox as required.
- ☑ select will 'Hide' the No Address button. This will ensure applicants select a location or address when submitting an application.
- ◻ unselect means the No Address button will appear and will allow applicants to not include an address when submitting an application.
- Click Save
Location/Map
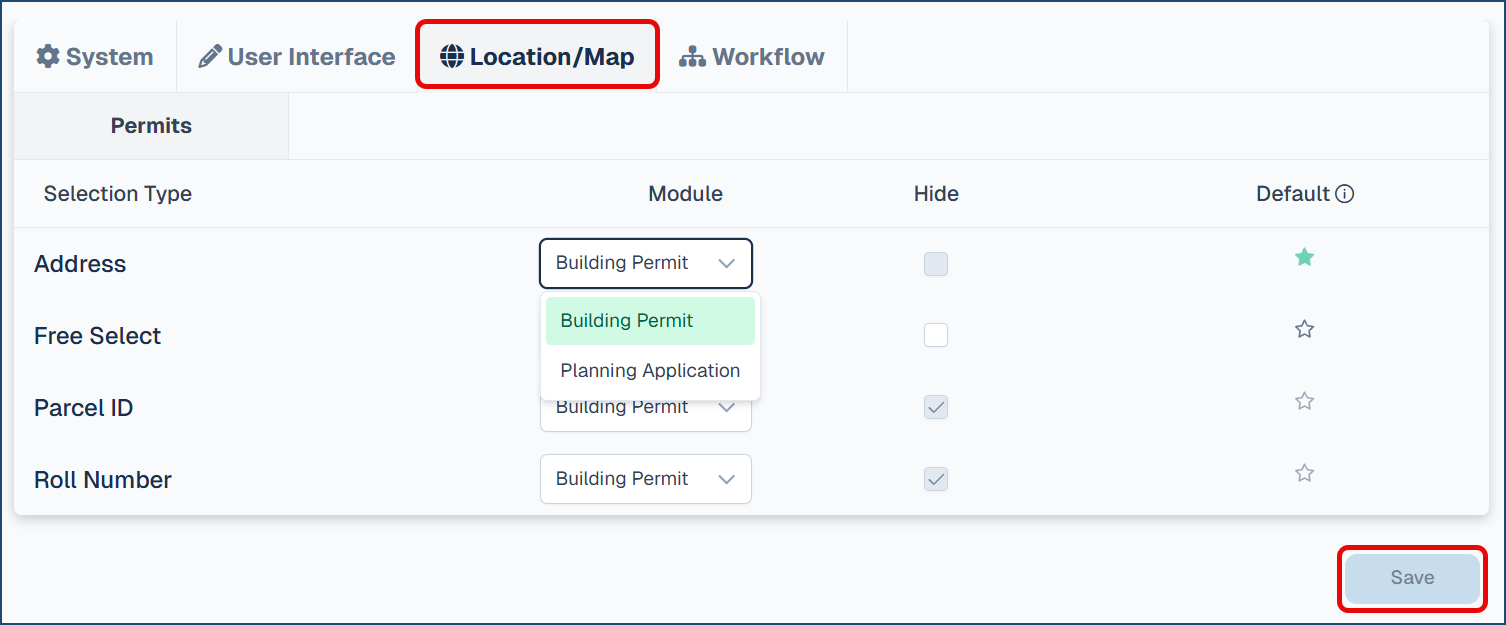
- Select which module from the drop down to apply the setting to (ie. Building Permit)
- Check the applicable box(es) to 'Hide' or make Default.
- Repeat steps for the various Citywide modules in the drop down (Planning Application)
- Click Save
Workflow
1. Permits tab
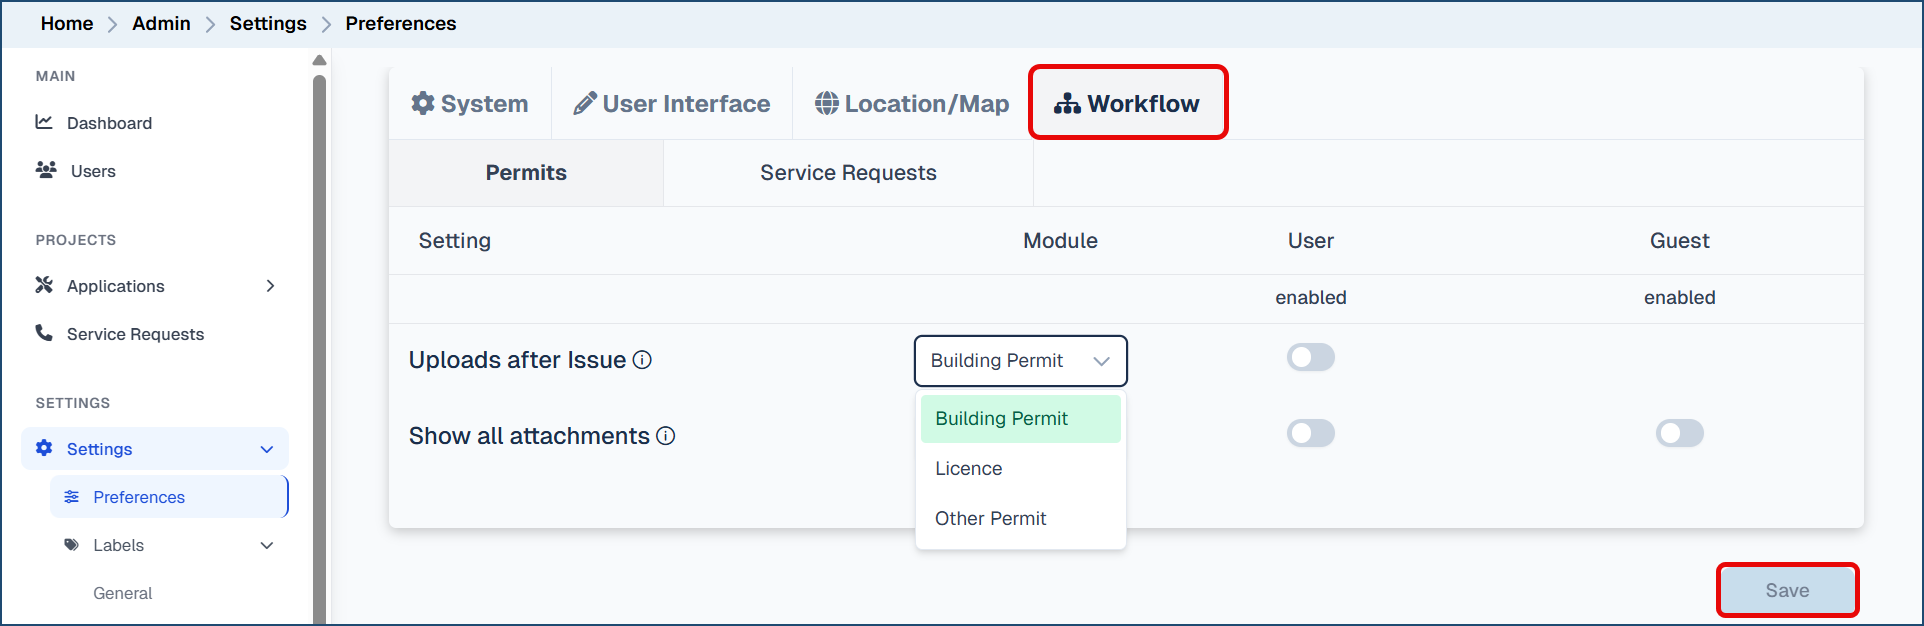
- Select which module from the drop down to apply the setting to (ie. Building Permit)
- Enable the applicable setting toggle to turn on:
- Uploads after issue. This allows applicants to upload attachments after the permit or licence has been issued.
- Show all attachments. This enables applicants to show all attachments by scrolling down instead of per page.
- Repeat steps for the various Citywide modules in the drop down (Licence, Other Permit)
- Click Save
2. Service Requests tab
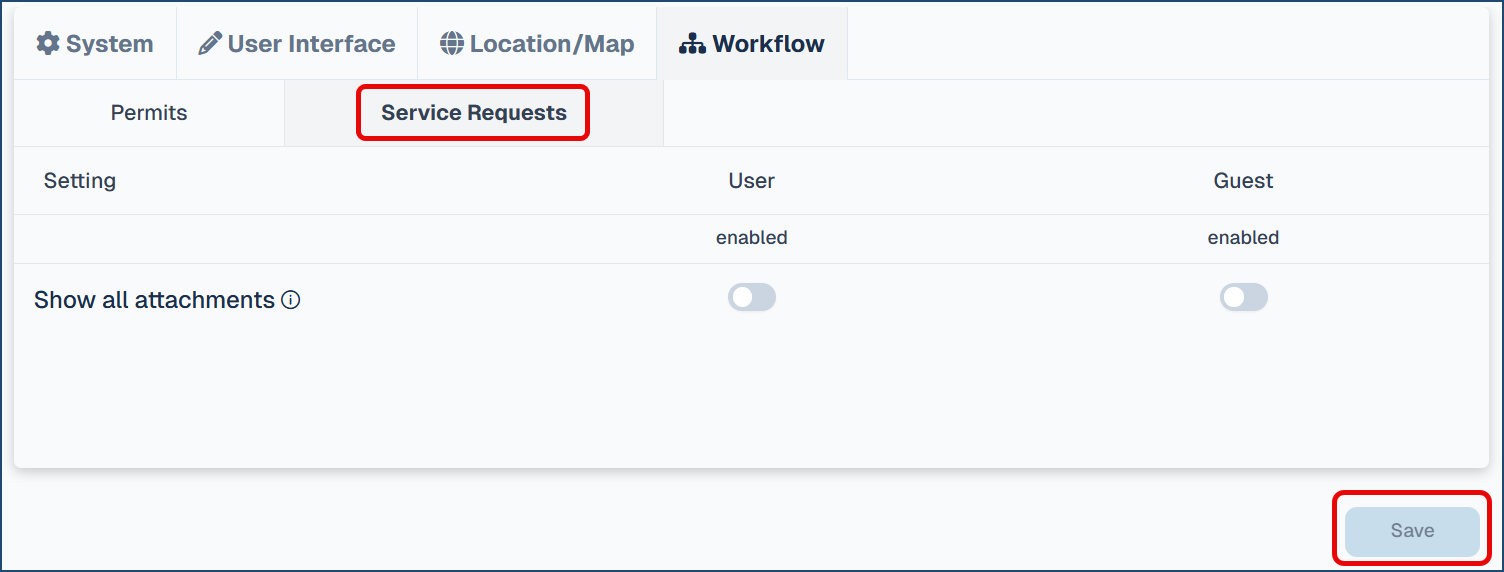
- Enable the applicable setting toggle to turn on:
- Show all attachments. This enables applicants to show all attachments by scrolling down instead of per page.
- Click Save
Labels 🢡 General
This is where you can customize the labels of the various Application form fields so that they match the preferred wording in your municipality.
The number or fields and their purpose, as well as their labels, are identical across all the application forms. The Project Details field, for example, is a common field in all the module forms, and it is labelled as such ("Project Details") by default for all the modules forms.
The General options to set up the Portal Home Page: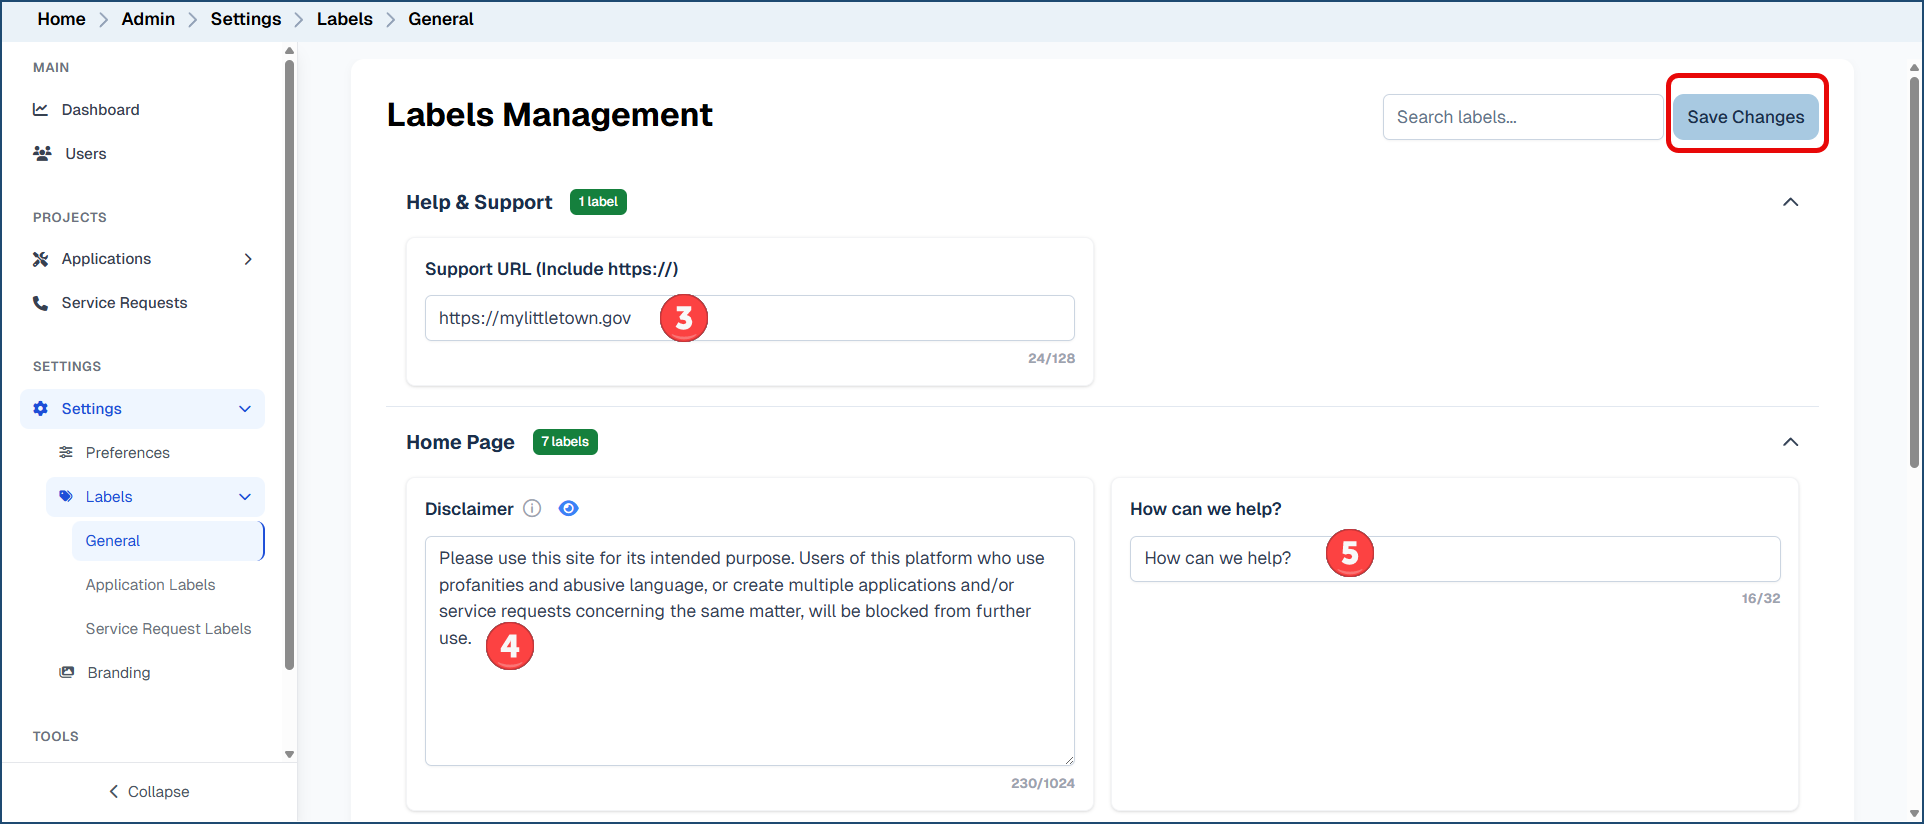
- Enter a Support URL❸. This is the webpage on your website that will guide your constituent applicants and service requestors with help information on how to use the Portal. It cannot exceed 128 characters in length and should include the "http://" prefix. The URL will appear in the menu accessible from the Portal Home page slide drawer icon (also sometimes referred to as the "hamburger menu icon") under the "Help and Support" option. (See the End User Documentation section below.)
- Optionally, enter a Disclaimer ❹ on the Home page. It will appear at the bottom of the Portal Home Page. Note that you are limited to 1024 characters.
- Optionally, enter the Help prompt ❺, leave the current "How can we help?" wording, or simply leave this option blank to show no help prompt.
- Click Save Changes.
Application Labels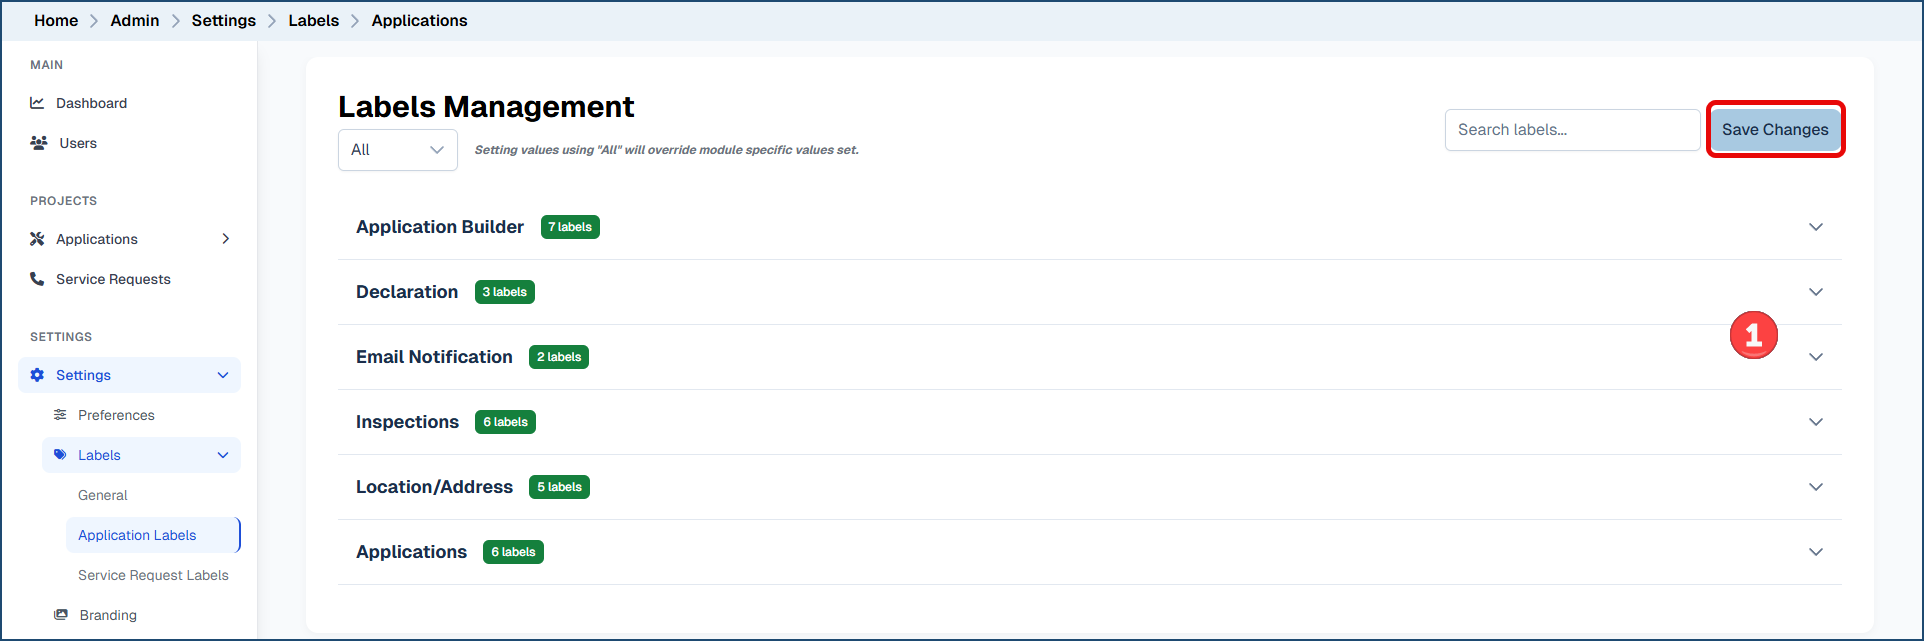
To change/customize various application labels:
- Click the applicable pull down of the area(s) within the portal you want to customize labels for ❶.
- Application Builder: change labels for the details within each stage of the application submission process.
- Declaration: change labels for the declaration section of the Final Summary stage when submitting an application.
- Email Notification: change the default text of the email sent to applicants after the application is submitted.
- Inspections (if applicable): if requests for inspections are enabled via the online portal, change labels of the inspections section of the application details.
- Location/Address: change the labels of the location/address fields when submitting an application.
- Applications: change the labels of the displayed fields when submitting an application.
- Enter the desired custom label(s) as needed (64 characters or less)
- Click Save Changes
Service Request Labels
Changing the labels for Service Requests is identical to those for Applications.
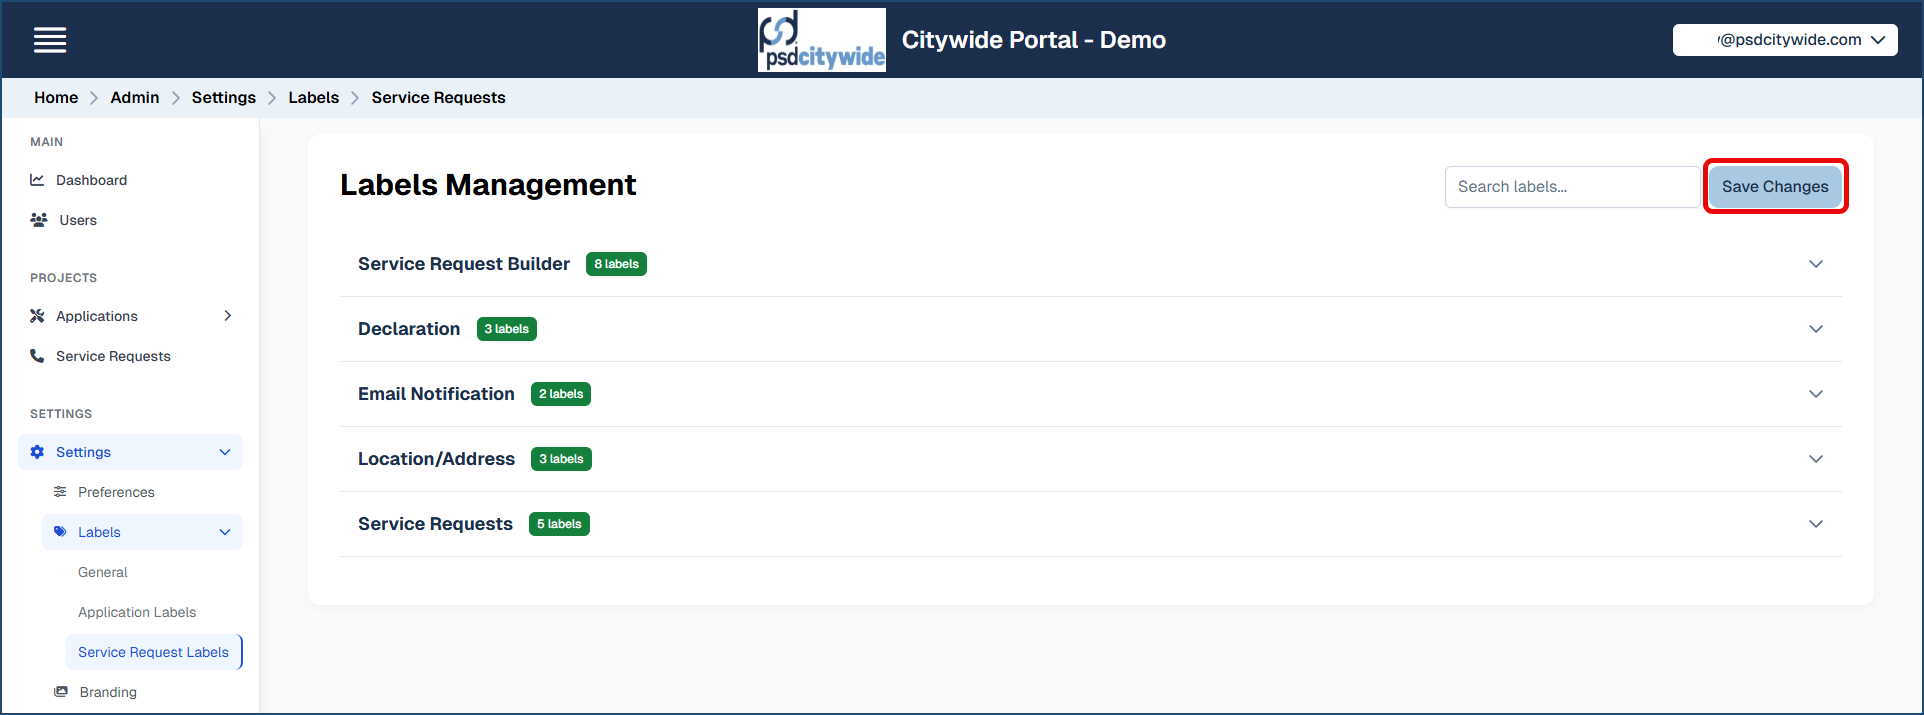
To change/customize various service request labels:
- Click the applicable pull down of the area(s) within the portal you want to customize labels for ❶.
- Service Request Builder: change labels for the details within each stage of the service request submission process.
- Declaration: change labels for the declaration section of the Final Summary stage when submitting a service request.
- Email Notification: change the default text of the email sent to requestors after the service request is submitted (Note: emails can only be sent to registered portal users).
- Location/Address: change the labels of the location/address fields when submitting a service request.
- Service Requests: change the labels of the displayed fields when submitting a service request.
- Enter the desired custom label(s) as needed (64 characters or less)
- Click Save Changes
Branding
Branding involves setting up your logo and a favicon (the tiny icon that will appear in the browser's tab preceding the Portal name).
- Drag the your organization's logo image into the Logo section ❶, noting the limit and recommendation above it. (Clicking on Upload ❸ will allow you to select the image using your File Manager.
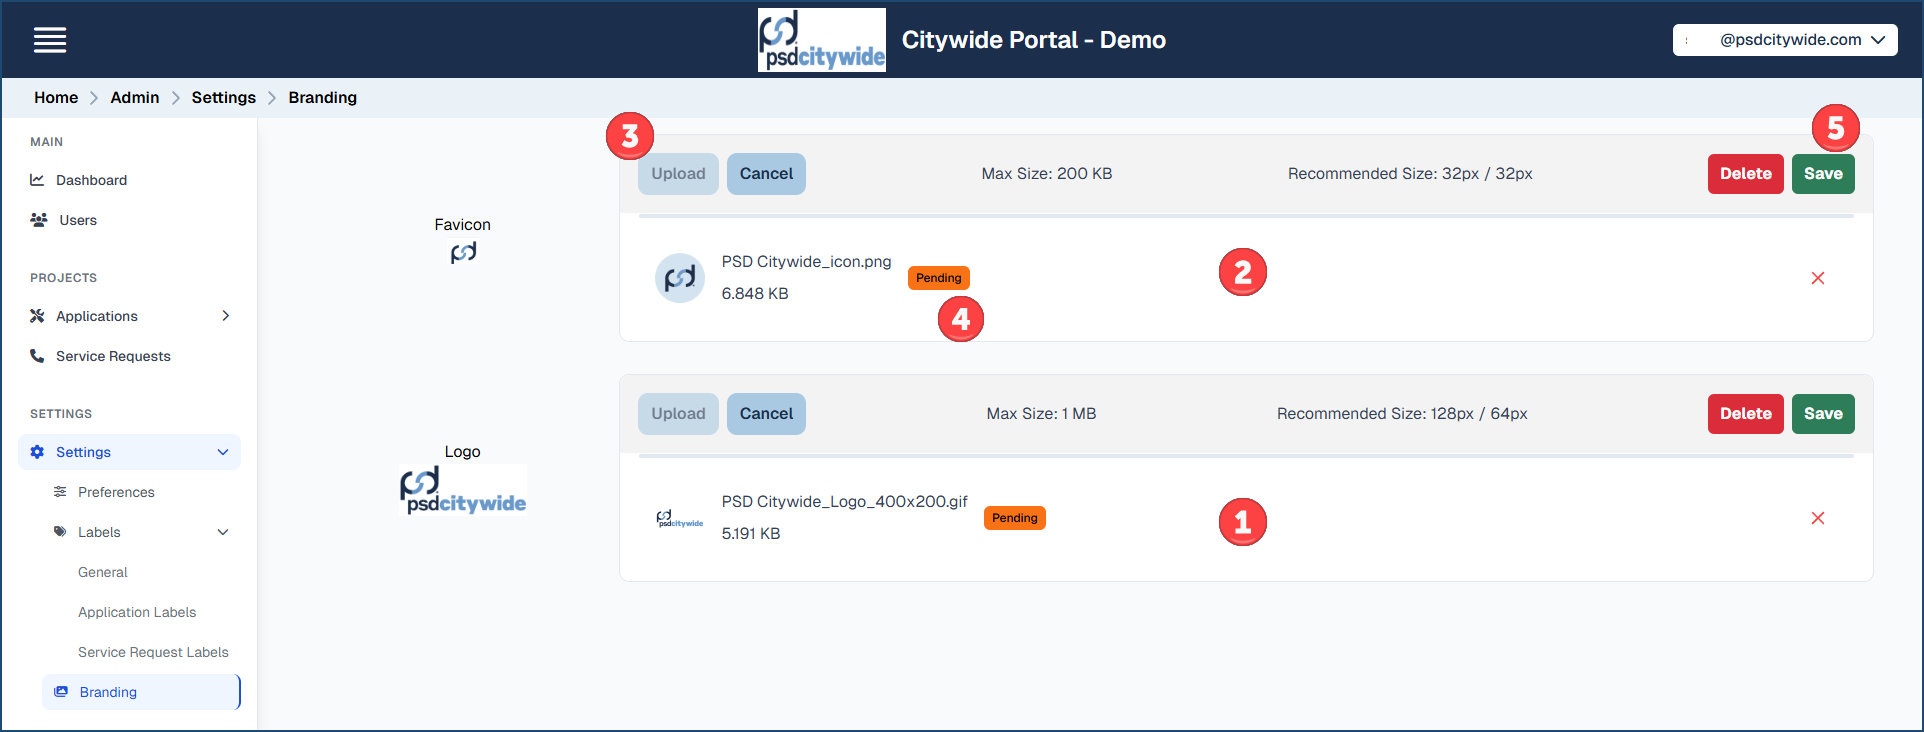
- Drag an image which will serve as your favicon into the Favicon section ❷, also noting the limit and recommendation above it.
- Both boxes will show Pending ❹ next to the image files until such time as you click on Save ❺.
End User Documentation
The Citywide Portal End User Guide is available on this site. It covers all the Permit Applications and Service Requests that are available in the Portal, but many of these may not be setup in your Portal implementation. In addition, all the fields in the article have the default Citywide field names, which you may have re-labelled to comply with existing terminology used in your municipality or for some other reason. Discrepancies between the default field names in the article and your re-labelled field names may prove confusing for end users.
Therefore, we have created Microsoft Word versions of the Citywide Portal End User Guide and a Citizen Quick Reference Guide (attached to the End User Guide web page) which you are encouraged to modify so that its contents reflect the Portal site that it documents. You can also address any other issues or concerns you wish to communicate to your Portal users in the revised document.


