
This is the generic version of the Citywide Portal User Guide. It covers all the Permit Applications and Service Requests that are available in the Portal, but many of these may not be setup in your Portal implementation. Also, all the fields in this article have the default Citywide field names, which your Portal Administrator may have re-labelled to comply with existing terminology used in your municipality or for some other reason. There are Microsoft Word user and reference guides in the Attachments section of this article, which you are encouraged to use or modify so that its contents reflect the Portal site that it documents. That modified document can then be attached by a portal administrator and made available to users by clicking on the Help and Support link.
Overview
Citywide Portal is a self-serve web application that allows the public to create, track and update applications within Citywide Permits and to create Service Requests.
Portal URL and Login
To access the Citywide Portal via a web browser page:
Canada: https://citywideportal.com
US: https://us.citywideportal.com
 |
|
User Types
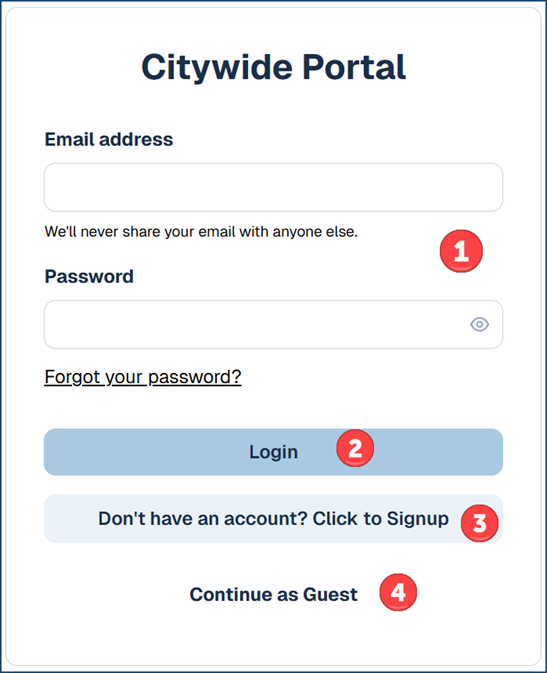
The choice of different options on the login screen will produce different results:
- If you are a registered user, your screen will look like this:
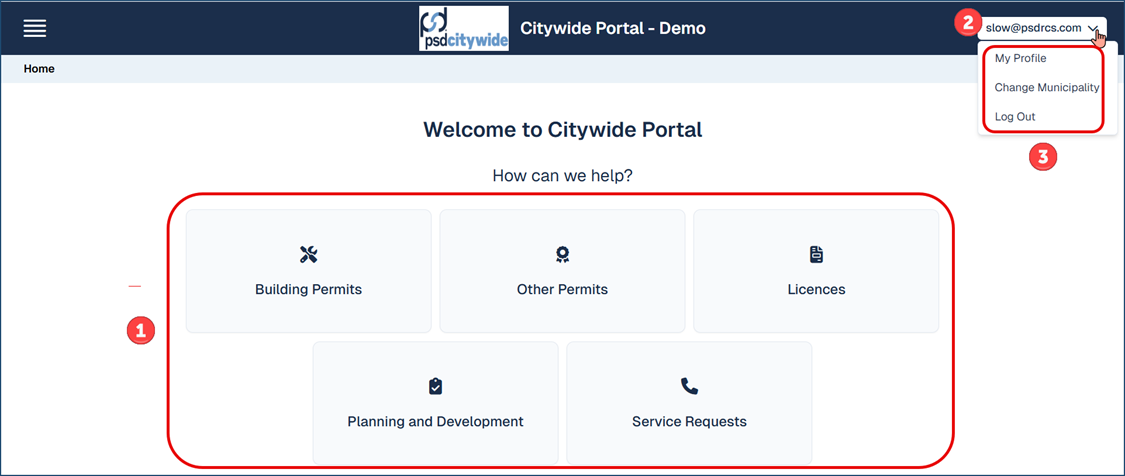
It displays:- The options ❶ the Portal is configured for (which are set by the Portal Administrator). The availability of various Portal options will vary from one municipality to another, depending on the municipality's Portal configuration.
- Your email address ❷, from which a pull-down menu produces the following options ❸:
- Profile: where you can alter the profile you created at the time you registered on the Portal.
- Change Municipality: change from the currently preselected municipality (saved from the previous login) to a different municipality.
- Log Out: Log out of Portal.
- If you are an unregistered user and you would like to register, click 'Don't have an account, click Signup' from the Login page. You will be prompted first with a screen in which you are required to:
- Enter an email address ❶ and password ❷
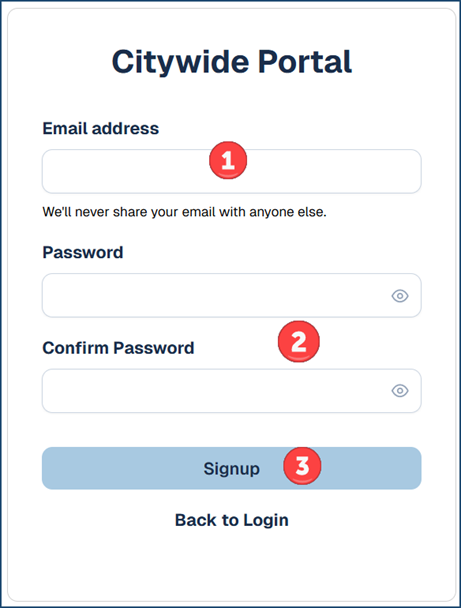
- Click Signup ❸.
- Check your email and click the Verify button in the email message to validate the registration.
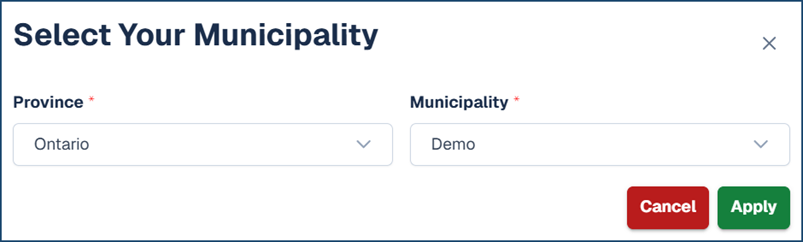
- Select a municipality:
- The options that correspond to the selected municipality will appear on your screen. Clicking on any one of them will produce the following Profile form, which you are required to fill out to complete your registration:
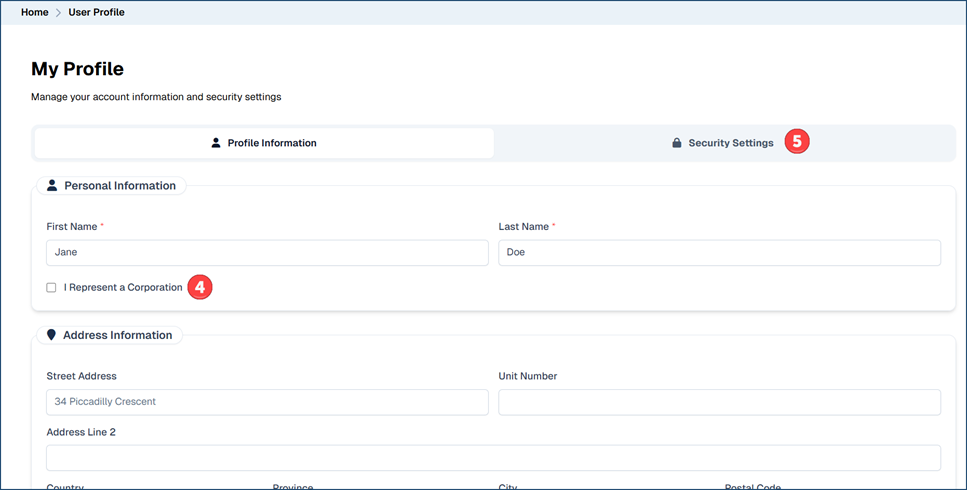
- Scroll down and complete all the fields in the form that are required. If you Represent a Corporation or if you are designating your account with Professional Information, check ✅❹ the appropriate box(es).
- If desired, to change your account Security Settings (ie. Password):
- Click the Security Settings tab
- Enter your current password
- Enter your new password and confirm the new password.
- Enter an email address ❶ and password ❷
- If you are accessing the system as a Guest, you will simply be prompted for a municipality and then presented with the Portal options that have been configured for the selected municipality.
- A major advantage in registering a Portal account is that you will be able to Save a partially completed application and come back to it later. This option is not available to you if you do not register.
Accessing the Various Application Types
The application process follows the same sequence for all the different Permit Applications (which include Building Permits, Other Permits, Licences, and Planning Applications). That sequence involves a wizard in which you will be building the application by answering a set of questions across a set of categories. The sequence is different for Service Requests. Both are reviewed in detail below.
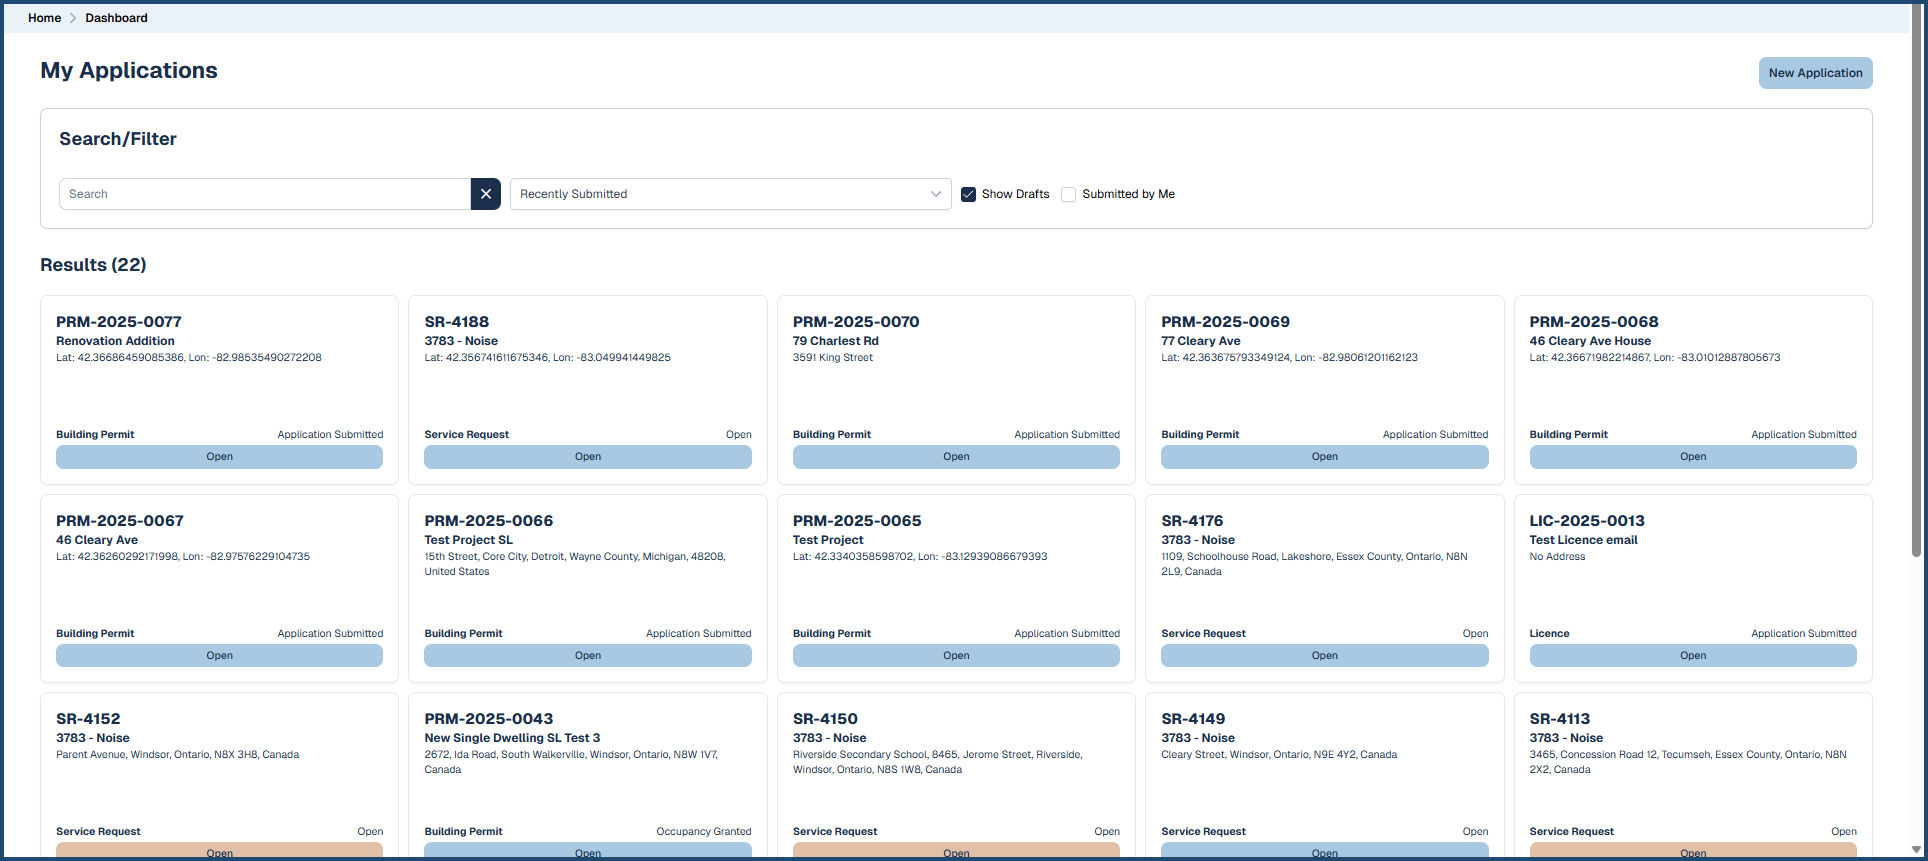
Clicking any one of the options on the Home page will open up the Dashboard page for the selected option. Here, for example, is the Building Permits Dashboard page: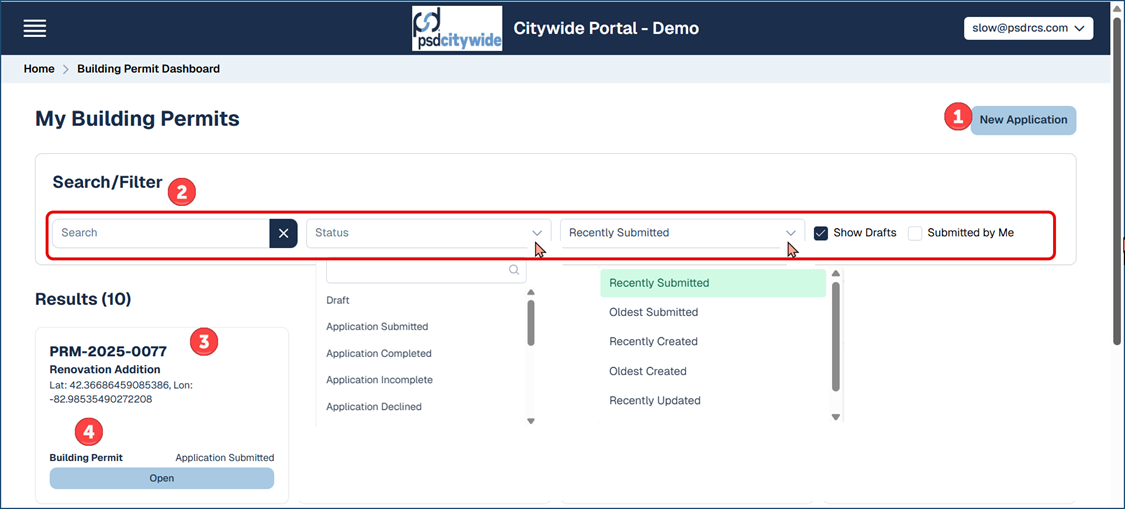
- Clicking New Application ❶ will open a page with the New Application wizard (discussed below).
- You can configure the Search/Filter options to either search for an existing individual application, or you can apply a filter restricting the list of applications according to Application status, order of submission, drafts, and those created by you.
- Each submitted or draft application will appear in a tile ❸, which displays:
- The internal CityWide Permit number (assigned by the system at the time when the application was processed).
- The Applicant-Provided Name for the Application.
- The address of the property involved.
- The Type of Permit ❹.
- The current status of the Application. "Awaiting Customer" status indicates that there is further action required by the customer/applicant (ie. outstanding payment or documents required)
- Clicking on Open will display a new page outlining all the details pertaining to the selected application.
Many of the field names on the Permit or Licence Application Forms as well as the Service Request Form may have different field names from those that you see on your screen. These differences should be minor, but their purpose and functionality will always be the same. For example, you will be asked to provide a unique name for each application. The field name used in the example below labels that field "Project Name." That same field (in the same place, serving the same function) may be labelled "Provide a Unique Name for the Project" or something similar on your Portal system. These differences should not be misleading. The change in the labels were made by your Portal Administrator. Our documentation here and elsewhere uses the default Citywide default labels.
- Click New Application ❶ on the Dashboard Application Page. (We'll use the Building Permit application here and remind you that all the permitting and licences applications involve the same set of stages and questions associated with each stage.
- Either confirm the Municipality that you've logged into, or select another one that is associated with your account. (You can even select the Province or State if necessary. For example, you could e.g. be a builder with projects across many different municipalities across the country.)

Switching from one municipality to another may increase or limit the number of available options on your Home page. The availability of options is set by your Citywide administrator for the municipality you have switched to.
- Click Apply ❸. The Application (in the following example, the Building Permit) wizard appears, set at the Project Details category.
Project Details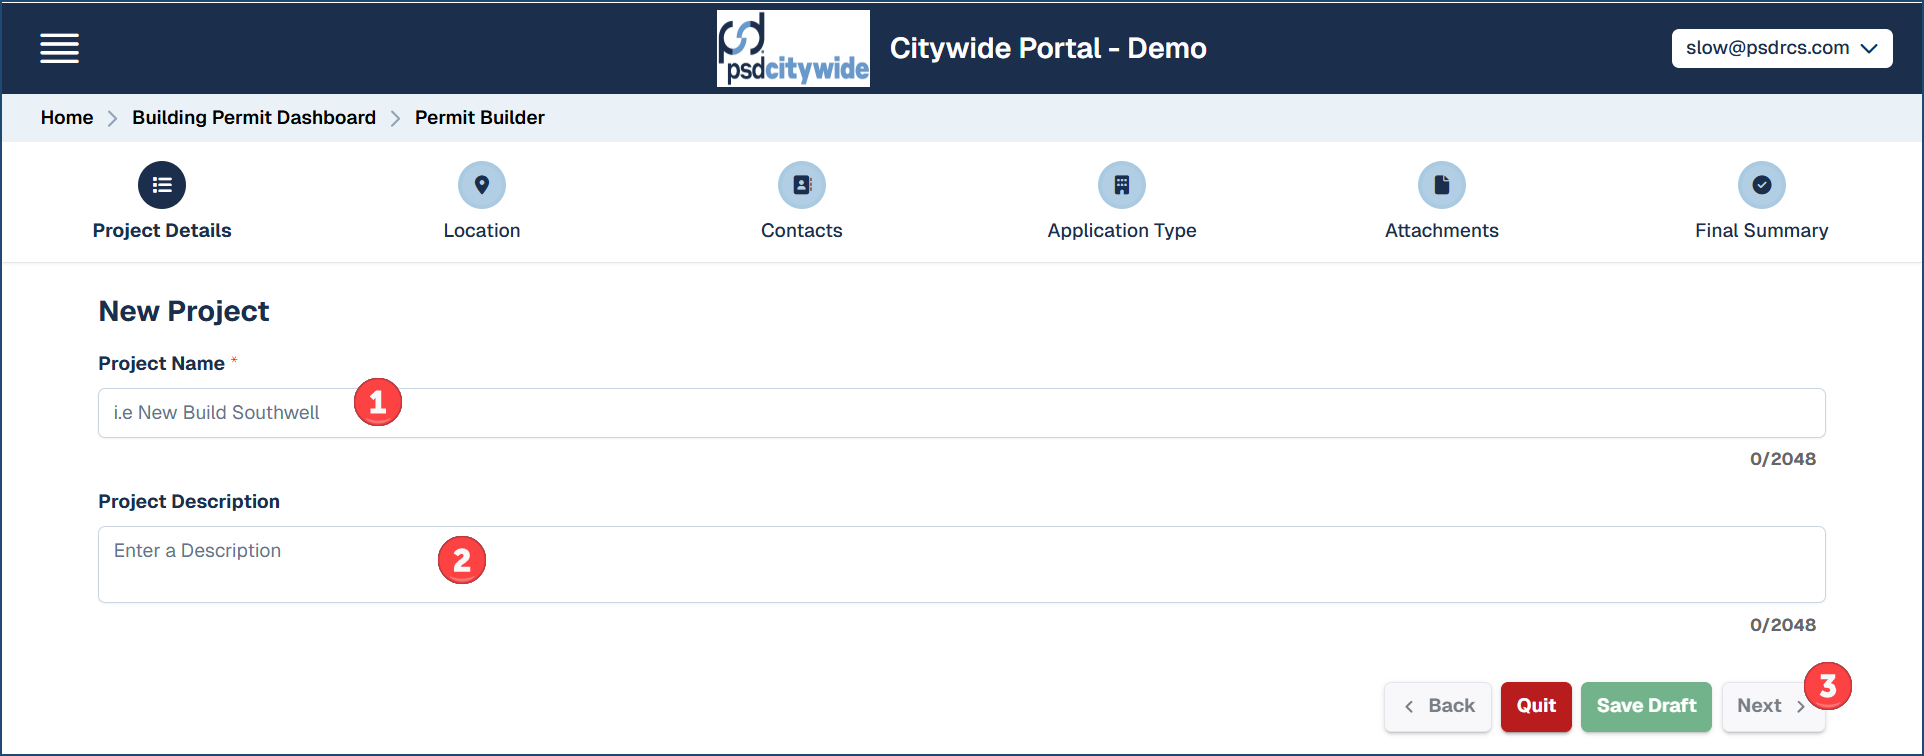
- Project Name ❶: Enter a concise and unique project name, one which readily identifies the project and makes it easily searchable.
- Project Description ❷: Enter a succinct description.
- Click Next ❸. The wizard advances to the Location category. (click Save Draft to save the current application; Quit to quit without saving; Back to go to a previous category in the wizard.)
Location
- Address ❶: Enter the address of the property the application is being sought for. Or (if applicable) click the 'No Address' button
 if your application does not require one.
- (Optional) Click the pull down for Free Select ❷ to have the GPS coordinates fill the Address field. This may be necessary if the property the project being is being applied does not have a recognizable address (but may e.g. be in a wooded area that is accessible from an uncharted dirt road). You can then click the precise location on the map to get the coordinates, which will then appear in the Address field ❶.
- (If applicable) Click the pull down for Parcel ID or Roll Number if you have a parcel GIS layer applied. Then click the location on the map.
- For Planning Applications only: Multiple properties can be selected if required. Click
 to add an additional property to the application. Repeat as needed for multiple properties.
- Clicking the location icon ❸ will pass your current physical location to the system and produce a map that corresponds to it.
- Click Next ❹. The wizard advances to the Contacts category.
Contacts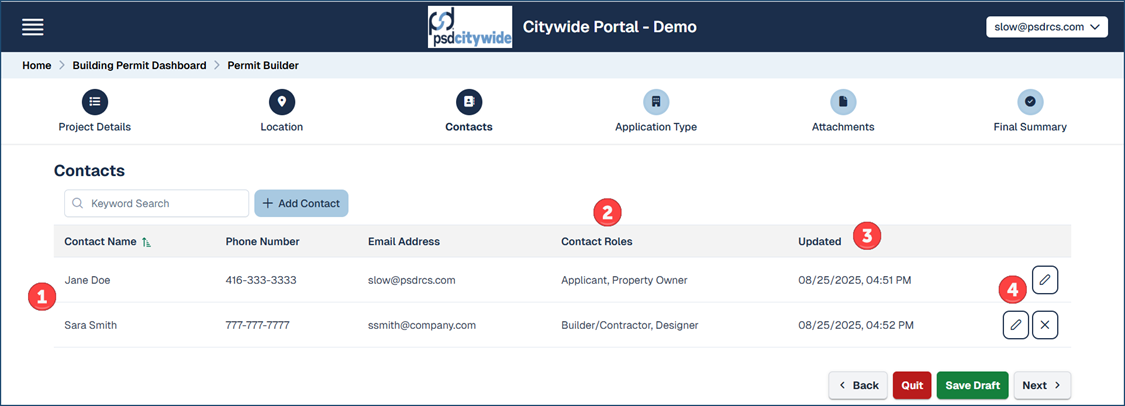
- Contacts are listed one per row ❶. Each contact can have one or more Contact Roles ❷. Numerous other roles may be configured in the system, all of which a selectable when the contact is being created. The Updated ❸ column shows the last date and time the contact record was updated.
- Click + Add Contact to add an additional contact(s).
- Complete the contact's details and their roles
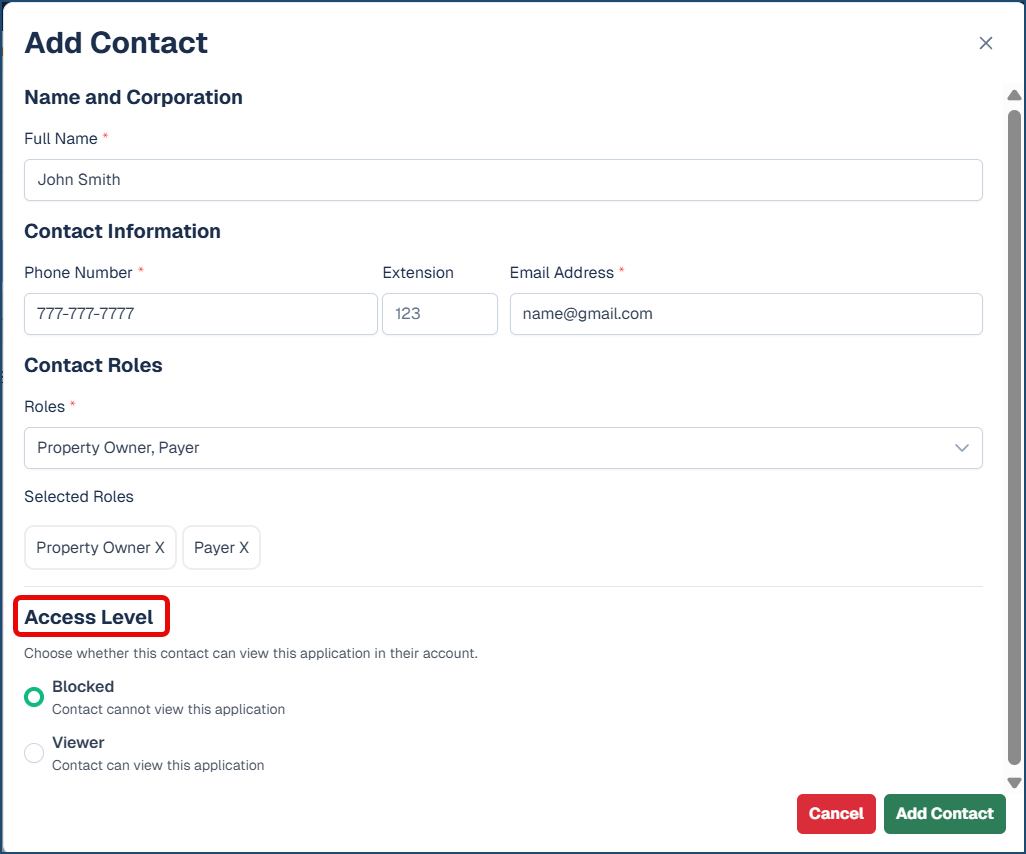
- Select the Access Level for this contact: Indicate if this contact should view application details in their account.
- Blocked or Viewer
- Click Add Contact
- Complete the contact's details and their roles
- Click the pen icon ❹ to edit the contact or click the X icon to delete the contact. Note: the 'Applicant' contact cannot be deleted.
- Click Next. The wizard advances to the Application Type category.
Application Type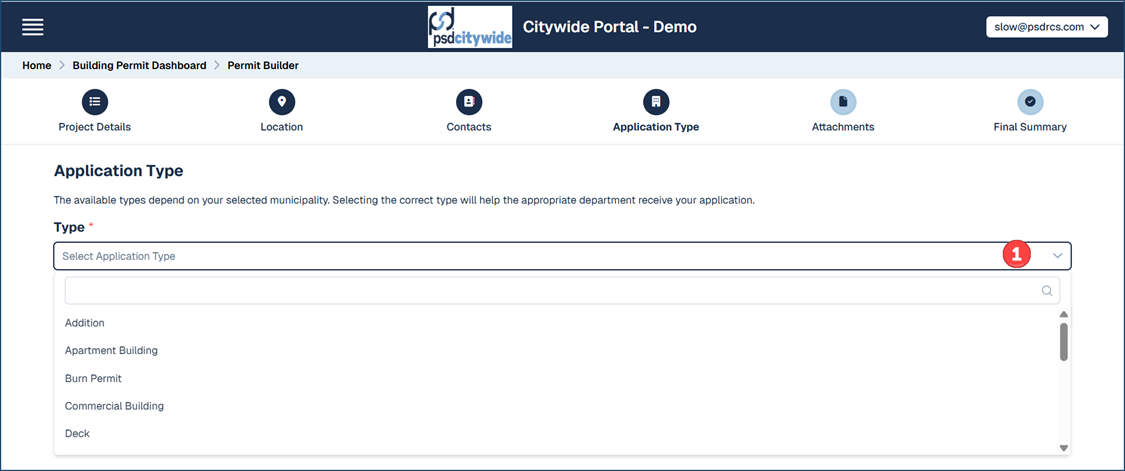
- Type❶ : Select the permit type from the pull-down. The available types are defined separately in the Citywide database for each individual municipality.
- Estimated Fees ❷: Displays the estimated fees associated with the Permit type.
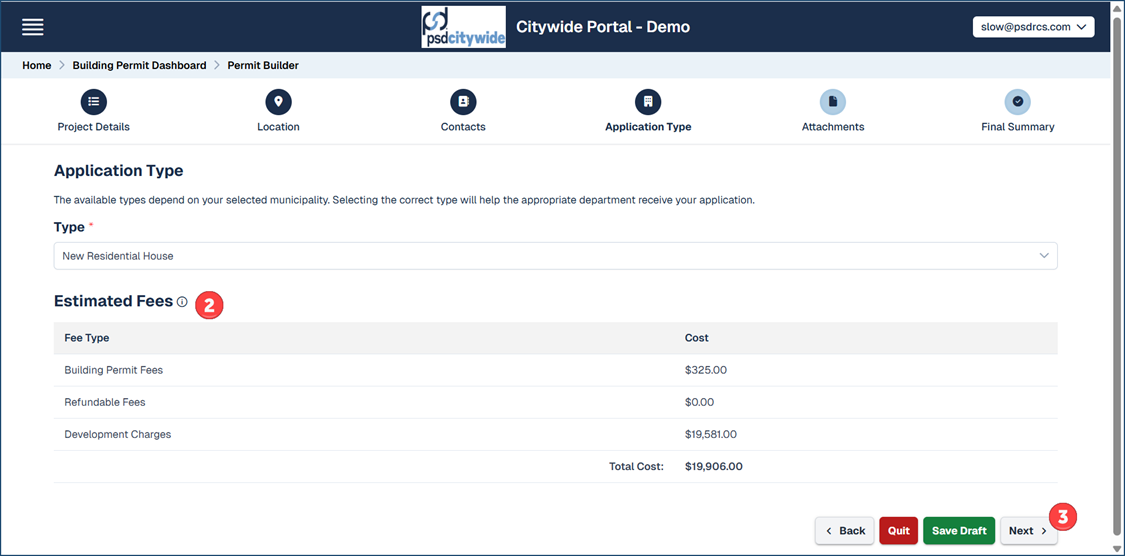
- Click Next ❸. The wizard advances to the Attachments category.
Attachments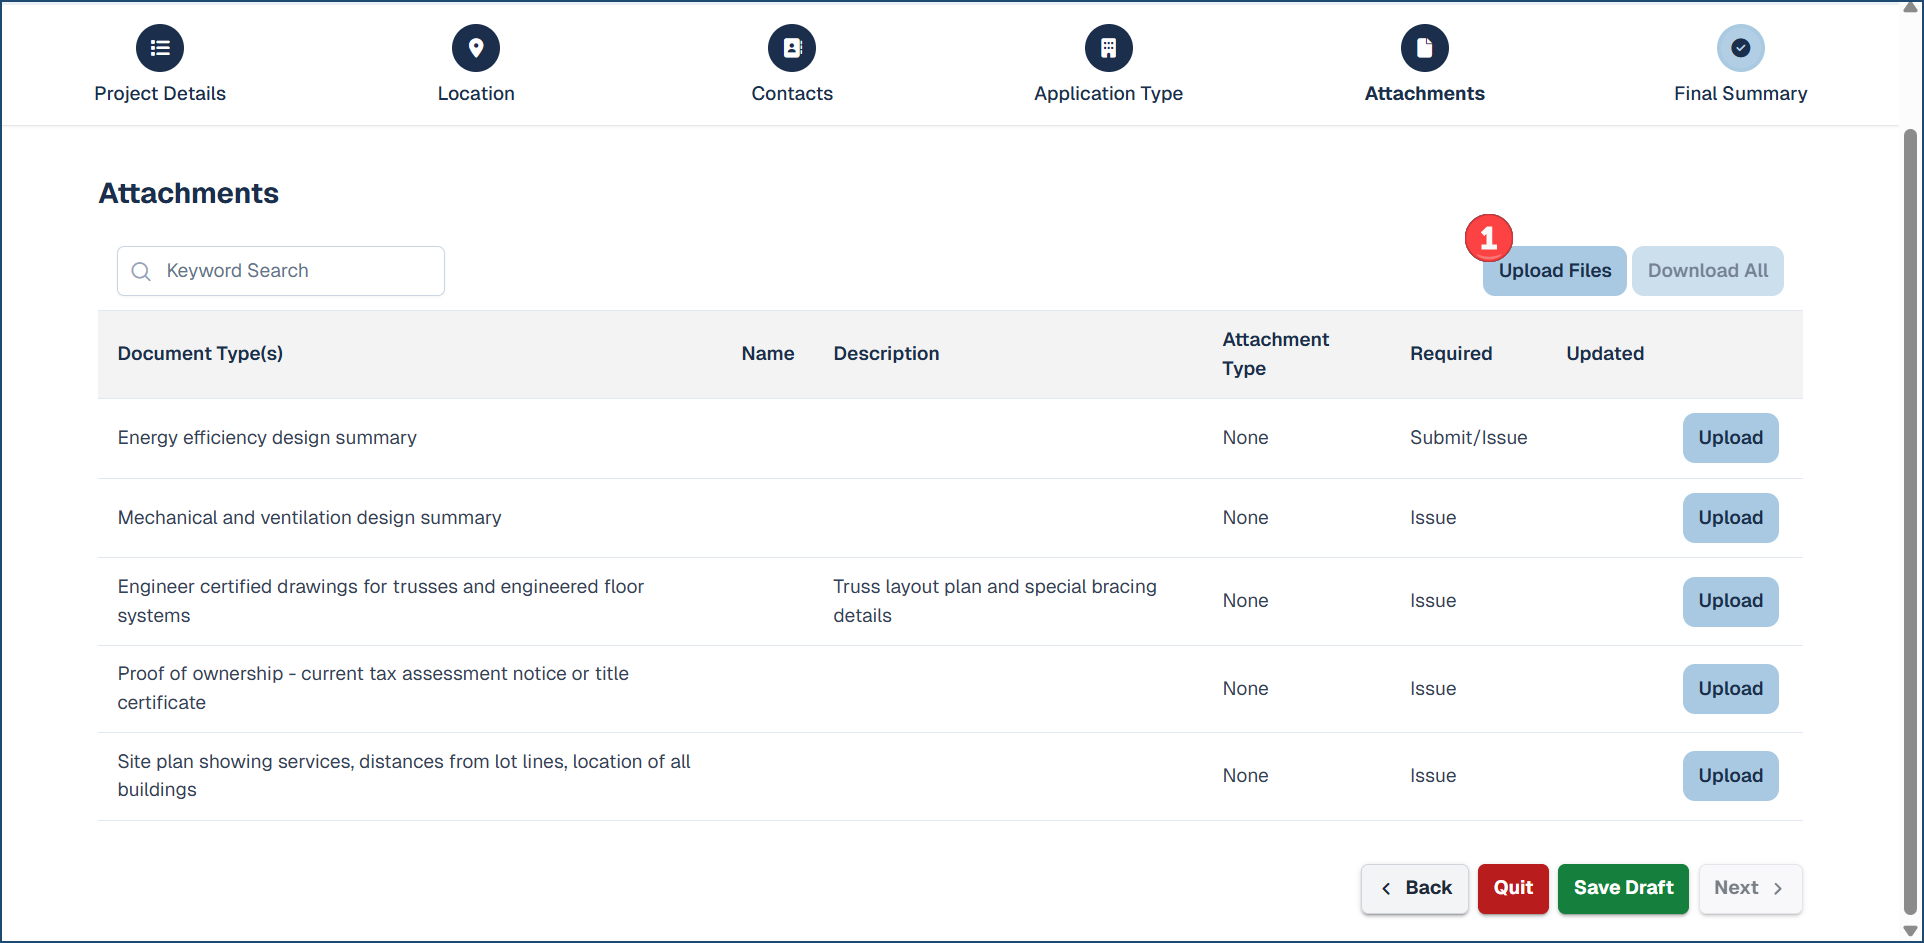
- There are different types of document attachments that you can associate with the permit and you can attach one file or as many files as needed.
- You will also see which document types are 'Required' with the application submission and before the permit is issued (Submit/Issue). Otherwise, documents are required before the permit is issued (Issue)
- Click Upload Files❶ to add attachment(s). The Add Multiple Attachments dialog box appears:
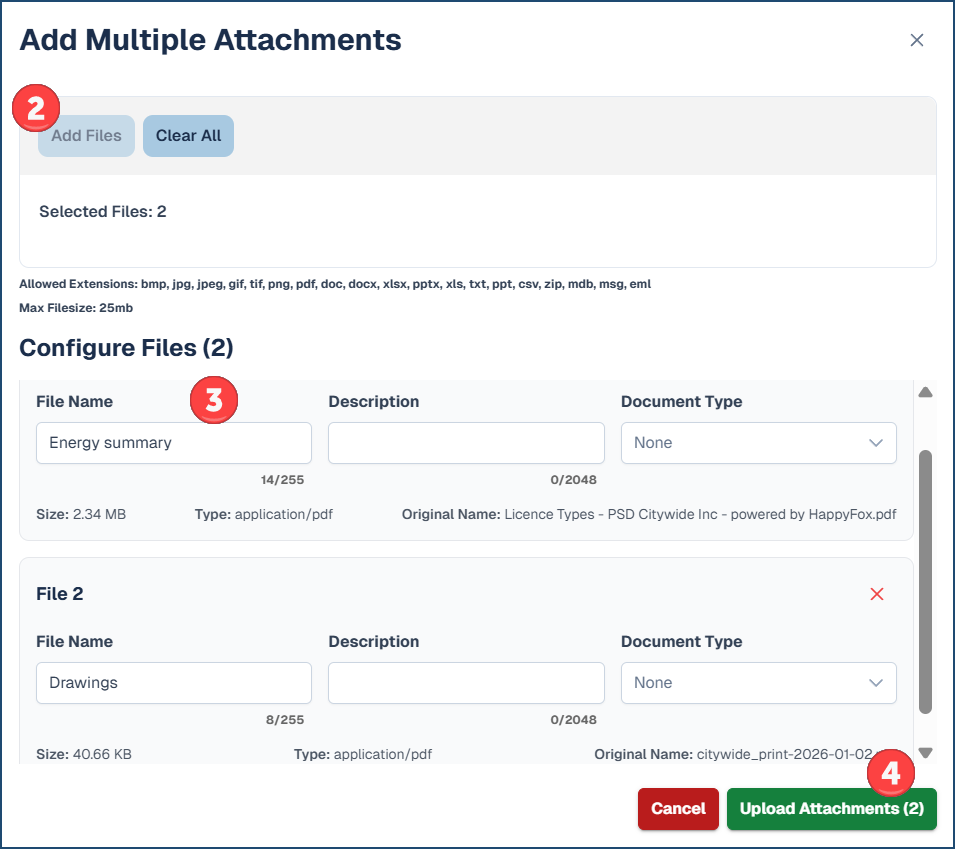
- Click Add Files ❷ or Drag and drop a file into the box. The File Name field ❸ will automatically be populated with the uploaded file name, but you can edit the name (perhaps giving it a clearer or more meaningful name).
- (Optional) Provide a Description.
- Select the Document Type.
- Click Upload Attachments ❹.
- Once you have attached your files,

- Click the pen icon to edit the attachment or click the download icon to download the attachment.
- Click X to delete the attachment.
- Click Next. The wizard advances to the Final Summary category.
Final Summary
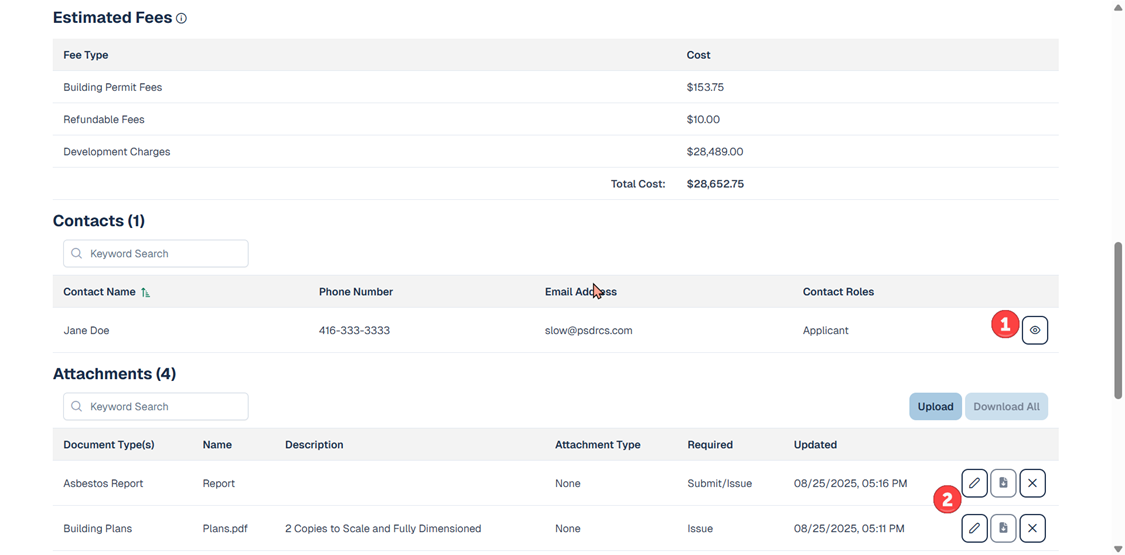
- This is the final screen, which provides you with a summary of the information entered in all the previous screens.
- Click the "eye" icon ❶ to open a detailed screen on the indicated topic.
- Click any of the edit icons ❷ available on this screen.
- Complete the 'Declaration' section with a signature
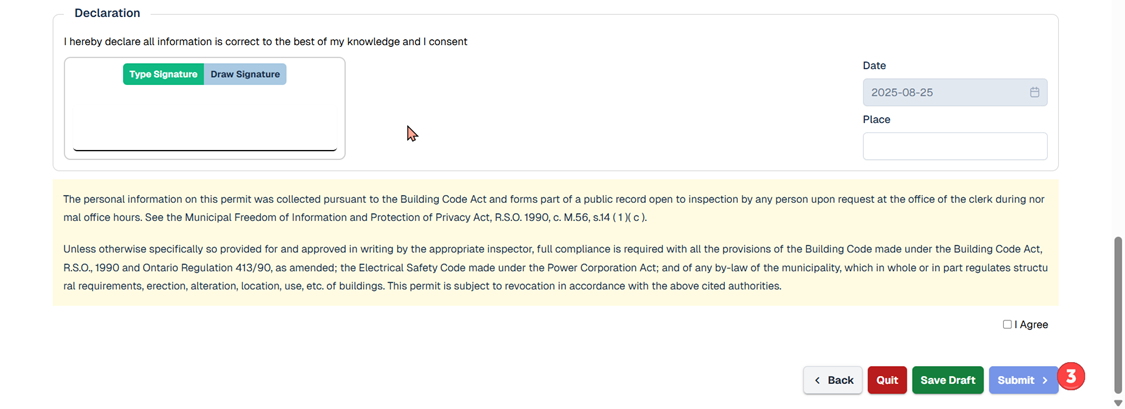
- Click Submit ❸ to submit the application.
Once an application is reviewed and a permit is Issued, users can view/print a summary within the portal.
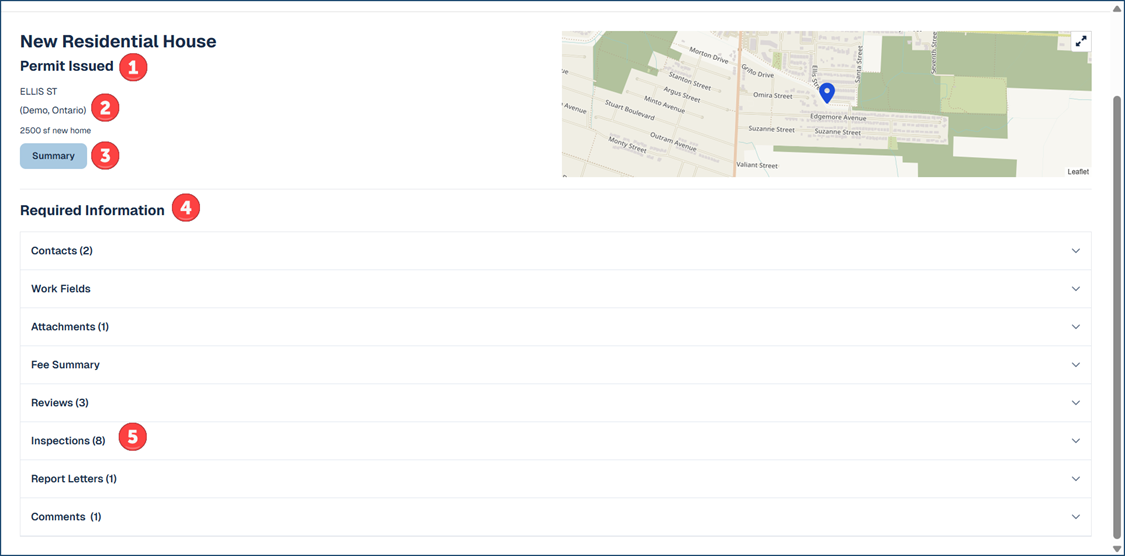
Once your existing application is opened from the dashboard, you can view further details of your current application.
- ❶ The current status of your application.
- ❷ The address/location or co-ordinates, municipality and description of your project.
- ❸ The
 button allows you to print/save or email a copy of a PDF summary of your application details.
 - ❹ The Required Information section shows the applicable additional details pertaining to your application.
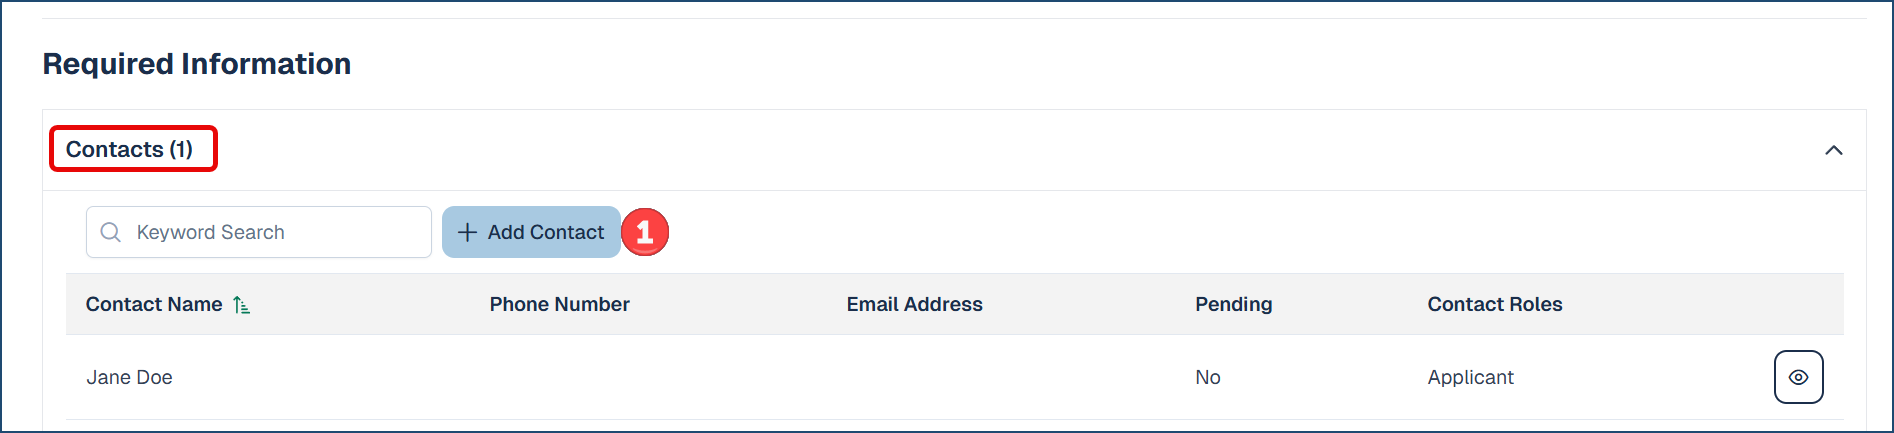
- Click 'Contacts' to view current contacts along with their roles as well as add additional contacts on the application.
- Click
 and complete the fields.
 - Then click Add Contact.
- Click
- (If enabled) Click 'Attachments' if the municipality allows applicants to attach and upload documents after the permit is issued.

- The
 button will be available if this option is enabled to attach documents after the permit is issued.
- The
- Click 'Contacts' to view current contacts along with their roles as well as add additional contacts on the application.
- ❺ Inspections (if applicable) displays the inspections required as your project progresses.
*If applicable and enabled by your municipality, you can request and schedule inspections via the portal. When viewing the application details, click Inspections to open the inspection list: 
- Click the Request Inspection icon
 to the right of the desired inspection.
 - Complete the Availability section
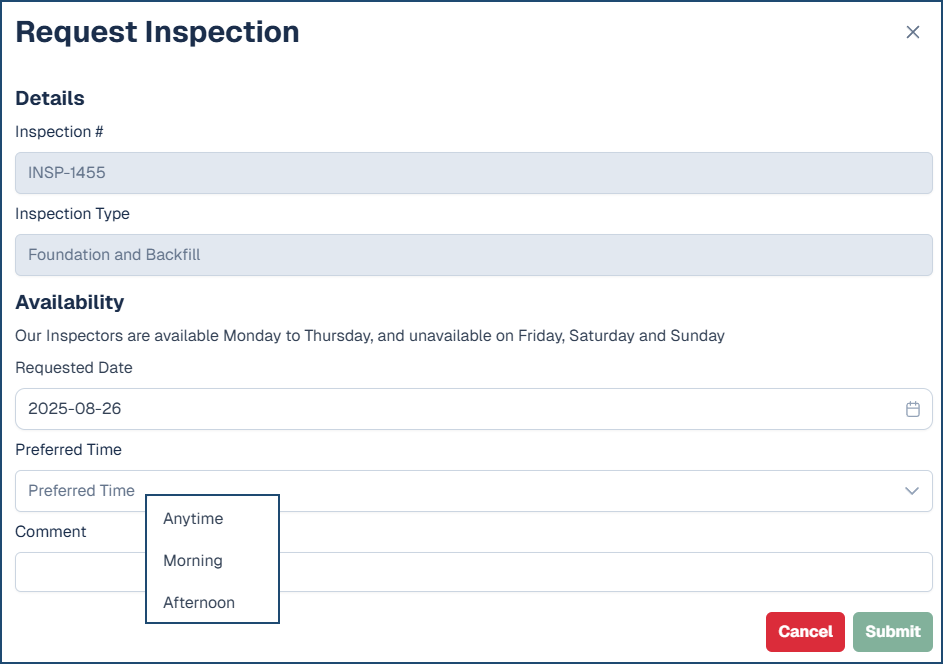
- Requested date
- Preferred time range (Anytime, Morning or Afternoon)
- Comments (optional)
- Click Submit
The inspection request will notify municipality staff to further process your request and communicate to the application contacts accordingly.
Create a Service Request
Creating a Service Request also involves a wizard in which you will be building the request by answering a set of questions across a set of categories. Click New Request from the Service Request Dashboard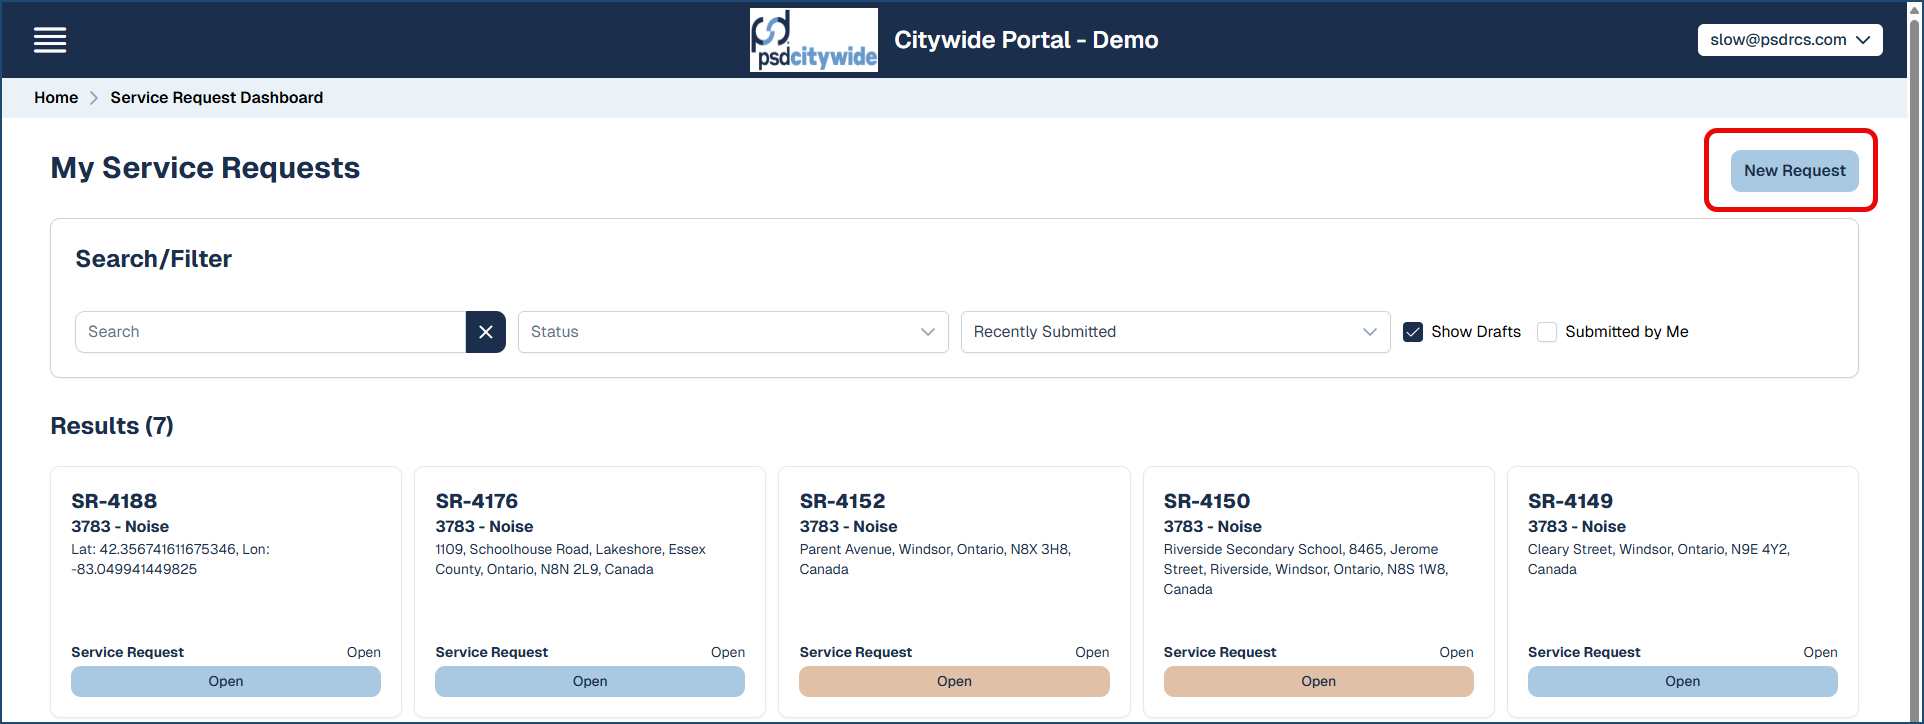 and it will start with entering Contact Details.
Contact Details❷
- If you are a registered user, the Contact Details that appear on the screen will be those contained in your Profile. If you are logged in as a Guest, then you'll be required to enter your contact information details before you can proceed to the next step.
- Contact Preference ❶: Select whether you would like to be contacted and how (phone or email).
- Click Next. The wizard advances to the Issue Location Description category. (click Save Draft to save the current application; Quit to quit without saving; Back to go to a previous category in the wizard.)
Location of Inquiry/Issue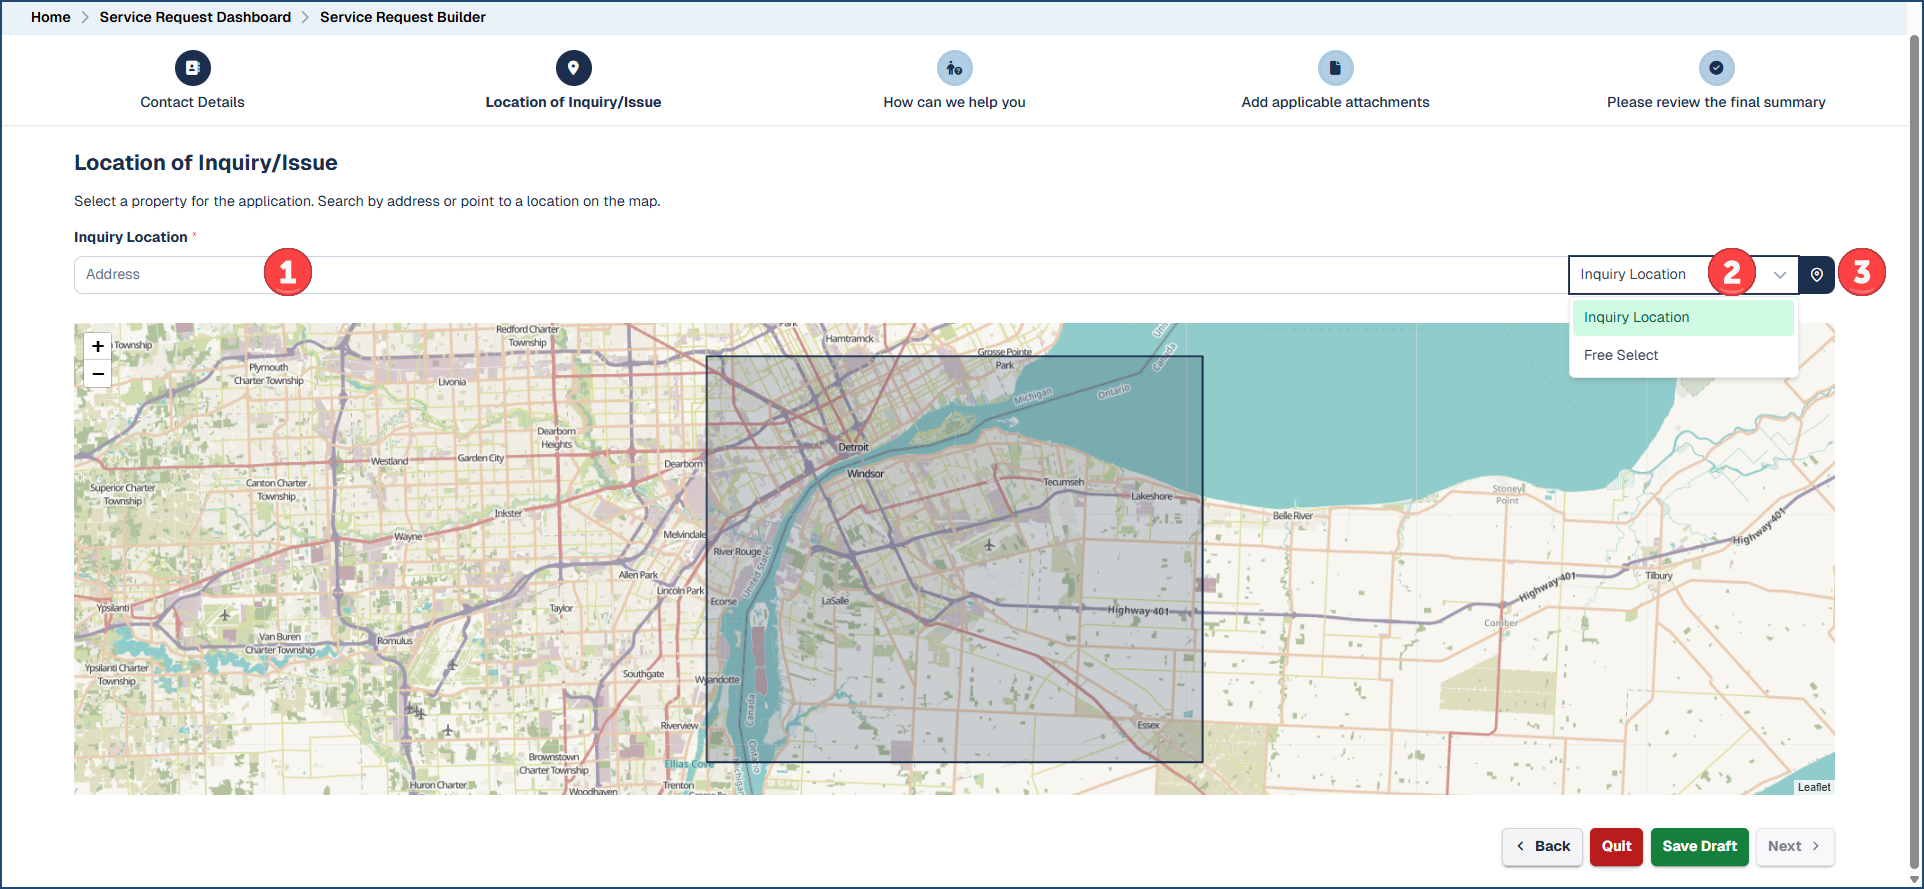
- Address ❶: Enter the address of the property the application is being sought for.
- Click the pull down for Free Select ❷ to have the GPS coordinates from the map to fill the Address field. This may be necessary if the property being applied does not have a recognizable address. You can then click the precise location on the map to get the coordinates, which will then appear in the Address field.
- Clicking the location icon ❸ will pass your current physical location to the system and produce a map that corresponds to it.
- Click Next. The wizard advances to the Service Request Type selection category ("Select from one of the following").
Service Request Type ("Select from one of the following")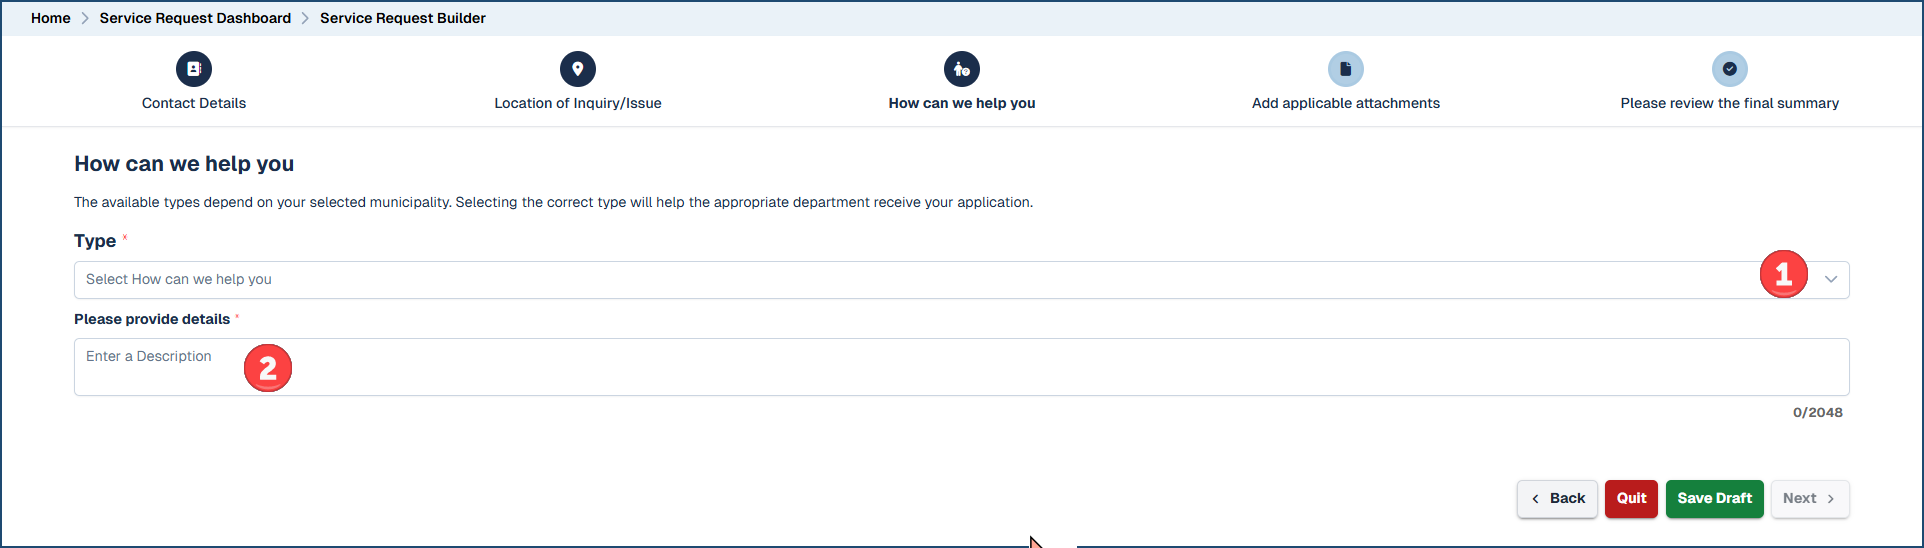
- Type ❶: Select the Service Request Type from the pull-down.
- Details ❷: Provide a detailed description of the matter requiring service.
- Attribute Fields (if applicable): one or a group of attribute fields affiliated with the Service Request Type will appear from which you can either select from a pull-down of options or enter further information.
- Click Next. The wizard advances to the Attachments category ("Add applicable attachments").
Attachments ("Add applicable attachments")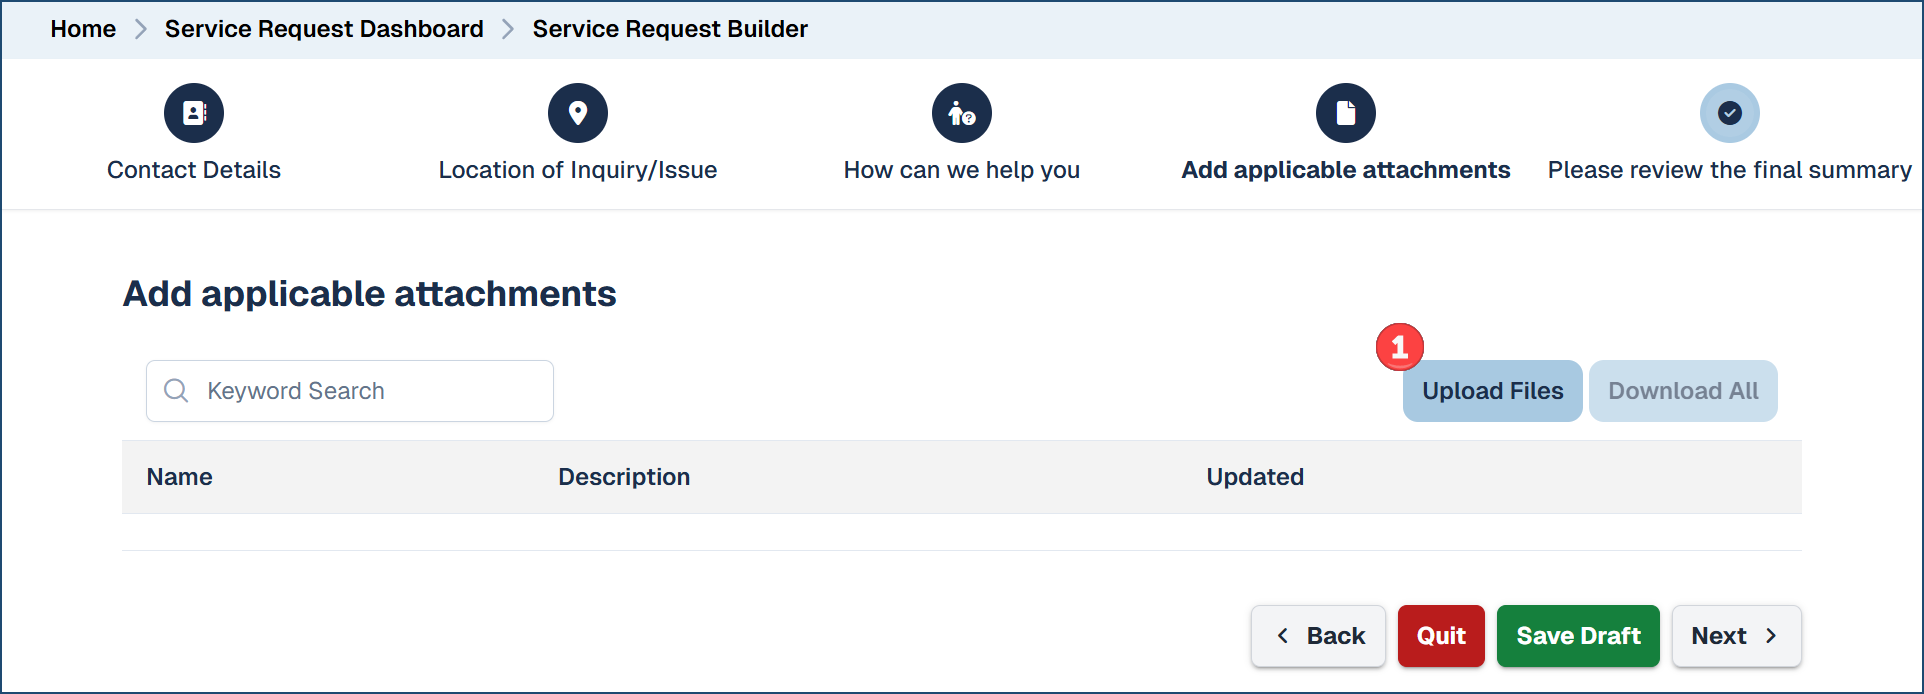
You can attach documents, photos, and any other attachments in connection with your service request.
- Click Upload Files ❶. The Add Multiple Attachments dialog box appears:
- Either click Add Files ❷ or Drag and drop a file into the box. The File Name field ❸ will automatically be populated with the uploaded file name, but you can edit the name (perhaps giving it a clearer or more meaningful name).
- (Optional) Provide a Description.
- Click Upload Attachments ❹.
- Once you have attached your files,
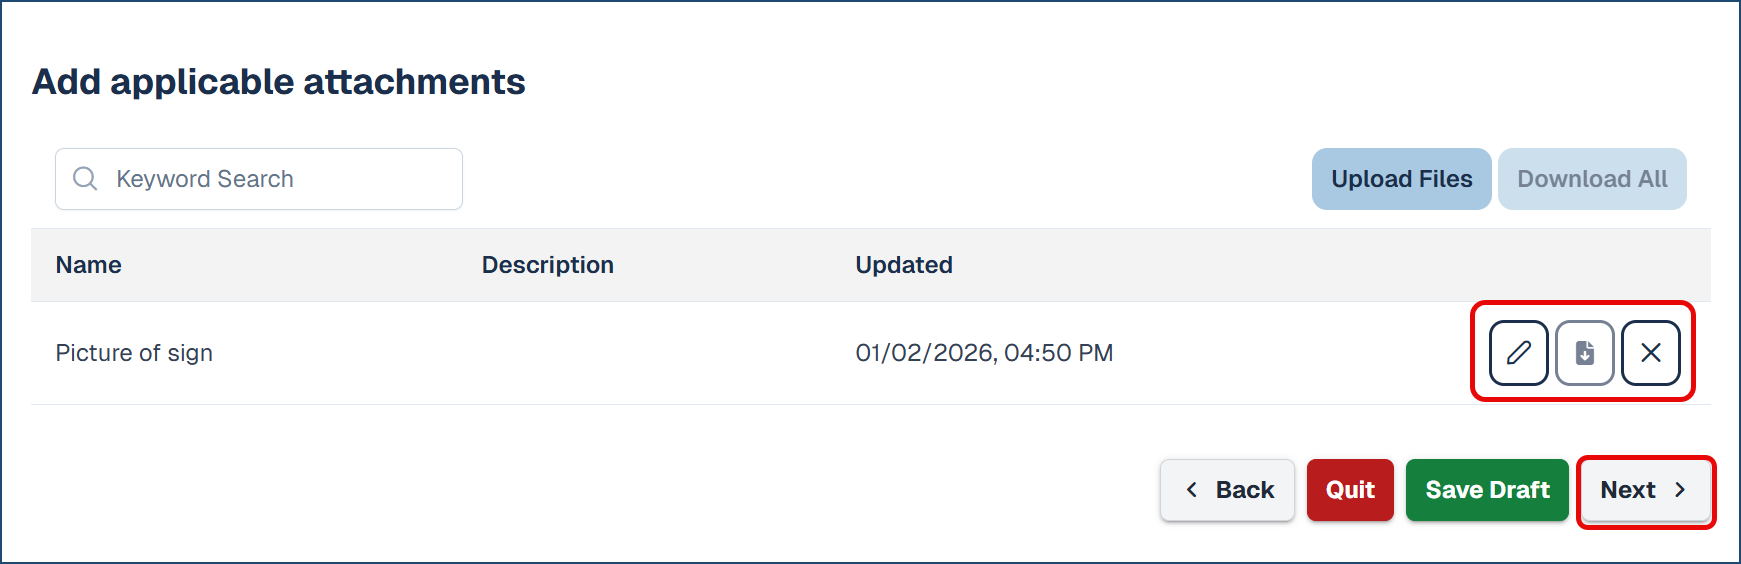
- Click the pen icon to edit the attachment or click the download icon to download the attachment.
- Click X to delete the attachment.
- Click Next. The wizard advances to the Final Summary category.
Final Summary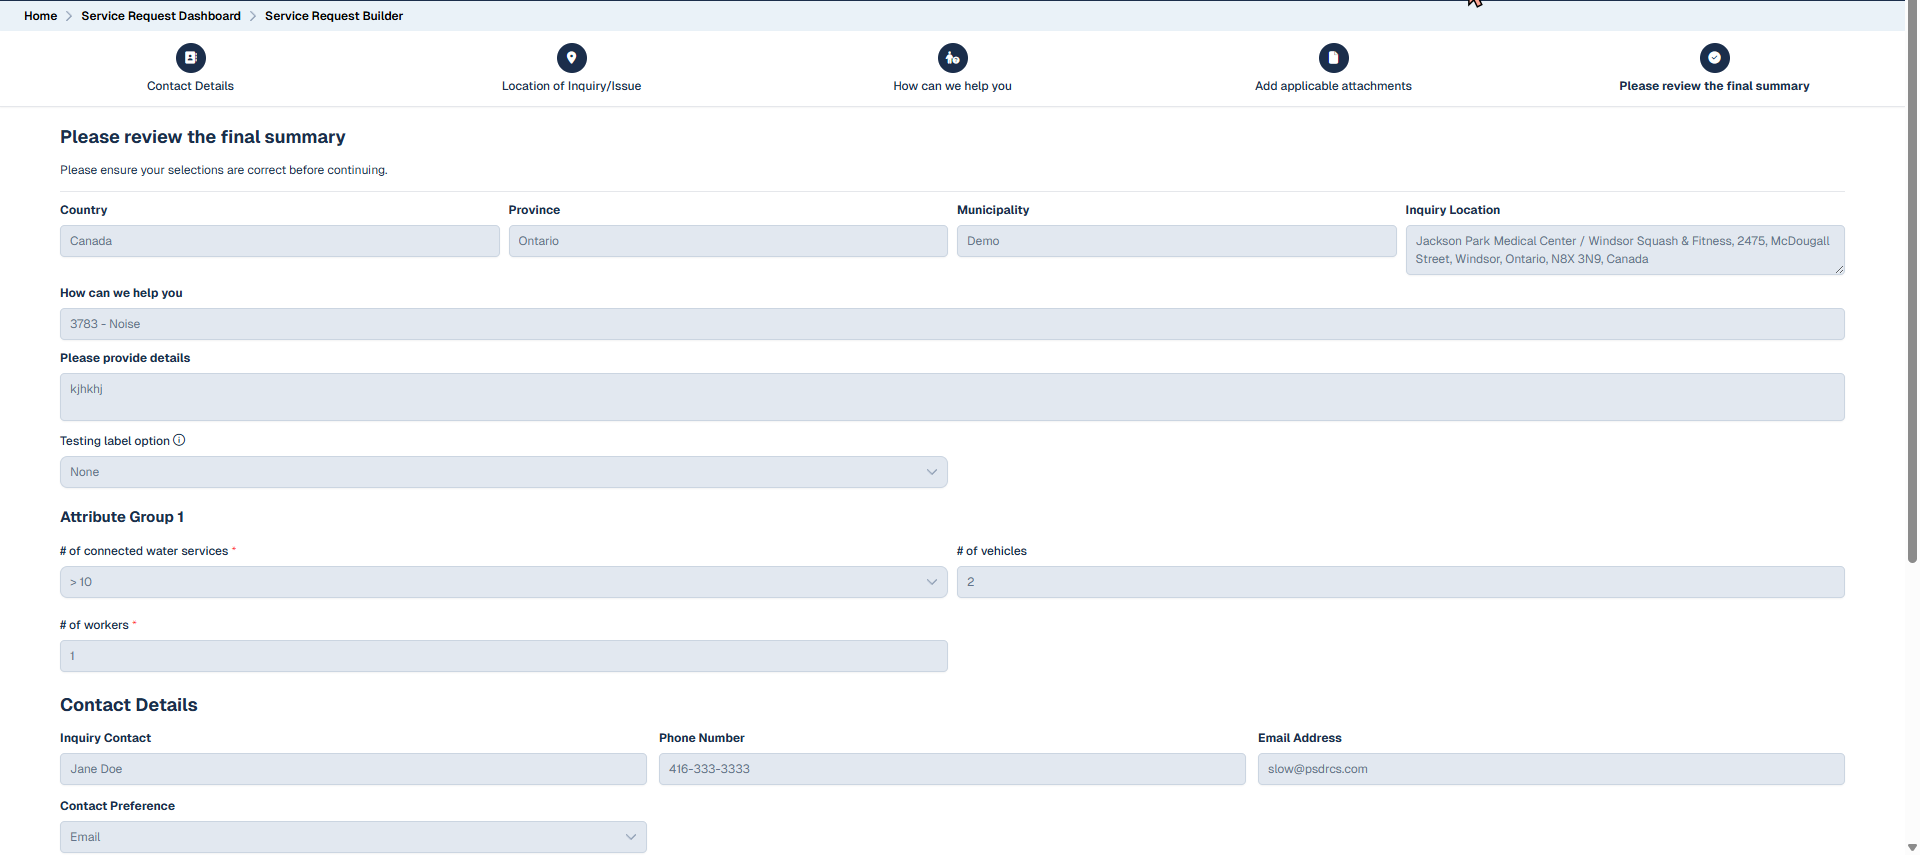
This screen shows you a summary of all the previous selections you have made, some of which can be edited on this screen.
- Complete the 'Declaration' section

- Then click Submit ❶ to submit your Service Request.
Viewing the System-Wide Dashboard & Help
To view all submitted applications and service requests on a single dashboard, use the System-Wide Dashboard found in the Home page menu: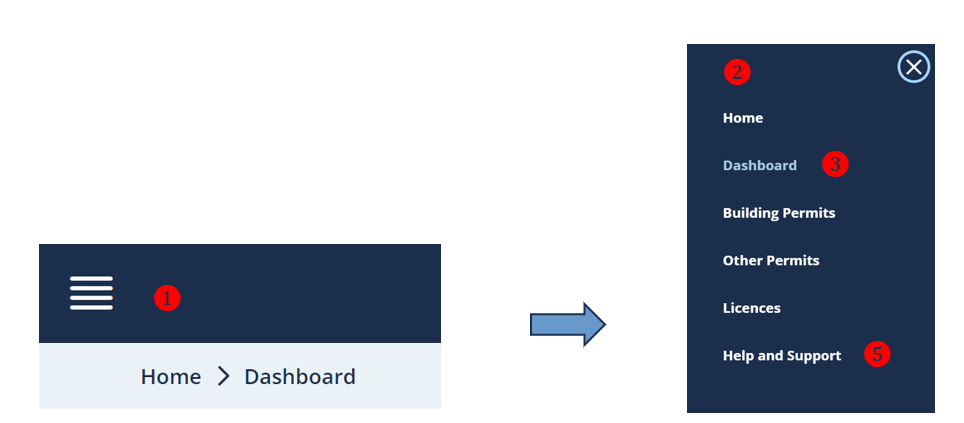
The System-Wide Dashboard is accessible from the menu icon ❶ in the upper left corner. click it reveals a menu ❷, which includes the System-Wide Dashboard ❸ option, all available permit application options and, if available, Service Request ❹, as well as the Help and Support option ❺.
Help and Support
Click the Help and Support ❺ option. You will be redirected to the Help and Support page set up by your municipality.


