
Overview
Financial adjustments are completed on the asset either individually at the asset level or in bulk using the Upload Center. Each adjustment has its own upload template. Citywide records the adjustment on the amortization schedule and recalculates as required from the adjustment date forward. The Adjustment Summary page provides an overview of all financial adjustments completed for the current asset and is read-only.

In the screenshot above, the Adjusted Cost field reflects the two adjustments that were applied to the asset. Adjusted cost equals the historical cost ($234,497) plus/minus any adjustments.
Additions (betterments) can add value, estimated useful life and/or quantity to the asset.

To complete an addition at the asset level:
- In the asset view click Additions.
- Click +New Addition in the top right.
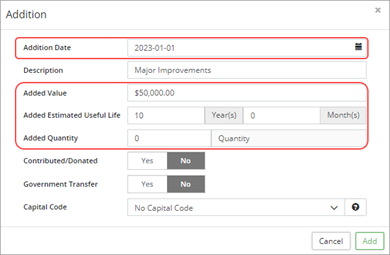
- In the Addition popup, enter a Date and a Description (optional). Cost information will adjust and is reflected on the amortization schedule form the date entered onward.
- Indicate whether the addition adds Value, Estimated Useful Life (EUL), and/or Quantity. Adding EUL extends the amortization of the asset.
- Set the Contributed/Donated and Government Transfer flags as needed.
- Select a Capital Code as needed.
- Click Add.
- Click Save.
The Upload Center/Additions template can be used to complete additions (betterments) in bulk.
- Click Upload Center on the Assets landing page.
- Click Upload Type and select Additions.

- Select Click to Export.
- Copy the string of text into a blank Excel worksheet. These are the field names that will need to be completed for each asset that has an addition.
- Enter the Asset ID, Adjustment Date (YYYY-MM-DD), Added Value and/or Added EUL (Months) and/or Added Quantity for each asset that has an addition.

- Enter a Description (optional).
- Enter Yes to mark an entry as Is Contributed/Donated or Is Gov. Transfer (these are optional fields).
- Enter a Capital Code (optional). Make sure the Capital Codes have already been entered into the database on the Classifications screen (Home ð Classifications ð Capital Code).
- Once all the additions have been entered and reviewed, copy all rows with data including the header row and paste it in the Upload Center, Input/Paste completed template below field.
- Review the information. Any errors within the data will have to be corrected in the Excel spreadsheet.
- Click Submit.
- When the upload is successful the additions will appear in the Pending Imports view.

- Review the additions and then click Approve Import. You must approve the imports otherwise the additions will not be included in reporting.
Assets that have reached the end of their useful lives and/or are no longer in use are marked as fully disposed. If the asset is being replaced, complete the full disposal on the existing asset and then complete a new acquisition for its replacement.

To complete a full disposal:
- In the asset view select Full Disposals.
- Click +New Full Disposal in the top right.
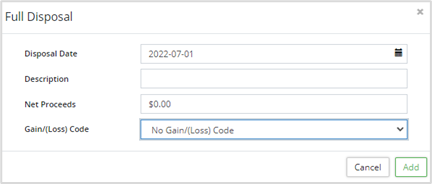
- In the Full Disposal popup, enter a Disposal Date and a Description.
- Enter Net Proceeds (optional).
- Select a Gain/(Loss) Code (optional). Gain/loss codes are setup in the manage section of the Assets landing page (Assets ð Manage ð Gain/Loss Codes).
- Click Add.
- Click Save. A prompt to Create Asset from Disposal displays.
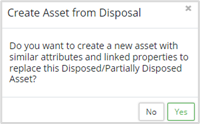
- If the asset is being replaced, click Yes. Citywide copies the details of the disposed asset into an Add Asset window.
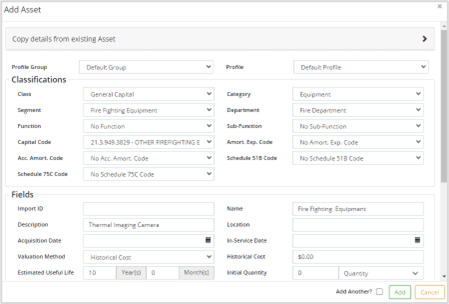
- The Classifications, Profile, Attributes, and several Fields will be copied from the disposed asset to the new asset. This ensures consistency in the data of the new asset. Changes can be made as needed.
- Enter an In-Service-Date which is used to start the amortization of the new asset.
- Enter the Historical Cost of the new asset.
- Enter an Initial Quantity.
- Update any other field as needed including adding/updating attribute information.
- Click Add. Citywide assigns an Asset ID# to the new asset and opens it on screen. Review all details including the amortization schedule.
Assets that have been fully disposed are identified by the ![]() icon. Fully disposed assets can be viewed in the Show Disposed Assets view. Click
icon. Fully disposed assets can be viewed in the Show Disposed Assets view. Click ![]() in the pre-set filter buttons (top left).
in the pre-set filter buttons (top left).
When replacing a GIS-linked asset, be sure to copy the linking key information (this could be the Import ID field or an attribute) and the GIS feature will automatically link to the new asset overnight.
Complete Full Disposals in Bulk
The Upload Center/Full Disposals template can be used to complete full disposals in bulk.
- Click Upload Center on the Assets landing page.
- Click Upload Type and select Full Disposals.

- Select Click to Export.
- Copy the string of text into a blank Excel worksheet. These are the fields that will need to be completed for each asset that will be fully disposed.
- Enter the Asset ID and Adjustment Date (YYYY-MM-DD) for each asset to be disposed.
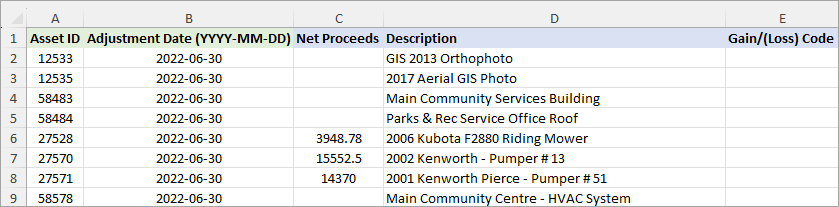
- Enter a Net Proceeds amount for those assets that may have been sold, etc. This is an optional field and can be left blank.
- Enter a Description (optional).
- Enter a Gain/(Loss) Code (optional). Gain/(Loss) Codes are set up on the Assets landing page in the Manage section.
- Once all the disposals have been entered and reviewed, copy all rows with data including the header row and paste it in the Upload Center, Input/Paste completed template below field.
- Review the information. Any errors within the data will need to be corrected in the Excel spreadsheet.
- Click Submit.
- When the upload is successful the full disposals will appear in the Pending Imports view.

- Review the full disposals and then click Approve Import. You must approve the imports otherwise the full disposals will not be included in reporting.
Partial Disposals are used when part of an asset is being disposed (e.g., a section of a road segment is being resurfaced). Users will have the option to create a new asset to replace the disposed amount. Disposal methods include dollar, quantity, and percent. Net proceeds can also be recording when completing a partial disposal.

To complete a partial disposal:
- In the asset view select Partial Disposals.
- Click +New Partial Disposal in the top right.
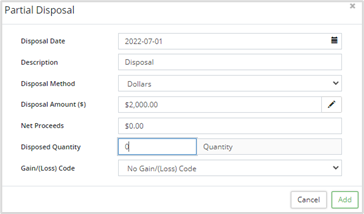
- In the Partial Disposal popup enter a Disposal Date and a Description.
- Select a Disposal Method:
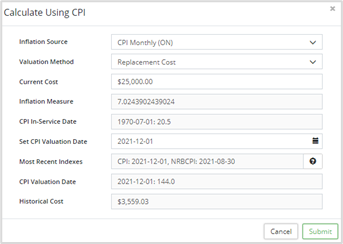
- Dollars - enter the dollar amount in the Disposed Amount ($) field. If the historical disposal amount is unknown, but a current cost is known, click Calculate Using CPI
 to deflate the current cost back to the original in-service-date. Fill-in the form including an Inflation Source, Valuation Method, Current Cost, and CPI Valuation Date.
- Quantity - enter a quantity in the Disposal Quantity field. The initial quantity and adjusted quantity fields are found on the Valuation page.
- Percent - use to dispose a % of the historical cost. Enter a percentage amount in the Disposal Amount (%) field.
- Dollars - enter the dollar amount in the Disposed Amount ($) field. If the historical disposal amount is unknown, but a current cost is known, click Calculate Using CPI
- Record Net Proceeds (optional).
- Enter a Disposed Quantity (optional). The Unit of Measure will auto-populate from the Valuation page.
- Select a Gain/(Loss) Code (optional). Gain/loss codes are setup in the manage section of the Assets landing page (Assets ð Manage ð Gain/Loss Codes).
- Click Add.
- Click Save. A prompt to Create Asset from Disposal displays. .
- Click Yes only if you would like to create a new asset to replace the partial disposal. The new asset will have its own Asset ID#, its own in-service-date, EUL, historical cost, and amortization schedule. See steps 8-14 above. Otherwise click No and complete an Addition to account for the replacement. See above for steps on how to complete an addition.
Assets that have a partial disposal are identified by the icon.
icon.
Complete Partial Disposals in Bulk
The Upload Center/Partial Disposals template can be used to complete partial disposals in bulk.
- Click Upload Center on the Assets landing page.
- Click Upload Type and select Partial Disposals.

- Select Click to Export.
- Copy the string of text into an Excel worksheet. These are the fields that will need to be completed for each asset that will have a partial disposal.
- Enter the Asset ID, Adjustment Date (YYYY-MM-DD), and Disposal Type. Enter a Disposal Amount or Disposed Quantity (for $/% typed only).

- Enter Net Proceeds (optional).
- Enter a Description (optional).
- Enter a Gain/(Loss) Code (optional). Gain/(Loss) Codes are set up on the Assets landing page in the Manage section.
- Once all the partial disposals have been entered and reviewed, copy all the rows with data including the header row and paste it in the Upload Center, Input/Paste completed template below field.
- Review the information. Any errors within the data will need to be corrected in the Excel spreadsheet.
- Click Submit.
- When the upload is successful the partial disposals will appear in the Pending Imports view.

- Review the partial disposals and then click Approve Import. You must approve the imports otherwise the partial disposals will not be included in reporting.
Writedown of an asset can include cost and/or EUL. To complete writedowns in bulk use the Upload Center/Writedowns template.

To complete a writedown on an asset:
- In the asset view select Writedown.
- Click +New Writedown in the top right.
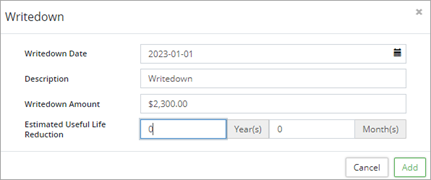
- In the Writedown popup enter a Writedown Date and a Description (optional). If the asset is ARO identified then the writedown popup will include a Type field allowing for writedowns on either the cost or on the ARO/ARC.
- Enter a Writedown Amount and/or an Estimated Useful Life Reduction (Year/Month).
- Click Add.
- Click Save.
Full and partial transfers of assets can be completed within Citywide without affecting prior year reports. Full transfers are used to modify the classification of an asset such as when an asset is transferred from one department to another. Partial transfers are used to split out an asset into multiple assets such as a single pooled asset that is split out into several individual assets all classified the same. Both options will create a new asset and ensure that prior year reports are not affected. Cost and/or quantity can be transferred. To complete transfers in bulk use the Upload Center/Internal Transfer template.

To complete a full transfer (i.e., inter-department transfer of a vehicle asset):
- In the asset view select Transfer.
- Click on +New Transfer in the top right.
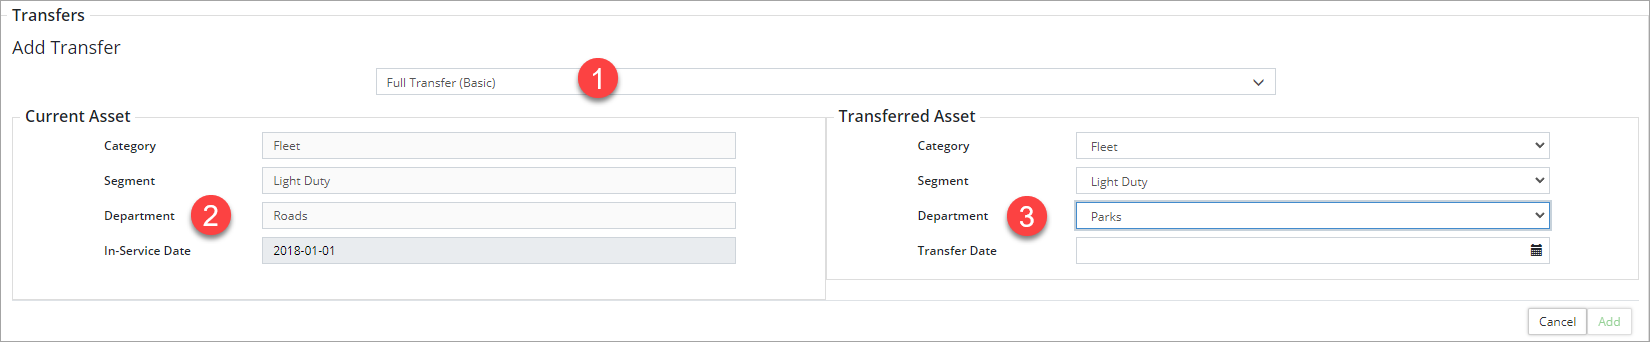
- Select a transfer type , either Full Transfer (Basic or Detailed). The difference will be in the number of classifications that may need to be changed. For example, to complete an inter-department transfer of a vehicle, select Full Transfer (Basic) to change only the Department. However, if additional classifications need to be adjusted such as Function/Sub-function then select Full Transfer (Detailed).
In the screenshot above, Full Transfer (Basic) is selected. The Current Asset section shows how the asset is classified by Category, Segment, and Department. The In-Service Date is also shown. The information is read-only. - In the Transferred Asset section , select a Department and enter a Transfer Date.
- Click Add. A new asset is pending.
- Click Save. The new asset is created and an Asset ID assigned. Any remaining costs have been transferred from the original asset to the new asset. The amortization will continue as per the original schedule.
Assets that have a Transfer are identified by an Æ (Outgoing Transfer) icon or Å (Resultant Transfer) icon.
To complete a partial transfer (i.e., split out a pooled asset):
- In the asset view select Transfer.
- Click on +New Transfer in the top right.

- Select Partial Transfer (Basic) . The difference between Basic and Detailed is the number of classifications that may need to be adjusted.
- In the Transferred Asset section, the Department, Category, and Segment classifications are copied from the original asset (as shown on the left). Enter a Transfer Date and press tab or enter. The system will calculate a New Estimated Useful Life based on the original In-service-Date and Adjusted Useful Life (shown on the left in the Current Asset section).
- Enter the number of units to be transferred in the Transfer Quantity (unit(s)) field.
- Enter a dollar value to be transferred in the Transfer Cost field.
- Click Add. The new asset is pending.
- Click Save. The new asset is created and an Asset ID assigned. Quantity and cost have been transferred from the original asset to the new asset. The amortization will continue as per the original schedule.
Assets that have a Transfer are identified by an Æ (Outgoing Transfer) icon or Å (Resultant Transfer) icon.
Additional Resource
In preparation to making any financial adjustments to assets in Citywide, please refer to our optional and suggested year-end checklist. It contains steps and optional settings to use as a reference when making asset adjustments - regardless if it is followed as a year end process or during the year.


