
Citywide Login
- Open a web browser and enter the applicable country URL below, then press Enter:
- Canada: v4.citywidesolutions.com
- US: us.citywidesolutions.com
- Click on Click Here to Log In.
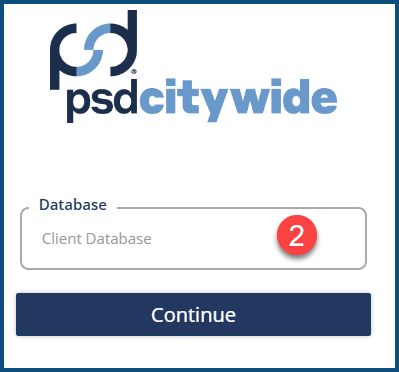
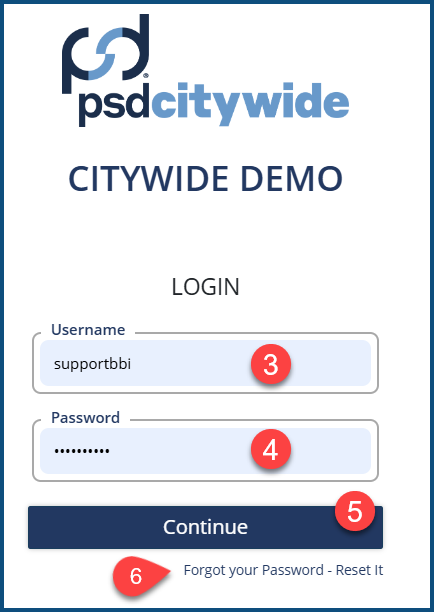
- Enter a Database name ❷, followed by your Username ❸ and Password ❹.
- Click Continue ❺. You may be required to change your password on the first login or, in some cases, on subsequent logins.
- If you have forgotten your password, click Forgot your Password - Reset It ❺. An email message will be sent to you with a temporary password, which you will be required to change upon your next login.
|
|
|
-
You can bypass selection of the database ❷ and start with the second screenshot by entering a front-slash-database-name following the above URL. Thus, in the above example, "/demo" was appended to v4.citywidesolutions.com (creating v4.citywidesolutions.com/demo) to immediately go to the second screen. You may wish to create a bookmark with the added database parameter.
The Home Page
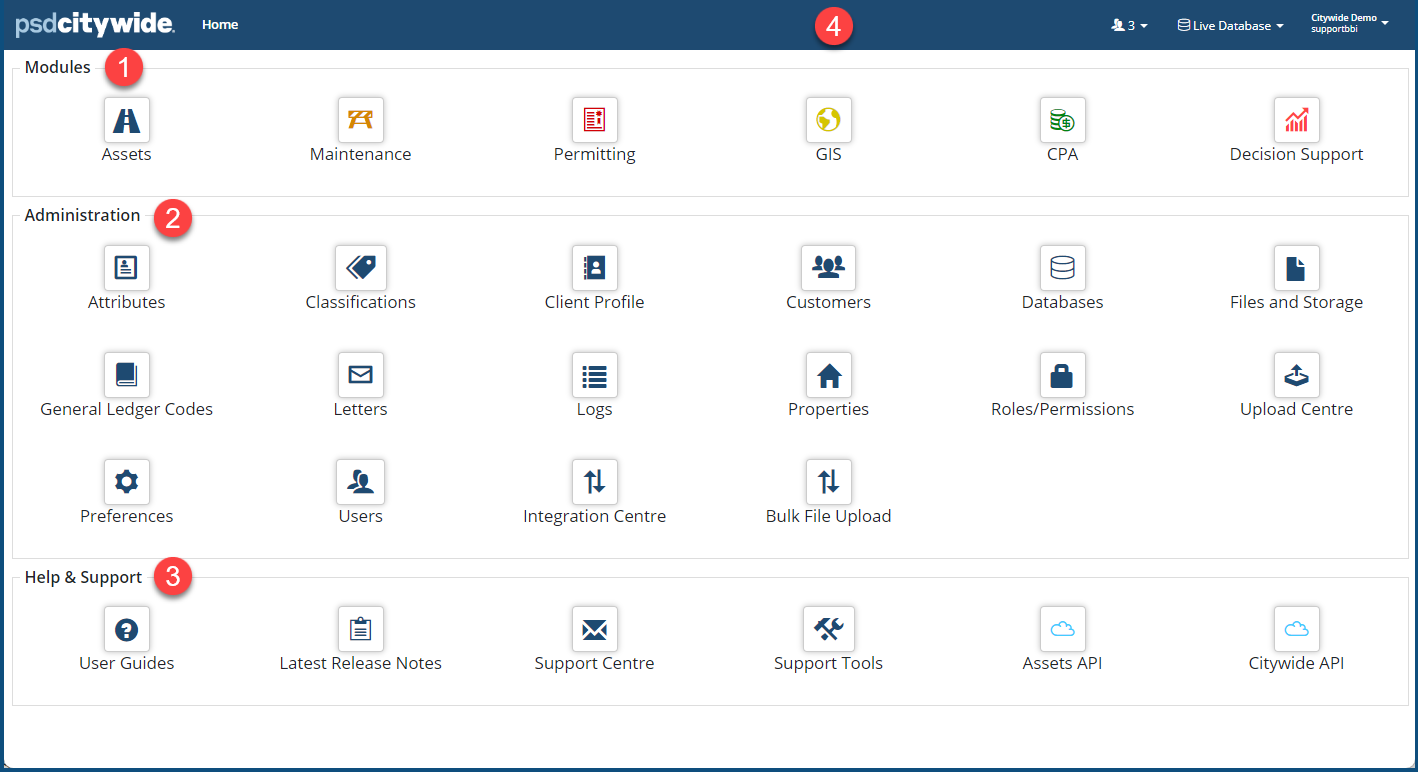
The Home screen displays all Modules ❶ within the Citywide platform, as well as Administration ❷ tools and Help & Support ❸ resources. The PSD Citywide banner ❹, located at the top, displays login information involving the database being accessed and user ID information, the number of active, logged in users, and the Help icon.
Not all icons and options will be available to all users, and clicking on many icons may not produce resultant access. Permission settings attributable to individual user accounts control what users can see and access.
The Home screen contains three sections:
- Modules: All modules within the Citywide platform are accessed here. Inactive (inaccessible) modules will display a screen tip with a message to contact Citywide.
- Administration: This section is used to manage system-wide settings and preferences. Accessibility to these tools is controlled through Roles / Permission settings.
- Help & Support: User guides, FAQs, Citywide Help articles and AI Chatbot are accessible within the platform. Users can also create support requests from the Support Center.
Citywide Banner
The Citywide banner ❹ is always visible at the top regardless of which screen is displayed.
|
Item |
Description |
|
Click to navigate back to the HOME page. |
|
|
Navigational path (aka "the breadcrumb trail") displays the locational depth of the current page within the system, starting with Home 🢡 {select module}🢡 {selected section}, etc. For example, if working with reporting year 2023 in Asset Manager, the breadcrumb trail will display Home 🢡 Assets 🢡 Inventory (2022) Active Inventory and WIP. Click on any part of the breadcrumb trail to navigate back to the screen corresponding to the selection section. |
|
|
Displays the number of Users who are logged into the database. Click to view additional information about connected users. · Username: Displays the login name · Database: Displays the name of the database the user is working in · Instances: Displays the number of webpages opened specific to the database · Status: Displays whether the user is active/inactive within the system |
|
|
Displays the name of the database the user is working with. Click to switch between databases. Clients can have up to three databases, and it’s good practice to have a sandbox copy of the default database. |
|
|
Displays the User ID and database name. Click to access: · My Account: Click to see account information and change password · Create Support Request: Click to create a Support request, as well as access FAQs, user guides, Citywide Help articles and AI Chatbot. · Logout: Click to logout. The system will log users out automatically after a period of inactivity |


