
Overview
The purpose of asset groups is to gather related assets into a group so that matters concerning them can be addressed at the same time. For example, if water hydrants in a sub-division were installed at roughly the same time, they could be grouped together. If and when the time comes for them to be upgraded or serviced, work orders could be created that encompass the entire group. Related assets can be grouped on the basis of their location, their age, and any other variable or set of variables. Accordingly, an asset can exist in multiple groups.
There are various places in CW where asset groups can be created and referenced. They are all discussed here.
Creating or Augmenting Asset Groups in the Assets Module
Method 1: Creating or Augmenting an Asset Group from Assets 🢡 Manage: Asset Groups
- Click on Asset Groups . The Asset Groups page appears:
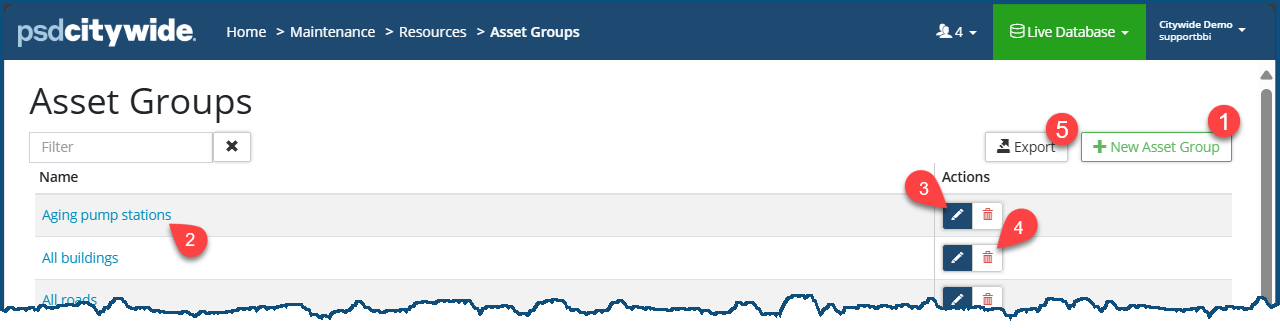
- You can either add a new Asset Group or add Assets to an existing Asset Group
- To add a New Asset Group
- Click on + New Asset Group ❶. The New Asset Group dialog box appears:
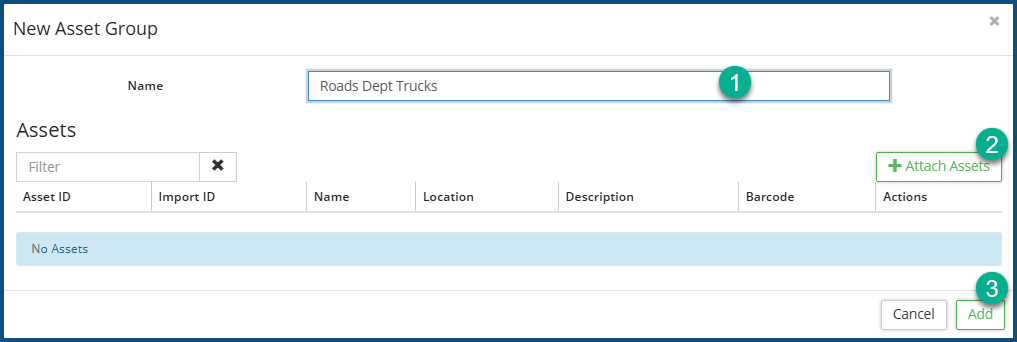
- Provide a Name for the New Asset Group ❶.
- Click on + Attach Assets ❷. The Select Asset dialog box appears:
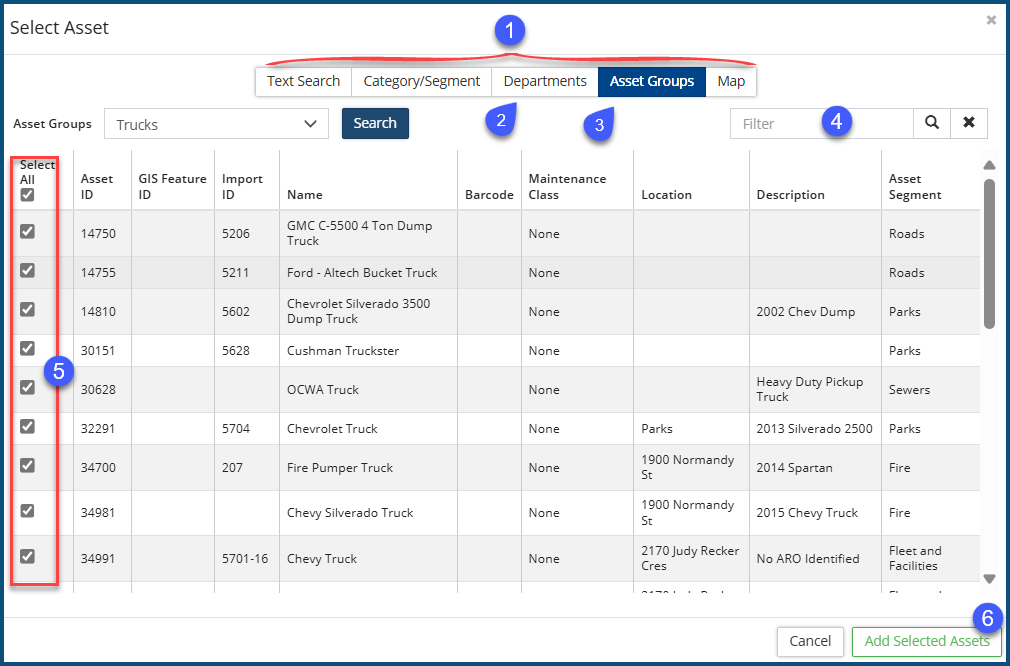
- Select the assets by applying one or more filters using the criteria accessible from the tabs ❶. If you apply more than one filter, the resultant list of assets will be the product of all the all the applied filters (compound filtering). In the following example, two filtering criteria were used: Departments = Roads ❷ .AND. Asset Groups = Trucks ❸.
- You can further whittle down the list by applying a further text-based filter ❹ to the filtered list.
- Check ✅ / uncheck ☐ ❺ the assets to be included in the new asset group.
- Click Add Selected Assets ❻.
- Click on + New Asset Group ❶. The New Asset Group dialog box appears:
- To Add Assets to an Existing Asset Group
- Click on the Asset Group ❷ to which you would like to add assets.
The Asset Group Details screen appears:
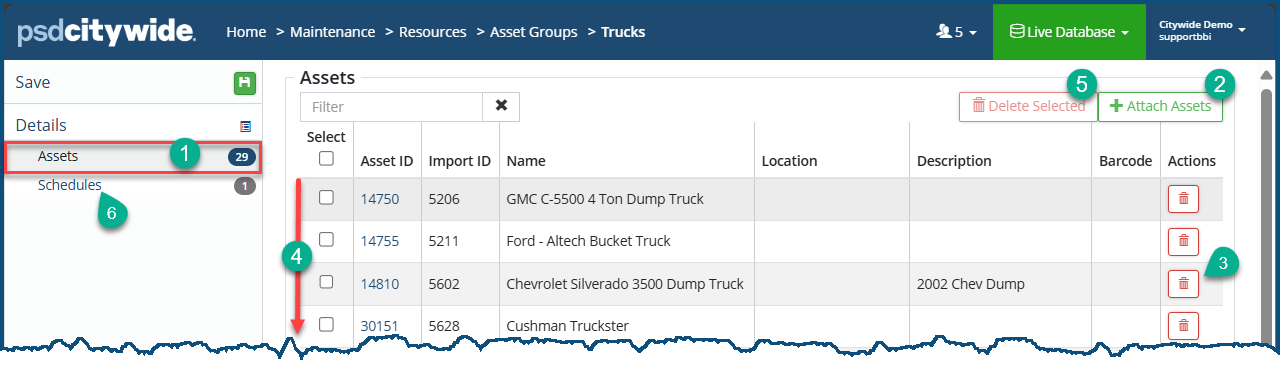
- Click on Assets ❶ in the Affiliate Panel. The list of current assets in the asset group appear in the right panel.
- Follow the instruction in steps 3 - 7 above. The selected assets will be added to the selected asset group, changing the Assets number ❶ accordingly.
- Click Save.
- Click on the Asset Group ❷ to which you would like to add assets.
Method 2: Creating or Augmenting an Asset Group from the Assets 🢡Inventory Grid
Creating an Asset Group from the Inventory Grid assumes that you have already filtered the grid down to the the assets that you would like to include in the group. Otherwise, the "selected" (unfiltered) assets will be all the assets in the system!
- Apply the filter(s) that encompass the the assets you wish to include in the asset group. In the following example, the assets have been filtered down Chevrolet ❶ Vehicles ❷ (the later filter applied, just in case there as Chevrolet generators, just as there are Honda cars and generators). This produces a total of 34 records ❸, which is a subset of Chevrolet vehicles of the overall 160 Vehicles, a further subset of the total 27,523 assets.
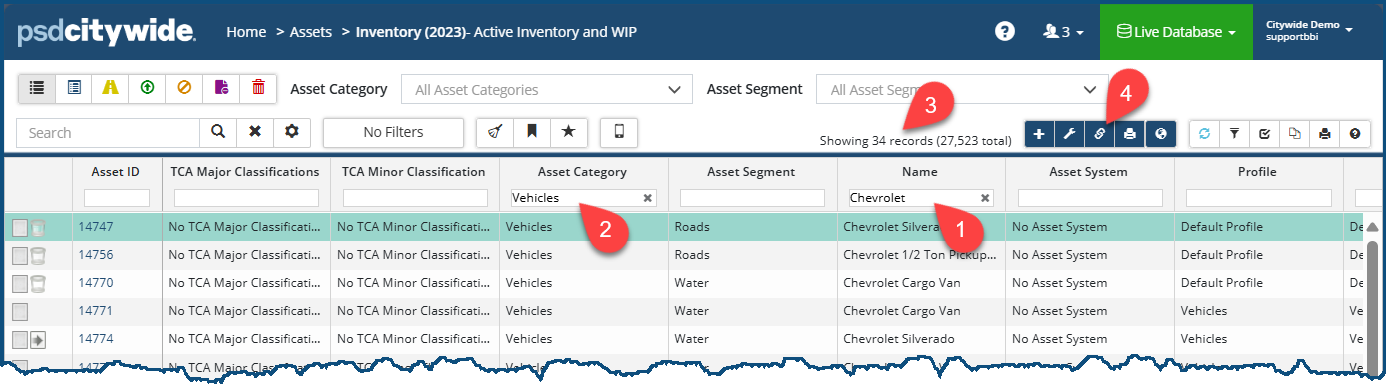
- Click on the Asset Groups
 ❹ icon. The Add Asset Group dialog box appears:
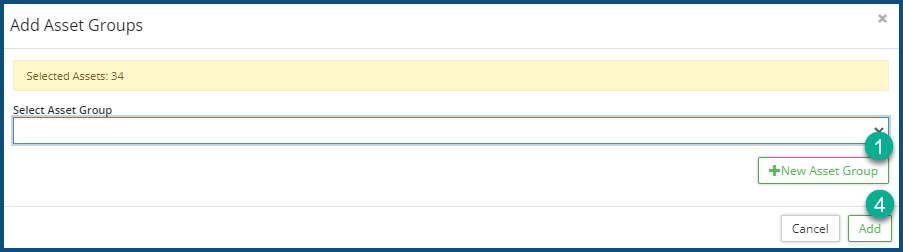
 - You have two choices here: to create a new asset group OR to add the selected assets to an existing asset group.
- To create a new asset group:
- Click on + New Asset Group ❶. The New Asset Group dialog box appears:
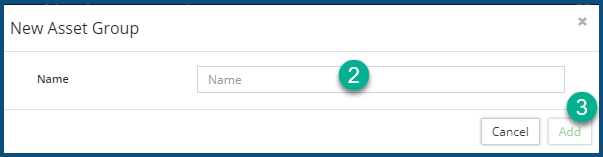
- Provide a Name for the asset group ❷.
- Click Add to add the group name❸
- Click Add to add the assets into the new group ❹ .
- Click on + New Asset Group ❶. The New Asset Group dialog box appears:
- To add the selected assets to an existing asset group:
- Select an existing asset group from the Select Asset Group pull-down ❺.
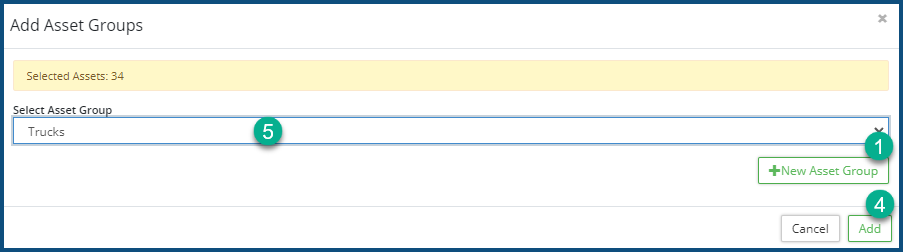
- Click Add ❹. The "Trucks" asset group will now have the 34 selected Chevrolet trucks added to it.
- Select an existing asset group from the Select Asset Group pull-down ❺.
- To create a new asset group:
To Delete assets (individually and in bulk):
- Click on the delete icon
 to delete a single asset. T
 - To delete multiple assets from the list, check ✅ on the multiple assets to be deleted, then click on Delete Selected and confirm the 'removal' of them.
To View Scheduled Maintenance Tasks Involving the Current Asset Group
- Click on Schedules ❻ in the Affiliate panel. The list of scheduled maintenance tasks associated with the asset group appears in the right panel:
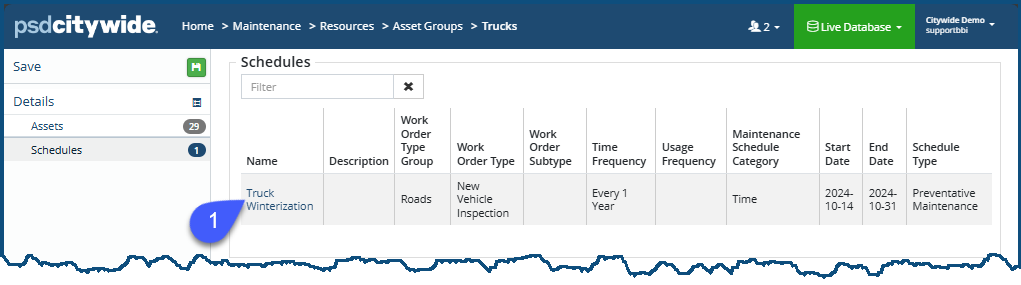
- Click on the individual scheduled maintenance item ❶ to view details pertaining it.
To rename an Asset Group, click the Edit icon ![]() ❸.
❸.
To delete an Asset Group, click he delete icon ![]() ❹.
❹.
Creating an Asset Group from within the GIS module
- Go to Home 🢡 GIS 🢡 GIS Viewer:
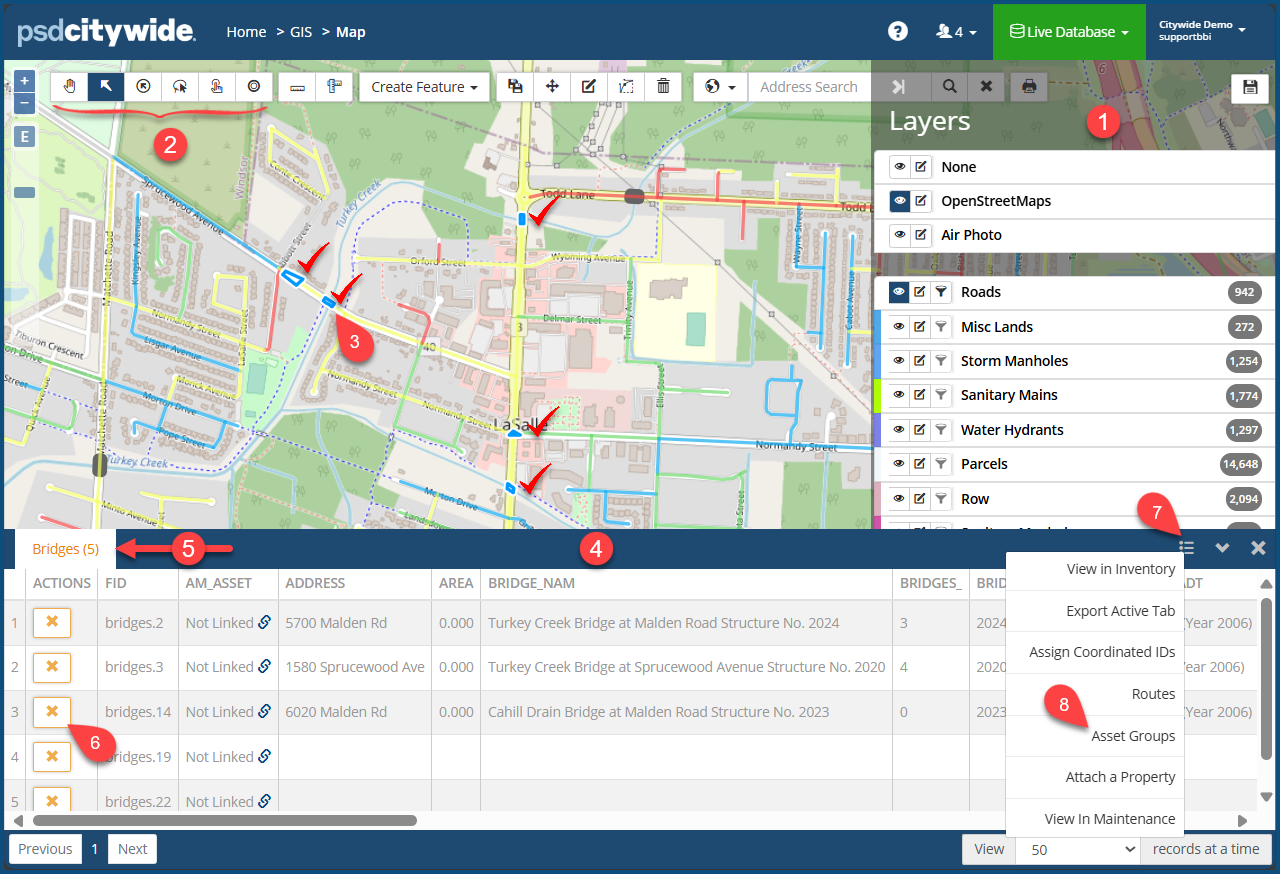
- Click on the Layer option ❶ to select the Asset type you would like to appear on the map. The assets will be highlighted on the map. (The "Bridges" layer was selected in the following example.)
- Click on the Selection Tool ❷ you wish to use to select the assets to be included in the group.
- Select the assets you would like to include in the Asset Group. The bridges on the map (indicated with the red checkmarks
 ) were selected on this map.) They are highlighted in the GIS Viewer in blue ❸ and produce a table ❹ consisting of the assets. Dissimilar assets will appear in separate tabs ❺ according to their asset type. (In this case, only bridges were selected for the current asset group, resulting in a single tab.)
 - Click on the
 icon ❻ on any row to remove it.
 - Click on the menu icon
 ❼ in the table header. A menu appears.
 - Click on Asset Groups ❽. The Add to Asset Group dialog box appears:
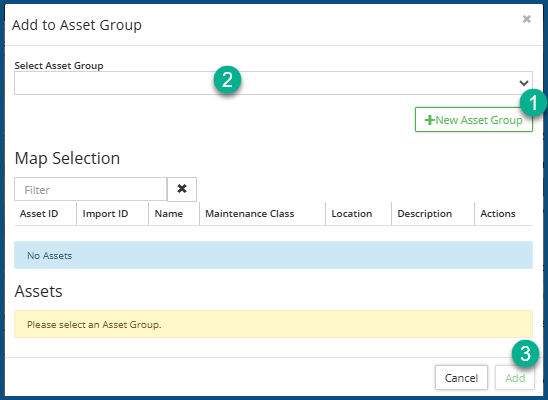
- Click + New Asset Group ❶ to name and create a new asset group.
- Click Select Asset Group ❷ to add the selected assets to an existing group.
- Click Add ❸.


