Overview
Preventative Maintenance Events are one of two types of scheduled events (the other is Scheduled Maintenance Events). Both types of events are based on Maintenance Schedules. The sole difference between them (apart from the fact that each is appropriate for different types of tasks) is that Preventative Maintenance events must be approved before a work order is created for them. It is here that that approval can be set and all other aspects of maintenance events viewed and updated.
The Preventative Maintenance Events Grid
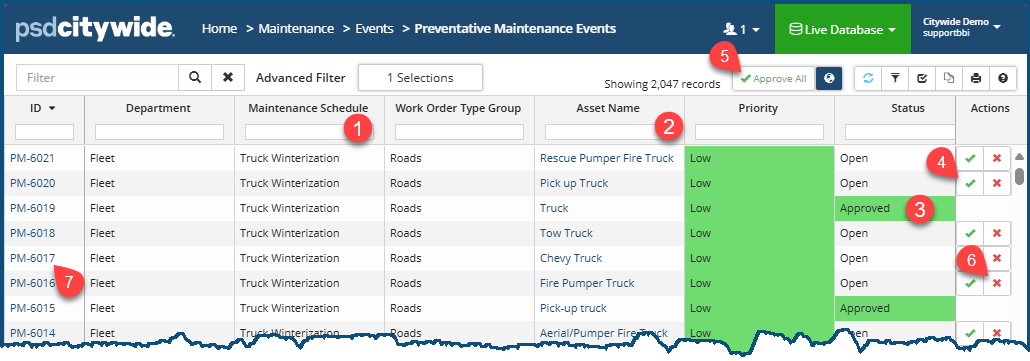
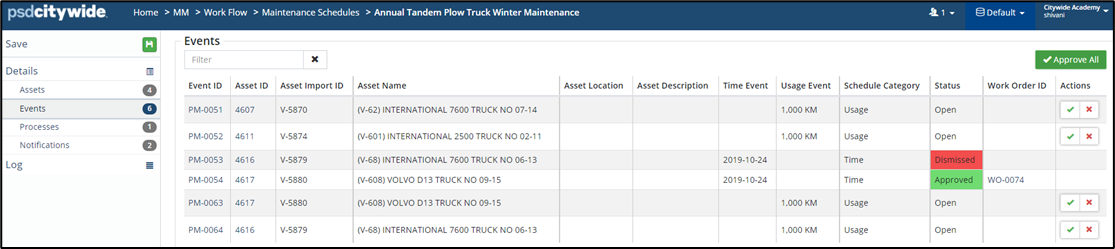
The following screenshot shows a Preventative Maintenance Events grid which displays all the preventative maintenance events sorted in descending order on the ID column. All the events that are visible in this screenshot are based on the Truck Winterization ❶ maintenance schedule, each of which involved a truck asset ❷ that is part of the Trucks Asset Group that was used to create all these events in Maintenance Schedules. The Status column shows the current state of an event: it is either Approved ❸ or Open (awaiting review and approval). Clicking on the an event checkmark ✅ ❹ opens up a dialog box in which the event is reviewed and where it may then be approved (more on that below). Clicking on Approve All ❺ will approve all events in the current grid, presumably filtered down to those events whose inclusion is being sought. Clicking on the X ❻ dismisses (does not delete) the event. (With a dismissal, the event remains in the system; it cannot be deleted here. It can only be deleted where it was created in the first place, which is in Maintenance Schedules.)
Viewing and Editing a Preventative Maintenance Event
Details
To open and view/edit a Preventative Maintenance event:
- Click on the PM ID ❼ number for the event. The event record appears, defaulted on the Details screen:
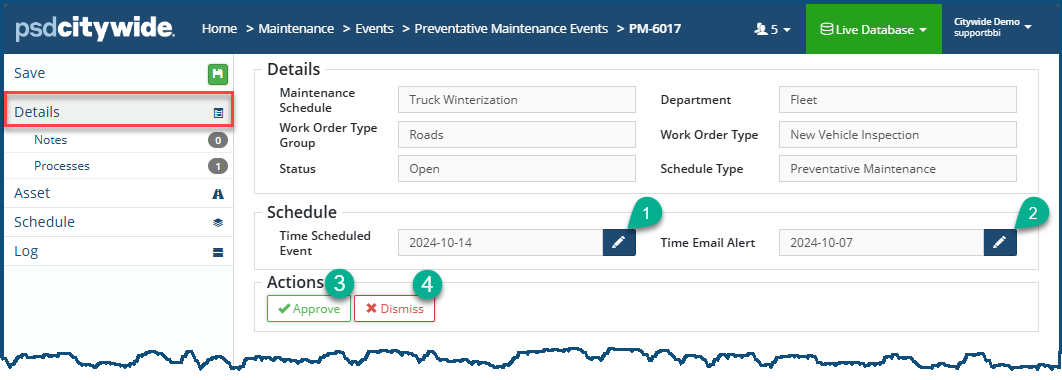
- Four actions are possible here only if the event has not yet been approved: editing the event ❶ and email alert ❷ times, or approving ❸ or dismissing ❹ the event. The other fields on the screen are informational.
Once a Preventative Maintenance Event it approved and a work order has been created, the scheduled times are embedded in the work order and they can no longer be edited on this screen.
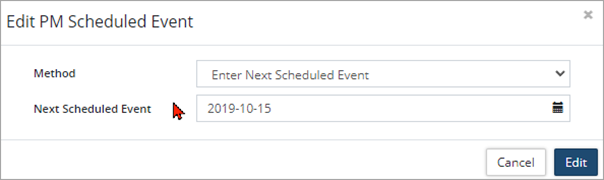
- To reschedule the event, click on the pen icon
 ❶ next to the Time Scheduled Event field. The Edit PM Scheduled Event dialog box appears:
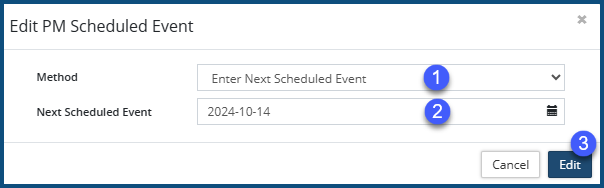
- Select the Method ❶. The method is used to determine how subsequent events will be scheduled. That is, since event scheduling is based in part on time formulations (e.g. "once a year"), the creation of new events and will be based on the rescheduling of this event. Choose:
- Method = "Enter Next Scheduled Event" if you would like the next scheduled event to be based on the date entered in the Next Scheduled Event ❷ field. Subsequent events will then be created based on the completion of the Work Order created from this rescheduled event. Hence, the next "truck winterization" event for this truck will (according to the "once-a-year specifications set up in Maintenance Schedules for this event) be in 2025-10-14.
- Method = "Enter Last Scheduled Event" if you would like the next scheduled event to be based on the completion date on the work order generated from the last scheduled event.
Setting up the Last Scheduled Event is especially important if your organization is new to using the CW Maintenance Module. Maintenance events, tasks, and dates were, of course, recorded somewhere other than in the Citywide Maintenance Module. Those dates (and other data), then, would need to be added here so that they can now be correctly tracked within CW.This dialog box changes here.
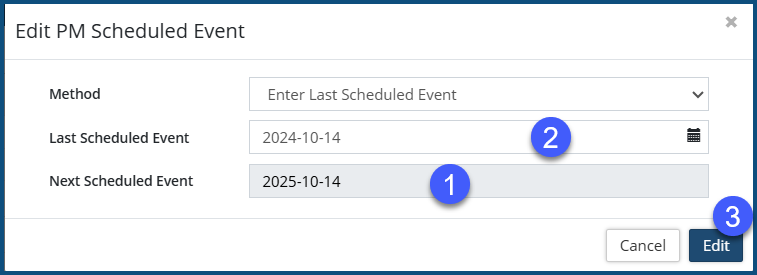
The Next Scheduled Event ❶ field is informational showing the next date based on the- Enter the Last Scheduled Event ❶ date.
- Click Edit ❸.
- To reschedule the PM Email Alert Event (which is the date on which a reminder notification is sent concerning the upcoming event), click on the pen icon ❷ next to the Time Email Alert field. The Edit PM Email Event dialog box appears:

- Enter an Email Event ❶ date or select one by clicking on the calendar at the far right part of the field.
- Click Edit ❷.
- To Approve the Event:
- Click on ✅ Approve ❸. The New Work Order wizard appears:

- Click here for detailed instructions on how to complete the Work Order.
- Click on ✅ Approve ❸. The New Work Order wizard appears:
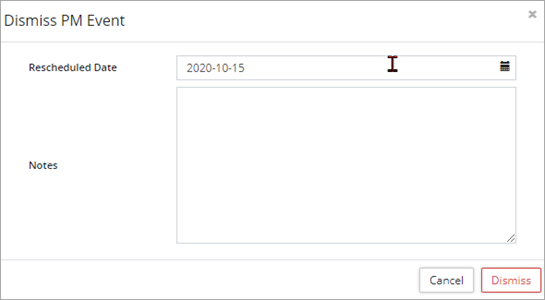
- To Dismiss the Event:
- Click on X Dismiss ❹. The Dismiss PM Event dialog box appears:
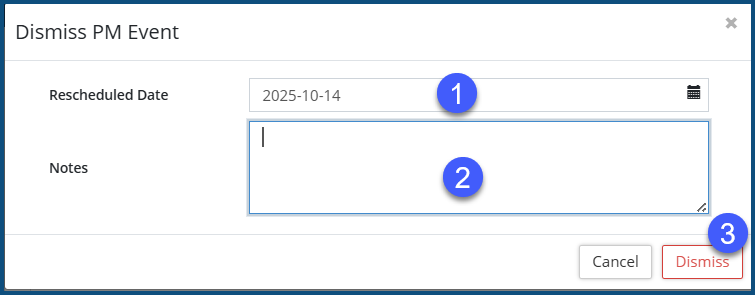
- Enter an Rescheduled Date ❶ date or select one by clicking on the calendar at the far right part of the field.
- Enter Notes ❷ that explain the reason for the dismissal.
- Click Dismiss ❸.
- Click on X Dismiss ❹. The Dismiss PM Event dialog box appears:
- To reschedule the event, click on the pen icon
Notes
Clicking on Notes will show any existing notes pertaining to the event and allow you to add additional notes, each of which will contain a Date stamp, the Note itself, the username of the person who added it (Added By), and the ability to edit or delete the note (Actions).
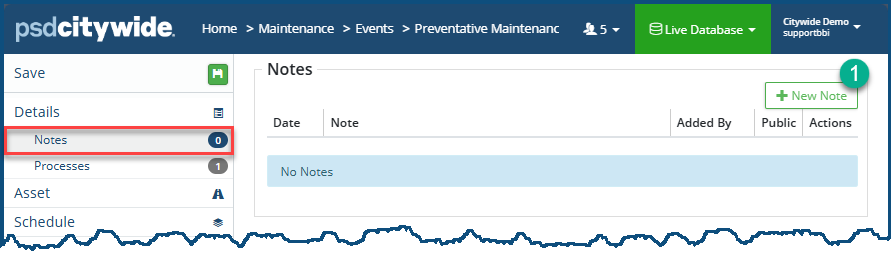
To add a Note:
- Click on +New Note ❶. The Add Note dialog box appears:
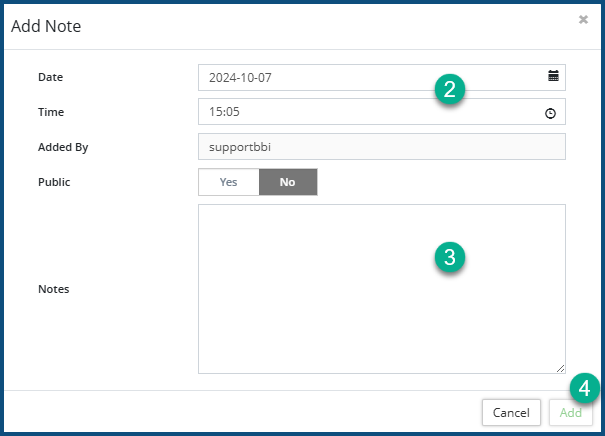
- Set the Date and Time ❷ if it is different from the current system date and time.
- Enter the Note ❸.
- Click Add ❹.
Processes
All the processes that are associated with this event are listed ❶ here, and additional processes can also be attached to the list. All the tasks associated with each process can also be viewed here.
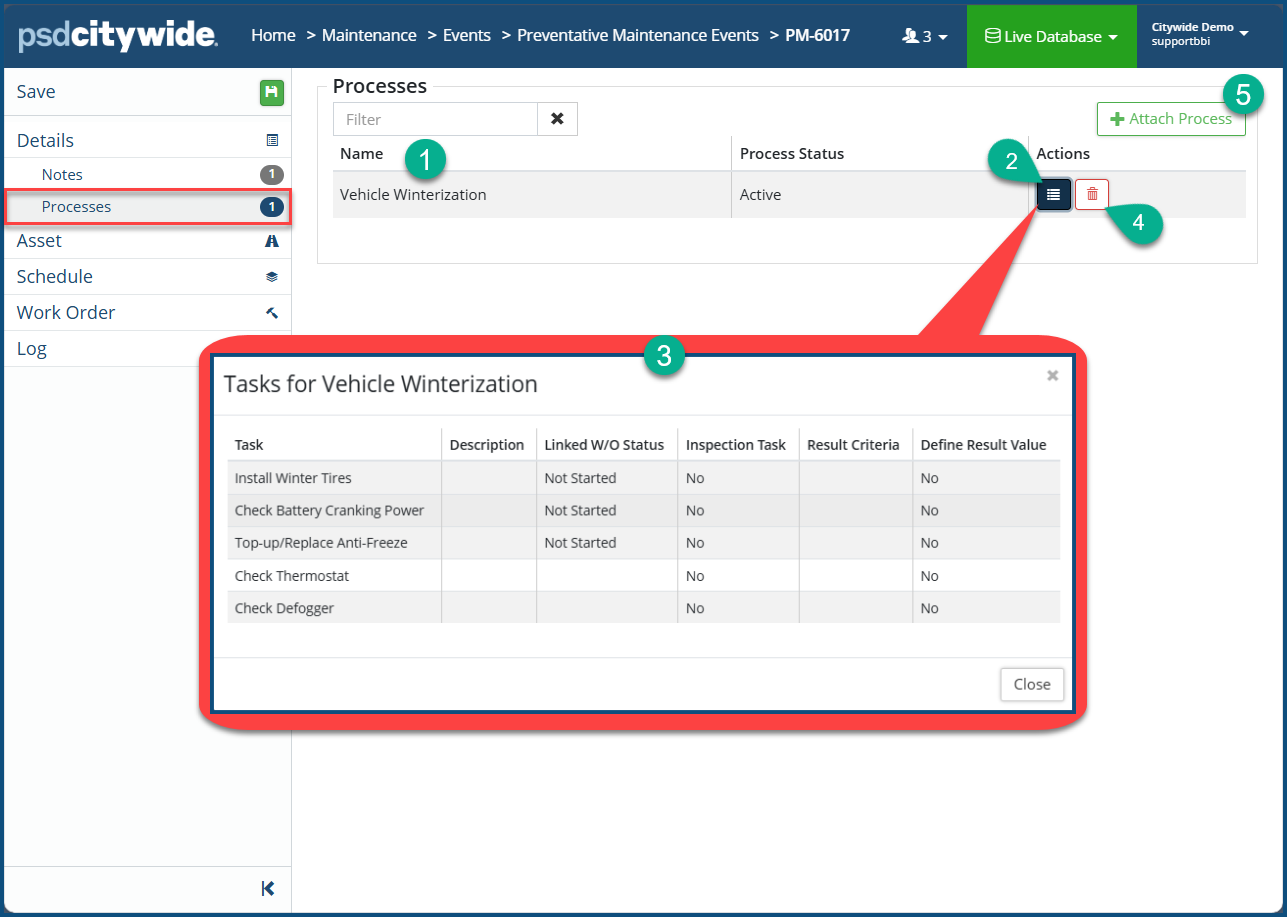
To View the tasks associated with a process:
- Click on the list icon
 ❷ associated with the process. The Tasks for {Process Name} ❸ dialog box appears.
 - The information in this list is informational. If tasks are missing or need to be deleted, this must be done in Home 🢡 Maintenance 🢡 Processes 🢡 Manager 🢡 Work Flow: Processes
To delete a process, Click he delete icon ![]() ❹.
❹.
To Attach a Process:
- Click on + Attach Process ❺. The Select Process dialog box appears:
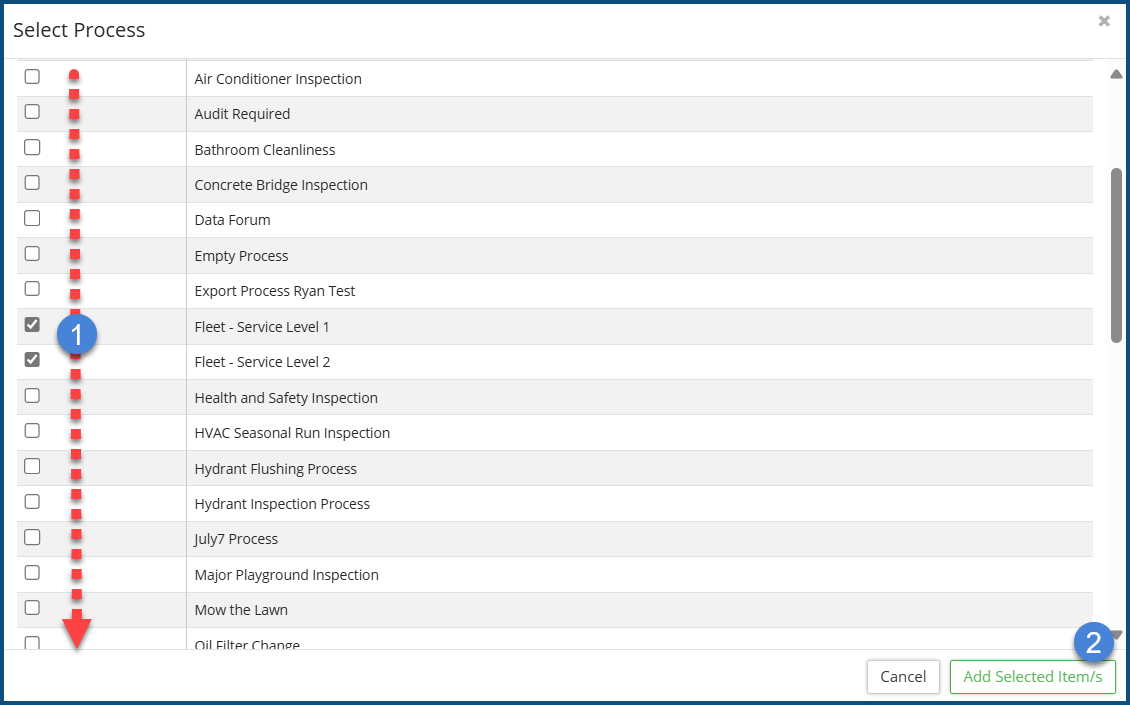
- Check ✅ ❶ the process(es) to be included.
- Click Add selected item/s ❷.
Asset
The Asset option displays basic information about the asset.
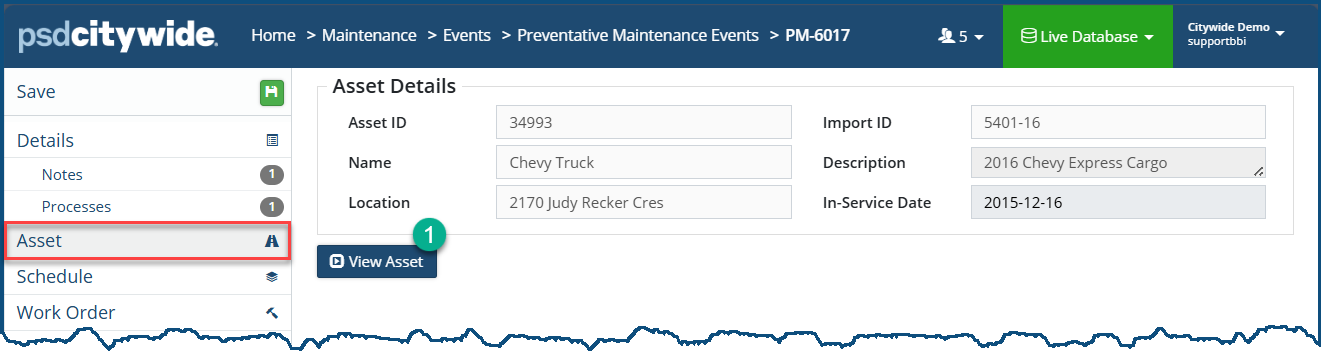
Click on View Asset ❶ to see locate the record for the asset in the Assets Module (Assets Inventory) where comprehensive information concerning all aspects of the asset can be seen.
Schedule
The Schedule option displays the current settings for the Event—those that are discussed in the above Details section. They appear in a read-only informational state.
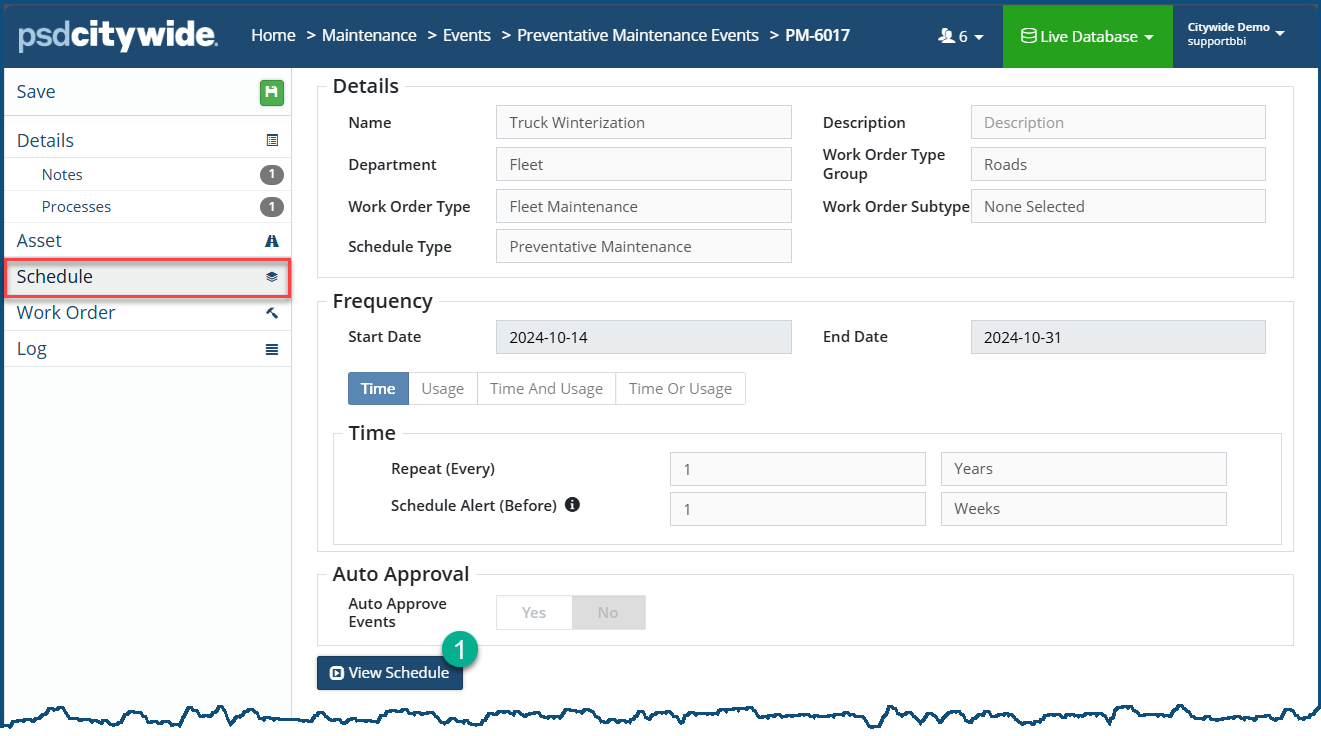
Click on View Schedule ❶ to make changes to the schedule.
Work Order
The Work Order option displays the Work Order Type settings for the Event. They appear in a read-only informational state.
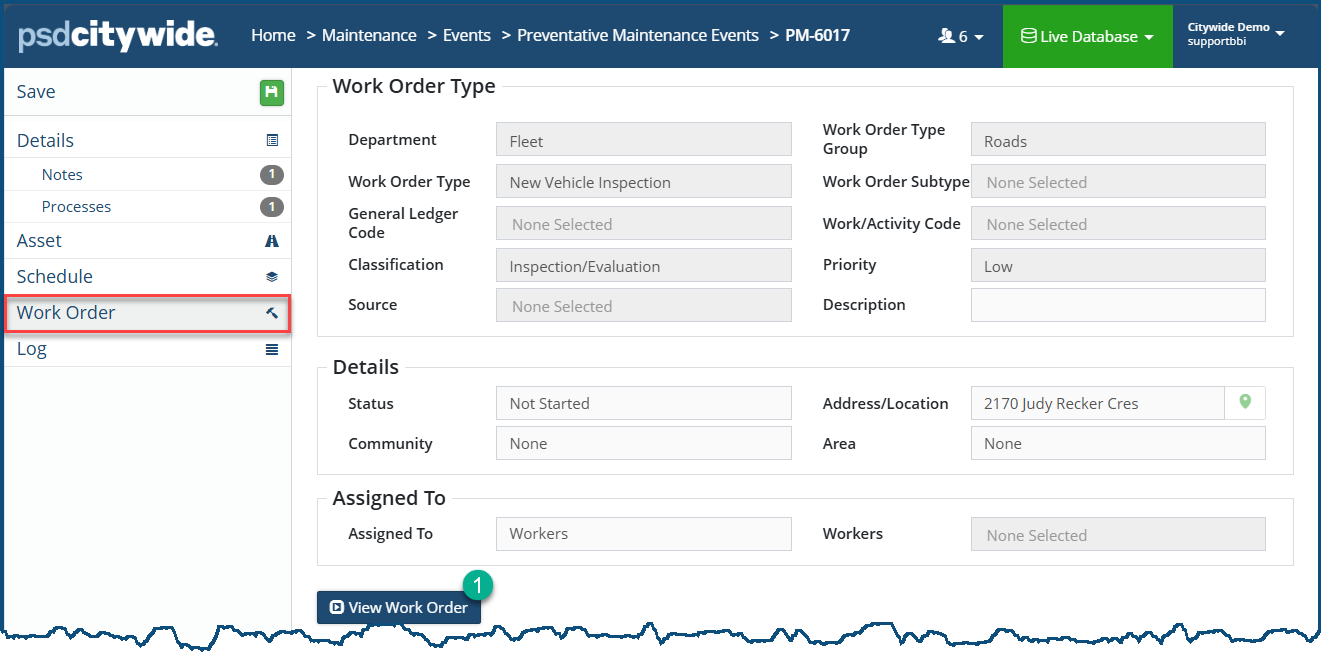
Click on View Work Order ❶ to make changes to the the work order.
A PM or SM Event (depending on the schedule type) is created for each asset included for the scheduled date. A PM event will require to be approved into a work order before the scheduled start date, while an SM event will not require an approval at any time as the work order will be generated along with the Event for the next scheduled date as soon as the previous work order is completed.
An approved event cannot be rescheduled; hence SM events cannot be rescheduled.
Review PM Events to Approve/Dismiss/Reschedule
- Navigate to Home 🢡 Maintenance 🢡 Events 🢡 Preventative Maintenance Events.

- Click an Event ID# to review details about the event such as notes, processes, the attached asset, or schedule.

- Edit the following options before a work order is completed:
- Approve the event to create a PM Work Order from the new work order wizard
- Dismiss the event to recreate the event for the next date as per the schedule
- Reschedule the event by editing the Time Scheduled Event Date
- Approve - click Approve and the New Work Order wizard appears. Enter details about the customer, address/location, details, and resources Once complete, a new PM event is generated.
- Dismiss - click Dismiss to record any notes associated with the decision to dismiss. A new PM event will generate according to the rescheduled date and the interval defined in the PM schedule.
- Reschedule – Click Edit
 to the right of the date field to edit the scheduled date of the PM Event. Enter the Next Scheduled Event Date. Subsequent events will be created based on completion of the WO created from this rescheduled event. The Method can also be changed to Enter Last Scheduled Event where the last scheduled event date can be entered and the system will calculate the next event date based on the PM schedule.
- The Time Email Alert for the PM notification can be edited similarly.
- The Time Email Alert for the PM notification can be edited similarly.
PM Event Approval from the PM Schedule
There are 2 options on this page:
- Select an Event from the Maintenance Schedule tab and approve individual events into a work order by clicking
 in the Actions column.
 - Click the Approve All button to create a Work Order for every PM event, based on the selected WOT and the next Event scheduled date.
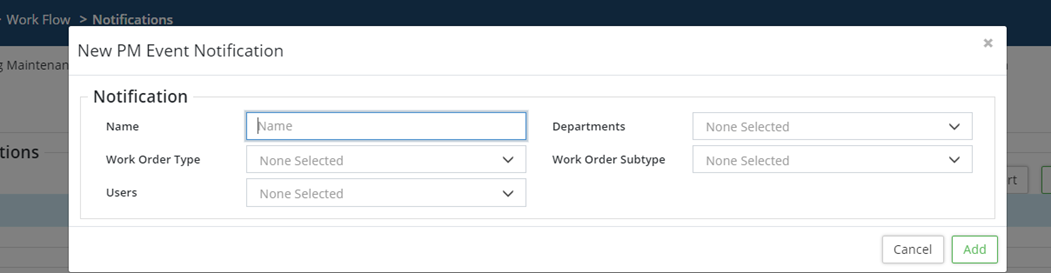
PM Event Notifications
PM Event notifications must be set up to receive email alert notifications for an upcoming PM Event as per the schedule and needs to be approved into a WO. The notification email time and frequency are set up on the maintenance schedule itself.
- Navigate to Home 🢡 Maintenance 🢡 Work Flow 🢡 Notifications and scroll down the screen

- Click +Add PM Notification to add a new notification and enter the required details.