
Overview
The Applications page is where Planning applications are first entered (or received through the Citywide Customer Portal - an online customer-facing application used to submit Planning applications. See the PSDCitywide Portal User Guide for details) and from where all other details pertaining to planning applications are accessible. It opens up in a grid in which each row contains an application with pertinent information appearing across a set of columns (which can be augmented and rearranged. See Grid Customization for details).
Applications rely on a variety of categories, such as Application Types, Reviews, Statuses, etc. whose contents must be fully set up in advance. These are all the categories that appear within the Home 🢡 Permitting 🢡 Planning: Manage section. An application record, for example, cannot be created without the appropriate application type, along with numerous other pre-sets.
This is the Applications screen, which lists all the planning applications in the system (currently) sorted in reverse chronological order by their unique, system-assigned application number ❶:
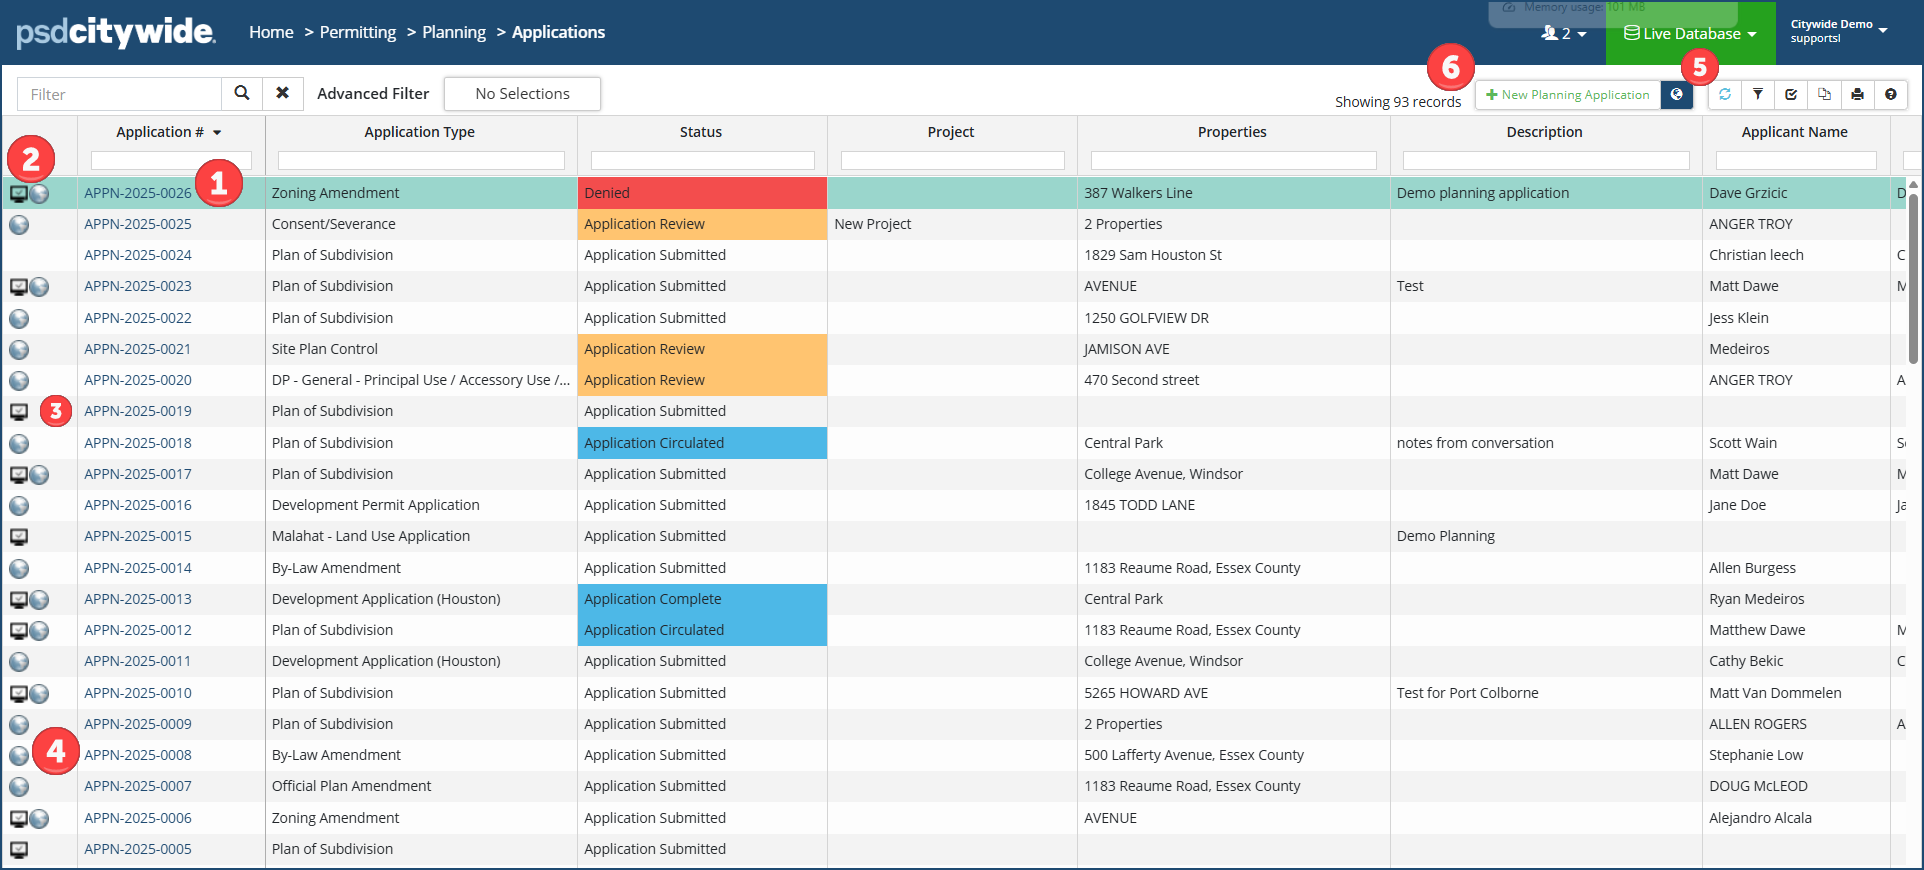
The first column ❷ may contain one or two icons: the checkbox monitor icon ![]() ❸, indicates that the current record was created using Customer Portal, while the globe icon
❸, indicates that the current record was created using Customer Portal, while the globe icon ![]() ❹ indicates that the property linked to the application has a GIS mapping. No icon indicates that that the application was created manually in the system and that it does not have a GIS mapping. Clicking on the GIS globe icon
❹ indicates that the property linked to the application has a GIS mapping. No icon indicates that that the application was created manually in the system and that it does not have a GIS mapping. Clicking on the GIS globe icon ![]() ❺ will allow you to access the Citywide GIS Viewer map from where you can see the location of the applications and view basic information concerning those sites.
❺ will allow you to access the Citywide GIS Viewer map from where you can see the location of the applications and view basic information concerning those sites.
Add a Planning Application
Property
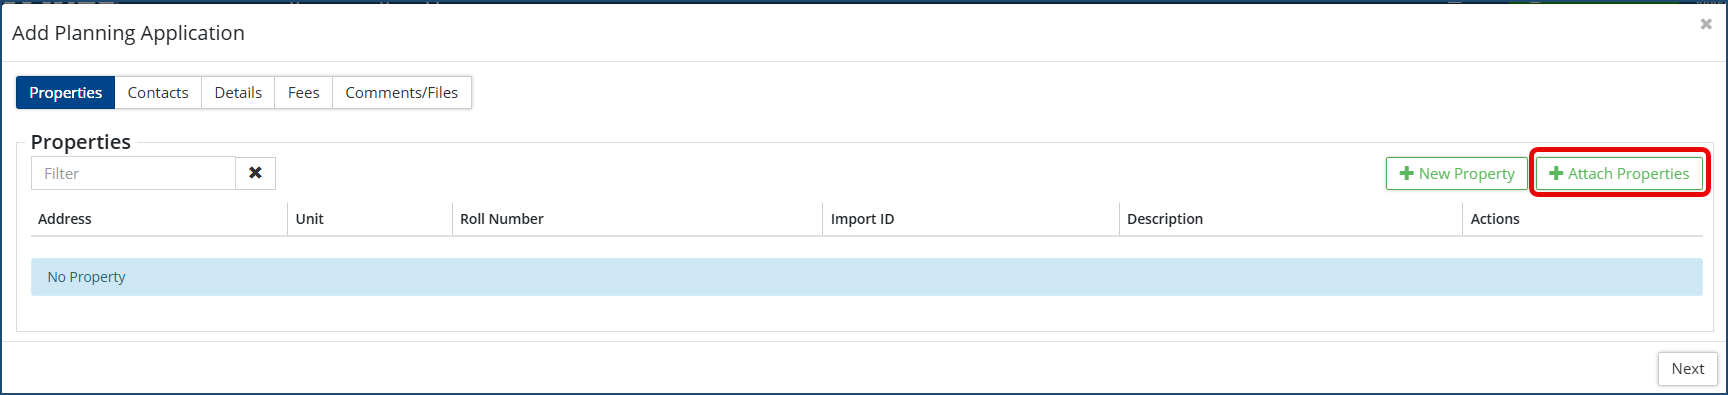
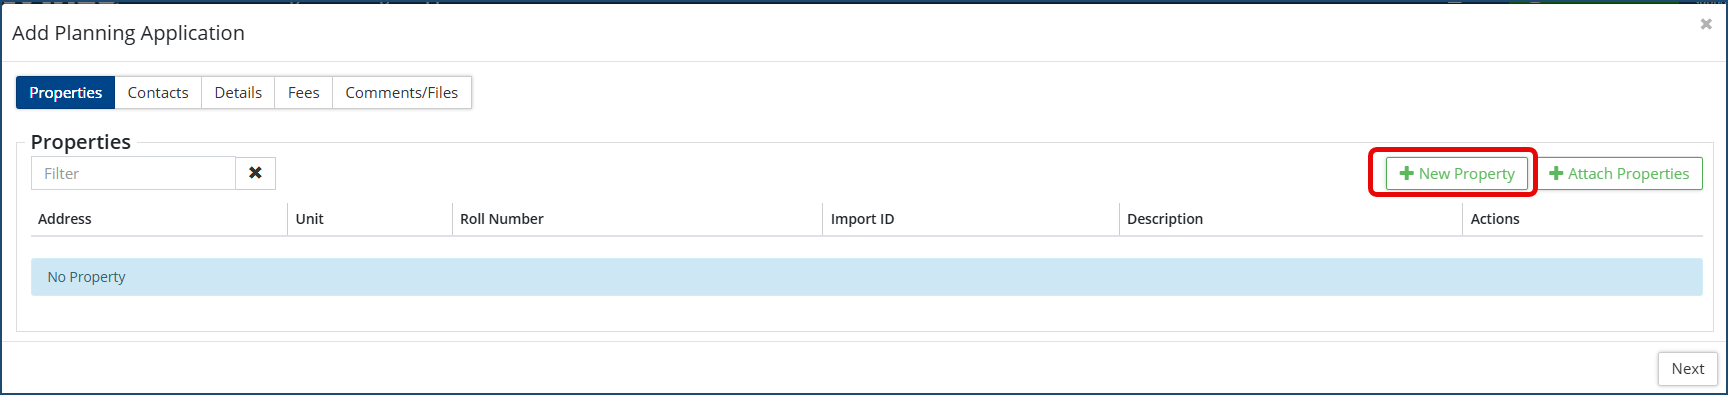
- Click on + Planning Application ❻. The Add Planning Application wizard appears, with the Properties tab pre-selected:
- Click +Attach Properties.
- Select from the list the property or properties this application applies to. Properties are set up prior to submitting an application - click here to view how to set up Properties in Citywide.
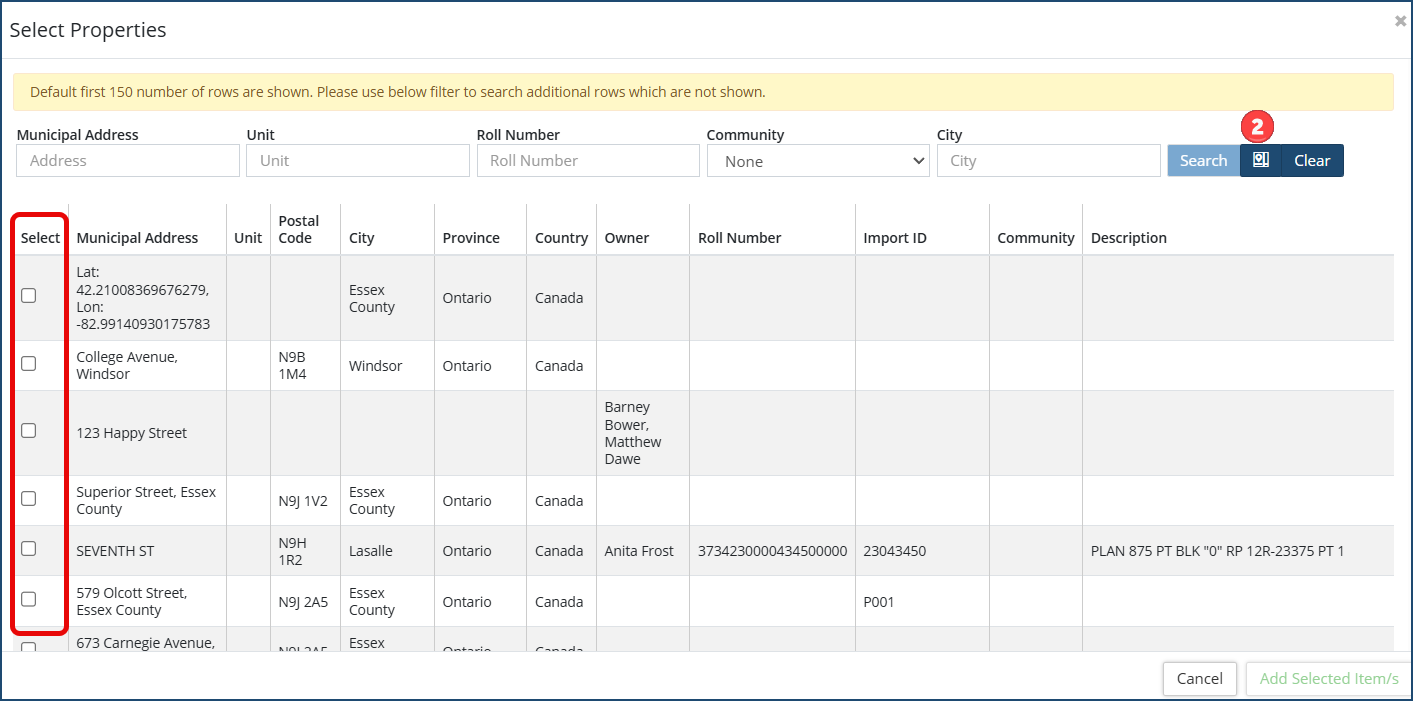
- Alternatively, search for the property using the filter fields (ie. Municipal Address, Roll Number or City, etc.) or (if GIS is enabled) you can click on the map marker icon ❷ to select a location from the GIS map:
-
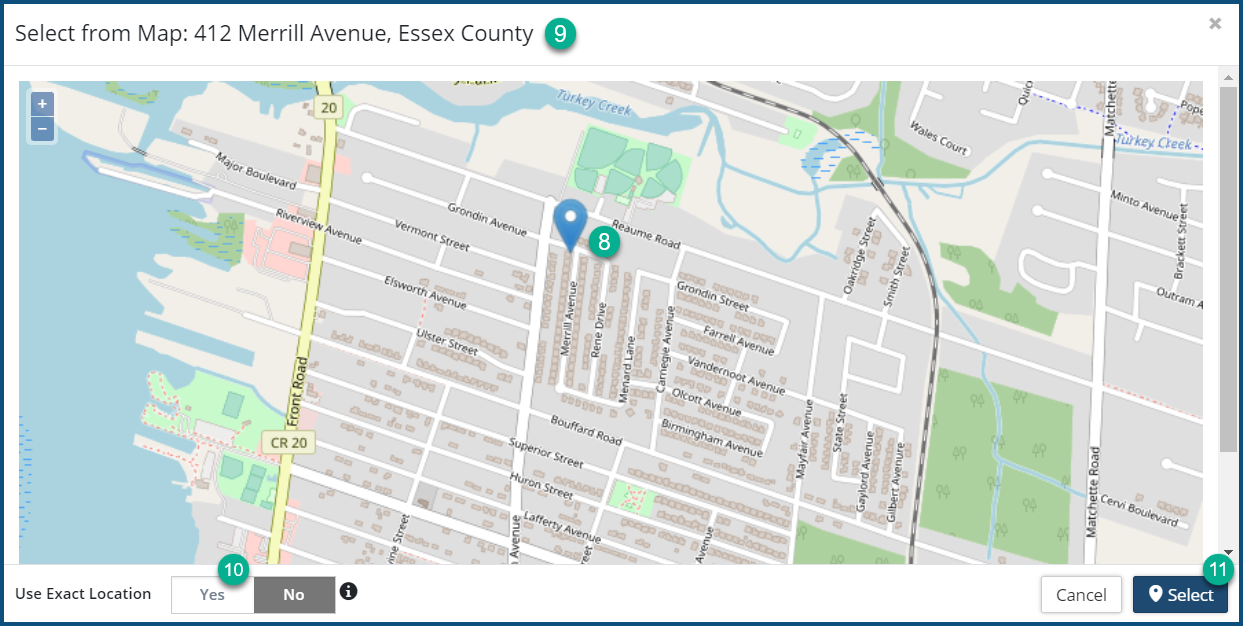
- Pinpoint the property by clicking on it on the map ❽. The address will appear in the header ❾. Alternatively, you can generate the GPS coordinates for the selected pin point by selecting Yes ❿ under Use Exact Location.
- Click Select ⓫.
- Click Add Selected Items to proceed.
- Optional: Click on + New Property to add a new property. (This option will only be available to you if your account is configured with the appropriate permissions to add new properties.)
The New Property dialog box appears: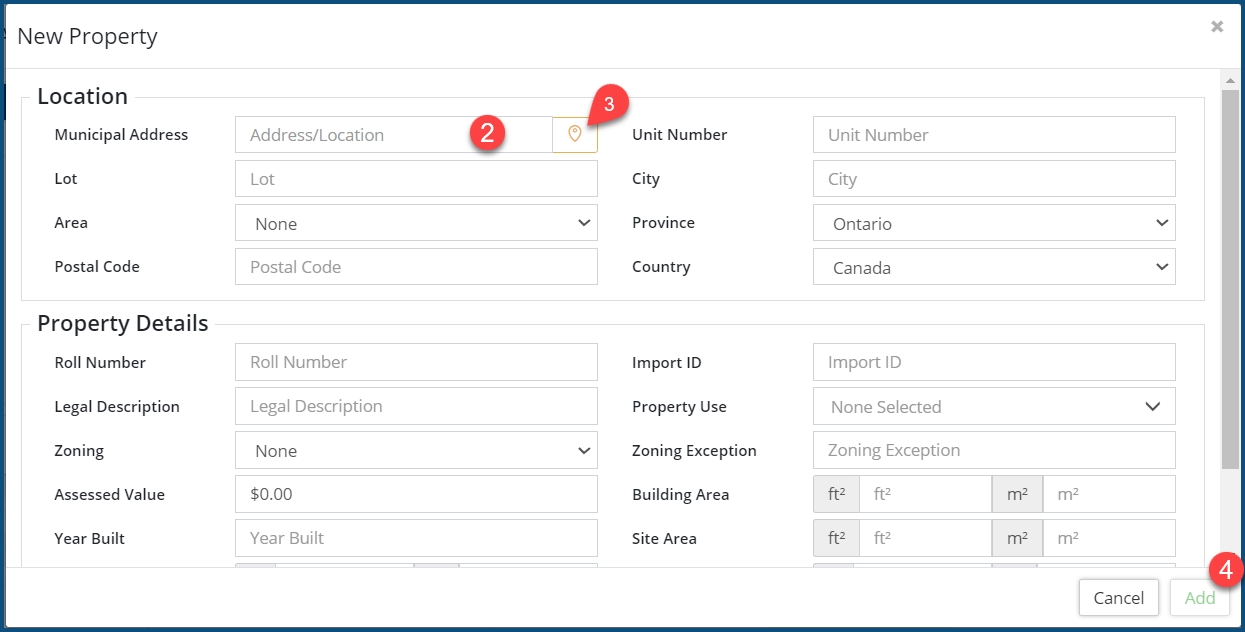
- Enter as many of the fields as you deem necessary. Only the Municipal Address field ❷, which can involve either a street name and number or GPS coordinates, is required.
- Click on the map marker icon ❸ to select a location from the GIS map (as per the above instructions).
- Click Add ❹.
- Optional: Click on + New Property to add a new property. (This option will only be available to you if your account is configured with the appropriate permissions to add new properties.)
- Click Next .
- Select from the list the property or properties this application applies to. Properties are set up prior to submitting an application - click here to view how to set up Properties in Citywide.
Contacts
Contacts refers to all the individuals associated with the Planning application. Contacts can comprise a variety of types that are hard coded in the system (e.g. Owner, Builder, Designer, etc.) and/or they can also include custom types that you can set up in Home 🢡 Permitting: Manage: Other Contact Types. To set up and manage your list of contacts in Citywide (a.k.a. 'Customers' - click here to view our Customers help article. You can add as many contacts (e.g. multiple Builder contacts) as required to an application.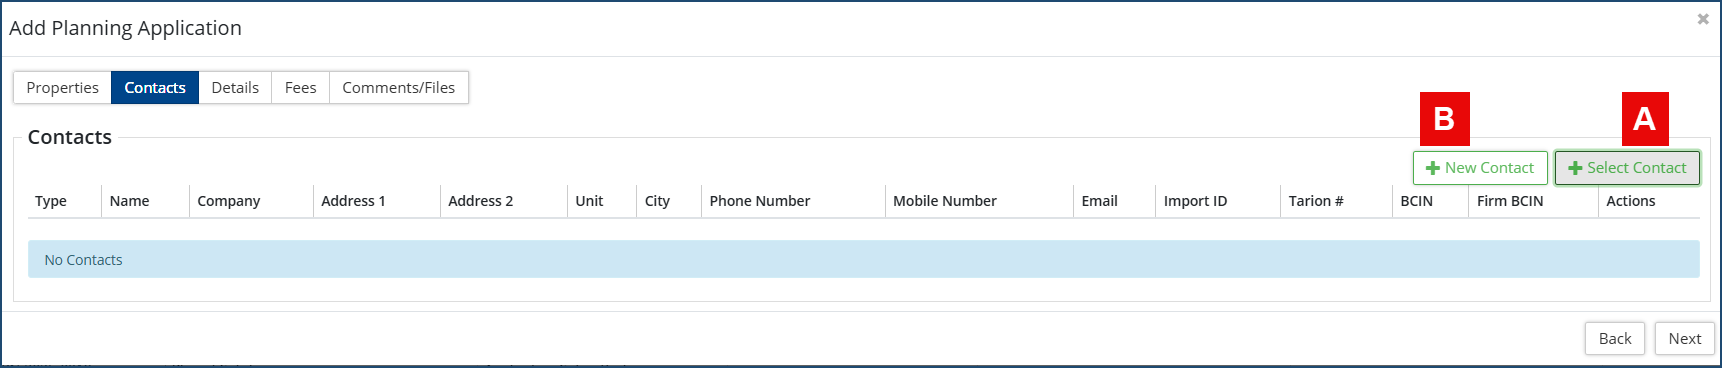
You can select an existing contact 🅰, or, if your if your user account is configured with the appropriate permissions, you can add 🅱a new contact here on the fly.
To select an existing contact:
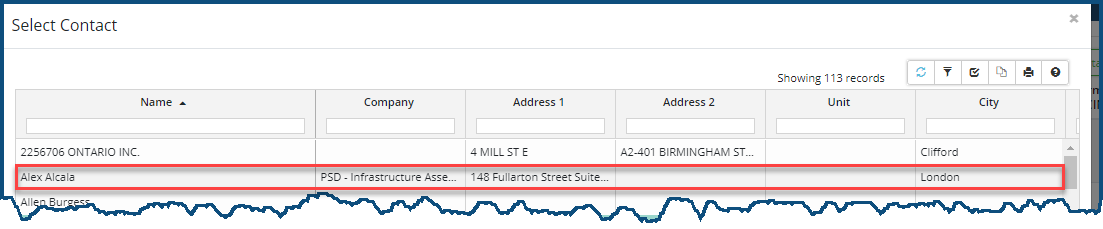
- Click on + Select Contact 🅰. The Select Contact dialog box appears:
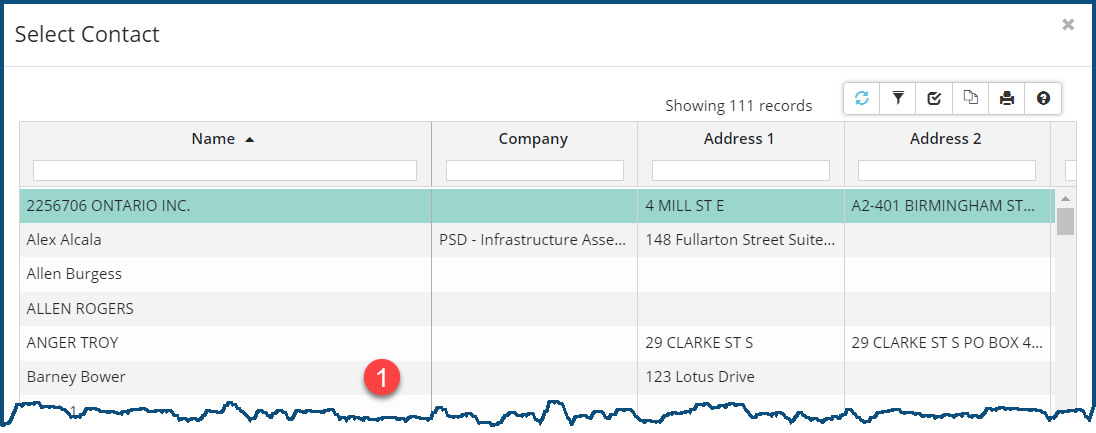
- Click anywhere on the row ❶ of the contact to be included. The Contact Type options appear:
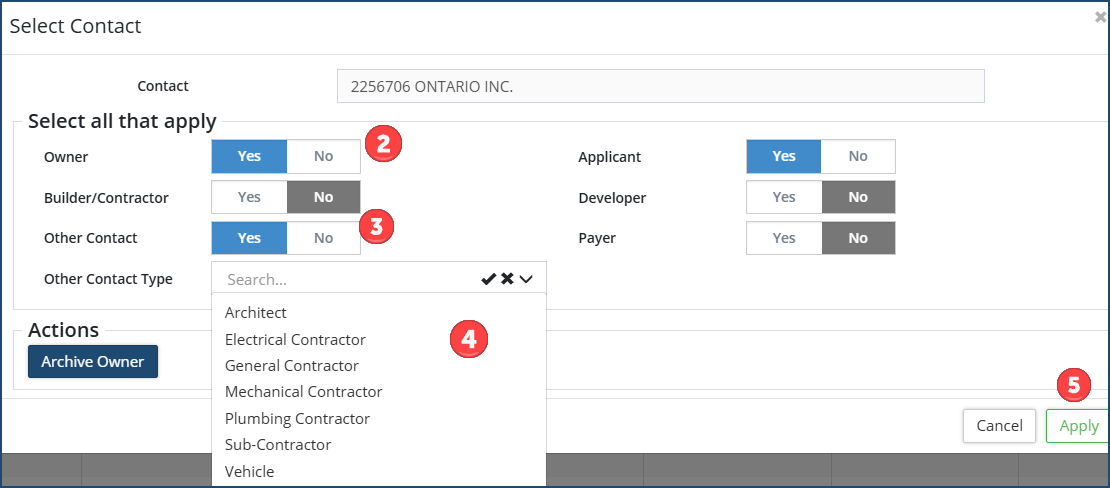
- Check Yes for all the applicable types. Selecting Owner ❷ will link the contact as an/the owner in the Property record. Clicking Yes on the Other Contact Type ❸ option will produce a drop-down ❹ that contains all the Other Contact Types added to the system and enabled (there to appear here) for Building Permits.
- Optional: Click
 if you need to archive the current owner of the property and continue to either select an existing contact or add a new contact as the new property owner.
 - Click Apply ❺.
- Repeat all the above steps to select an additional contact.
To Add a new Contact:
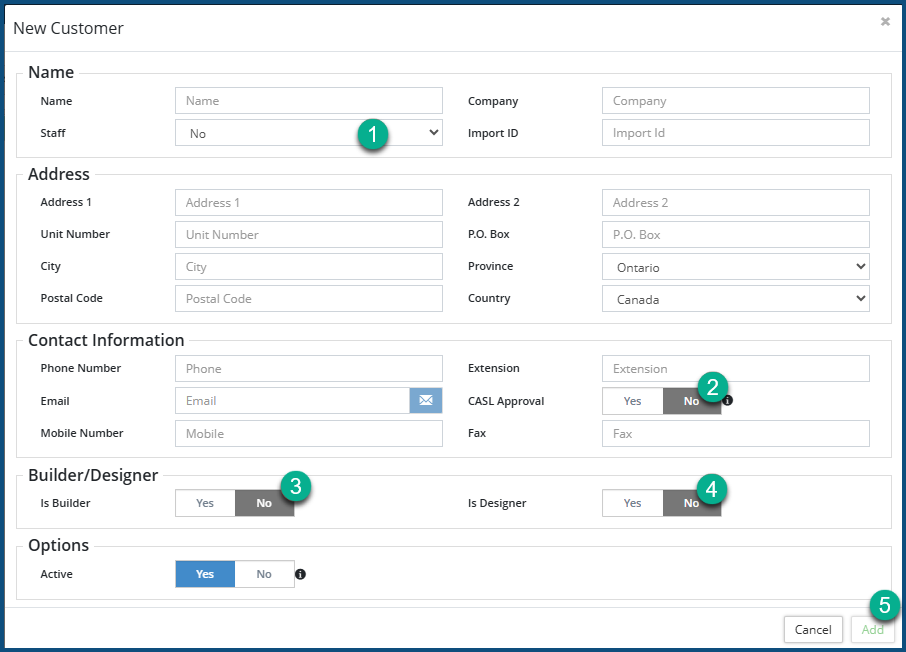
- Click on + New Contact 🅱. The New Contact dialog box appears:9
- The New Contact dialog box appears:
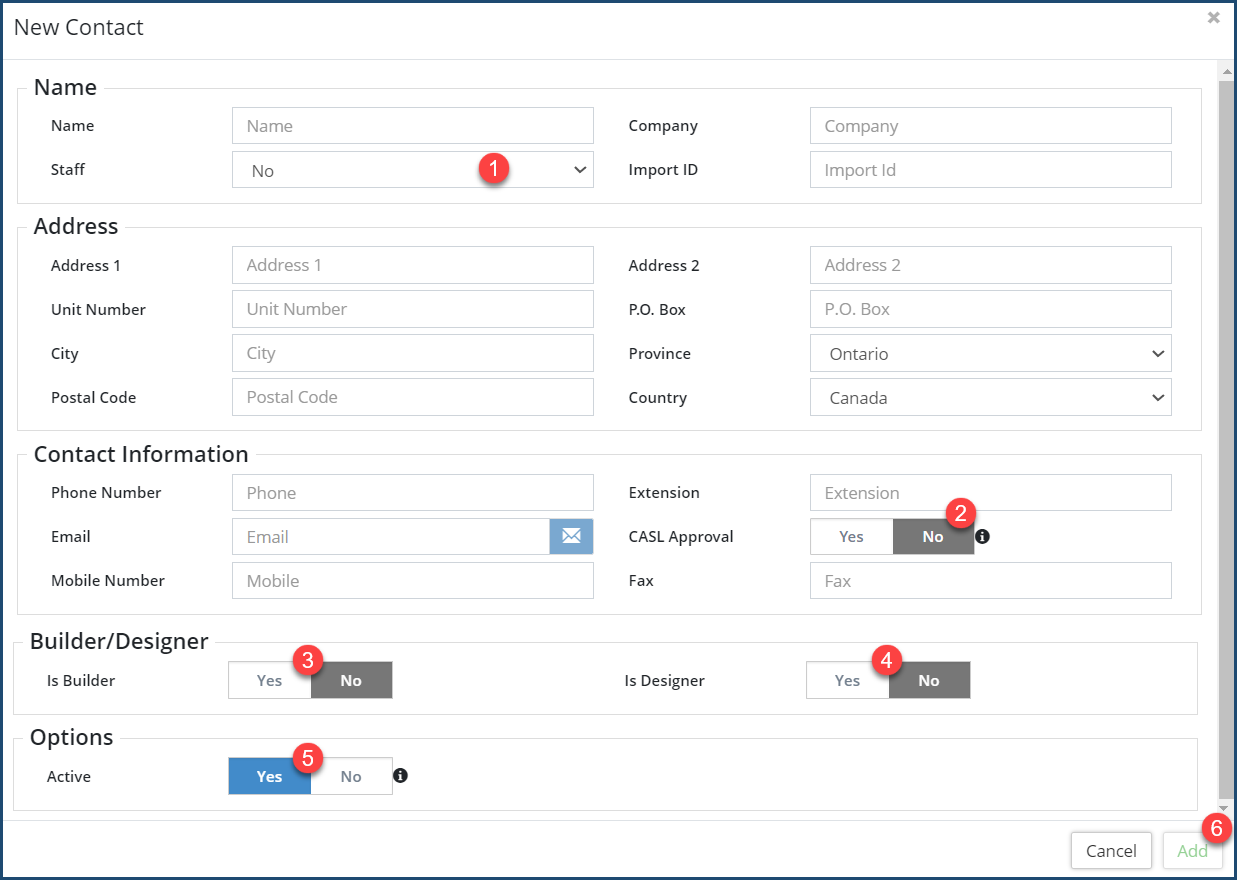
- Staff ❶: Select Yes or No concerning whether this is a staff person.
- CASL Approved ❷: Select Yes if this contact has provided consent to receive unsolicited emails from your organization; No, if not. (CASL, which stands for "Canadian Anti-Spam Legislation," involves passage of nation-wide legislation in Canada.)
- Is Builder ❸: Select Yes if this contact is a Builder; No, if not. Selecting Yes may produce additional fields. In Ontario, for example, builders are required to register with Tarion (a non-profit organization whose purpose is to ensure that purchasers of new homes receive the coverage they are entitled to under their builder's warranty) and have a Tarion Number issued to them. Selecting Yes produces a Tarion Number field on the screen.
- Is Designer ❹: Select Yes if this contact is a Designer; No, if not. Selecting Yes may produce additional fields. In Ontario, for example, building designers must be licenced and issued either an individual or firm-based BCIN (Building Code Identification Number) number. These two additional BCIN fields will appear when Yes is selected.
- Active ❺: Select Yes to make this contact active within the system; No, if not.
- Click Add ❻.
The Details screen contains all the details pertaining to the chosen Application type. It's contents are specific in each case to the chosen application type, and each application type has been individually defined by your Planning administrator to contain all the relevant fields for that application type. Also, the layout and structure of this screen can vary from one application type to another, each designed to facilitate a logical data entry flow (or e.g. to mimic an existing set of forms). That being said, you also have a great deal of flexibility in modifying the screen for each new application you create. You can, for example, add individual fields (within a field grouping) or even add an entire field group when entering the application details. This allows you to precisely define the individual planning application you are entering over and above the pre-set default field and field group settings that the chosen application type starts off with.
This is an example of a Planning Application Details screen for a Development Permit Application: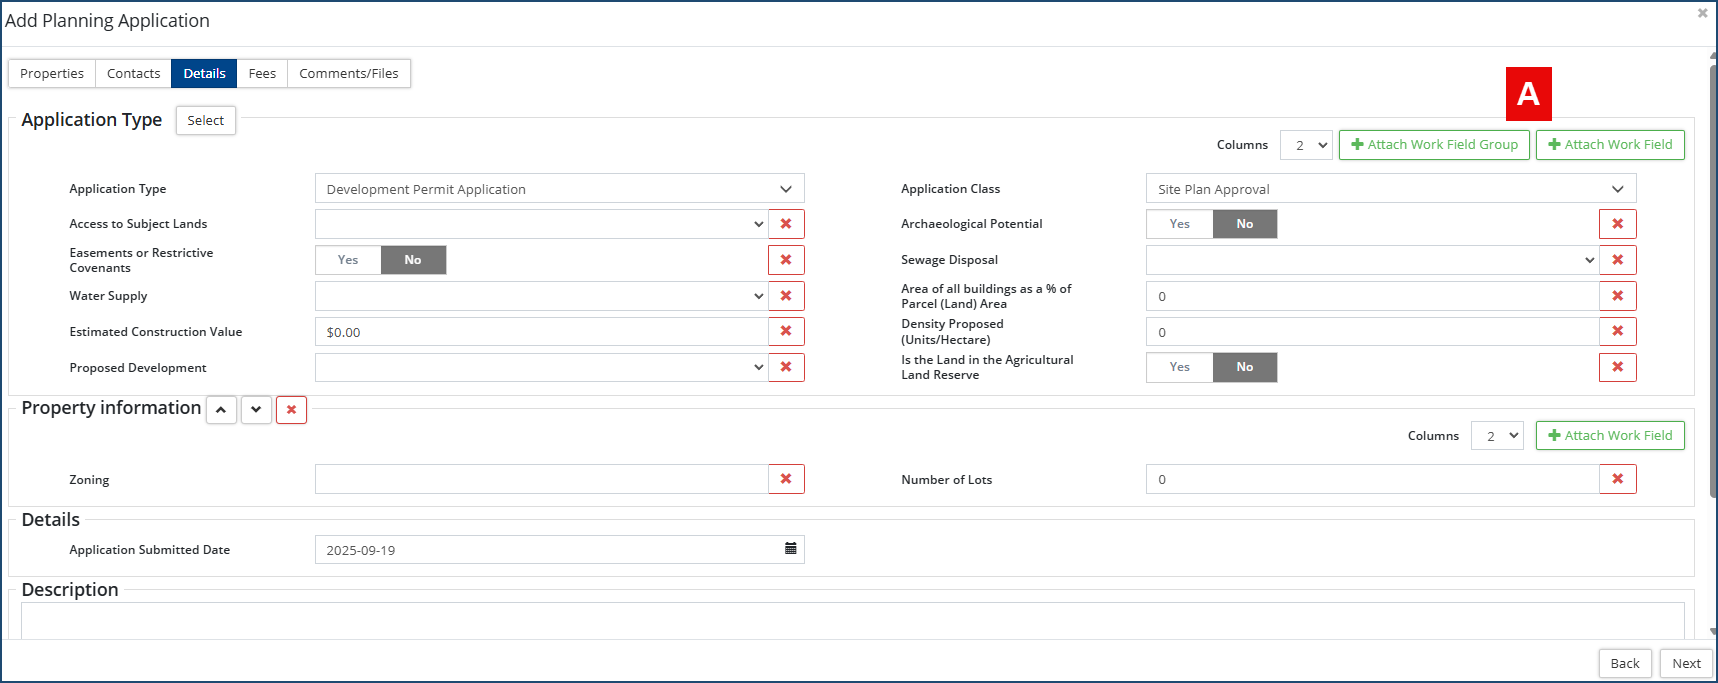
It contains a variety of sections and work fields that have been set up specifically by this municipality for this particular application type. Information required to submit this type of application will appear once the application type is selected. If set up in the application type, some of the fields may have default values in them, which can be overwritten.
Most of the fields on this screen are self-explanatory.
The screen is organized around a set of field groups 🅰. each group containing a set of related fields. You can click on + Attach Work Field within a group to add a new field. Click on the X next to field to remove it. Click on + Attach Work Field Group to add a new group to the screen, where you can then add fields to it.
Click Next .
Fees
All the fees associated with the Application type are calculated and presented on this screen. The linked fee(s) to the application type always appear, but you can also select and add any addition fees ❶ if required.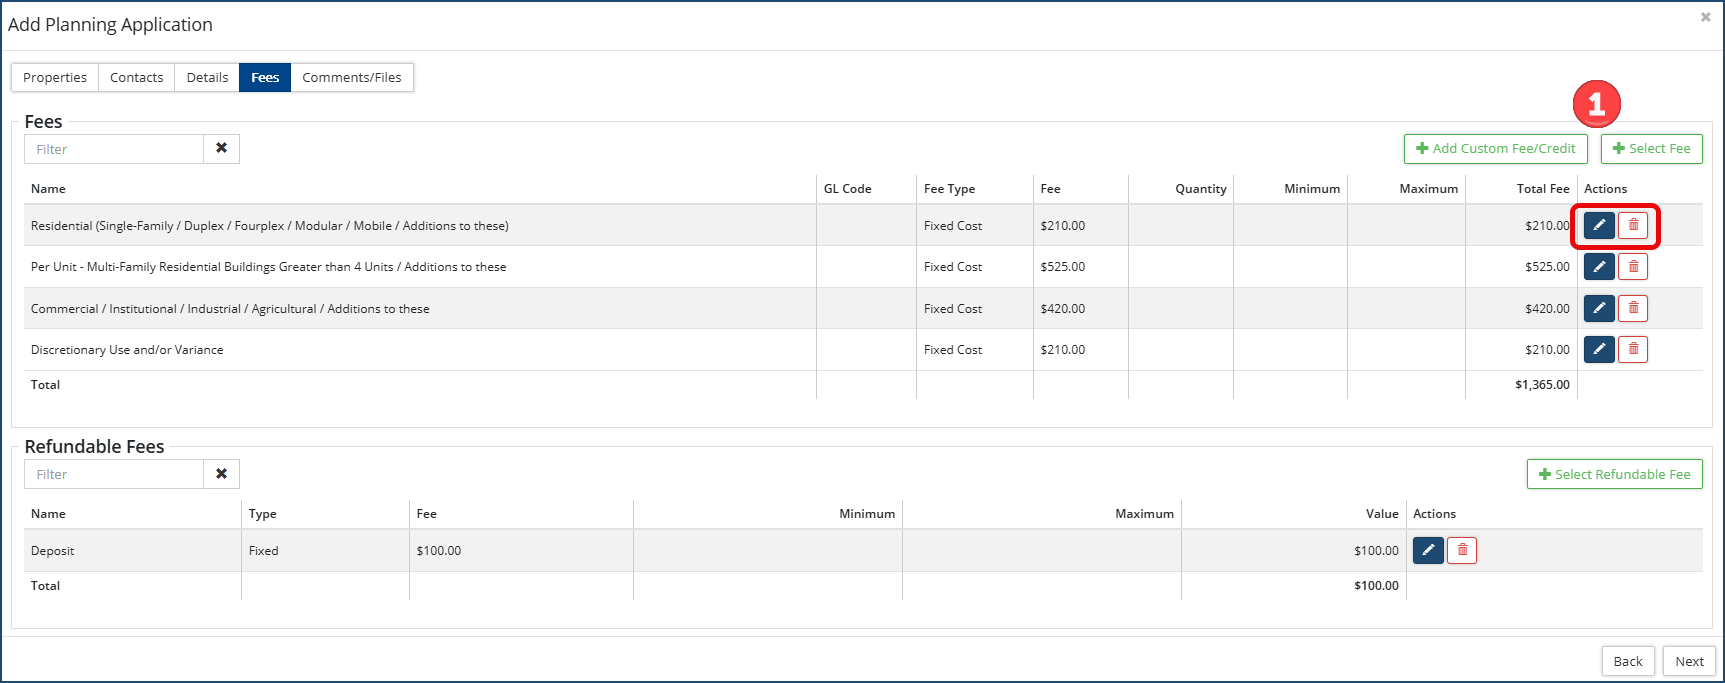
Any of the fees on the screen can be edited by by clicking on the Edit ![]() icon, which allows you to either overwrite the Quantity 🅰 (and have the total recalculated) or the Total Fee 🅱 (which will bypass recalculation):
icon, which allows you to either overwrite the Quantity 🅰 (and have the total recalculated) or the Total Fee 🅱 (which will bypass recalculation):
Click on the Delete icon ![]() to delete a fee/refund row.
to delete a fee/refund row.
Click on + Select Fee to add a fee from the list of fees set up in the system. The Select Fee dialog box appears:
- Click on the fee to be added . It will appear in your list of fees, where you can overwrite quantities for calculated fees, keep existing fixed fees, or overwrite fees.
- You can Edit
 and/or Delete
  a fee if and only if: i) you have the Permitting Administrator privilege enabled for your user account and ii) the selected fee has not been used in any of the existing applications in the system.
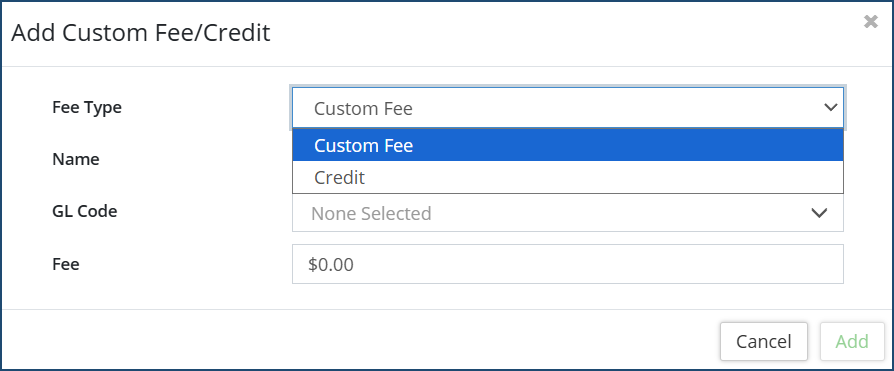
Click on + Add Custom Fee/Credit to add a fee or credit that does not exist in the system. The Add Custom Fee/Credit dialog box appears:
- Select the Fee Type from the pull-down: Either Custom Fee or Credit.
- Provide a Name.
- Select the GL Code (optional) that the Fee/Refund amount will be written to. GL Codes are maintained in the General Ledger Codes.
It is important to select the correct GL Code here in all cases, in that the fees can be exported through the GL Code Report and then imported into your accounting system. Entering the incorrect GL account code here may, when imported into your accounting system, create distortions there.
-
Enter the Fee/Credit Amount.
-
Click Add.
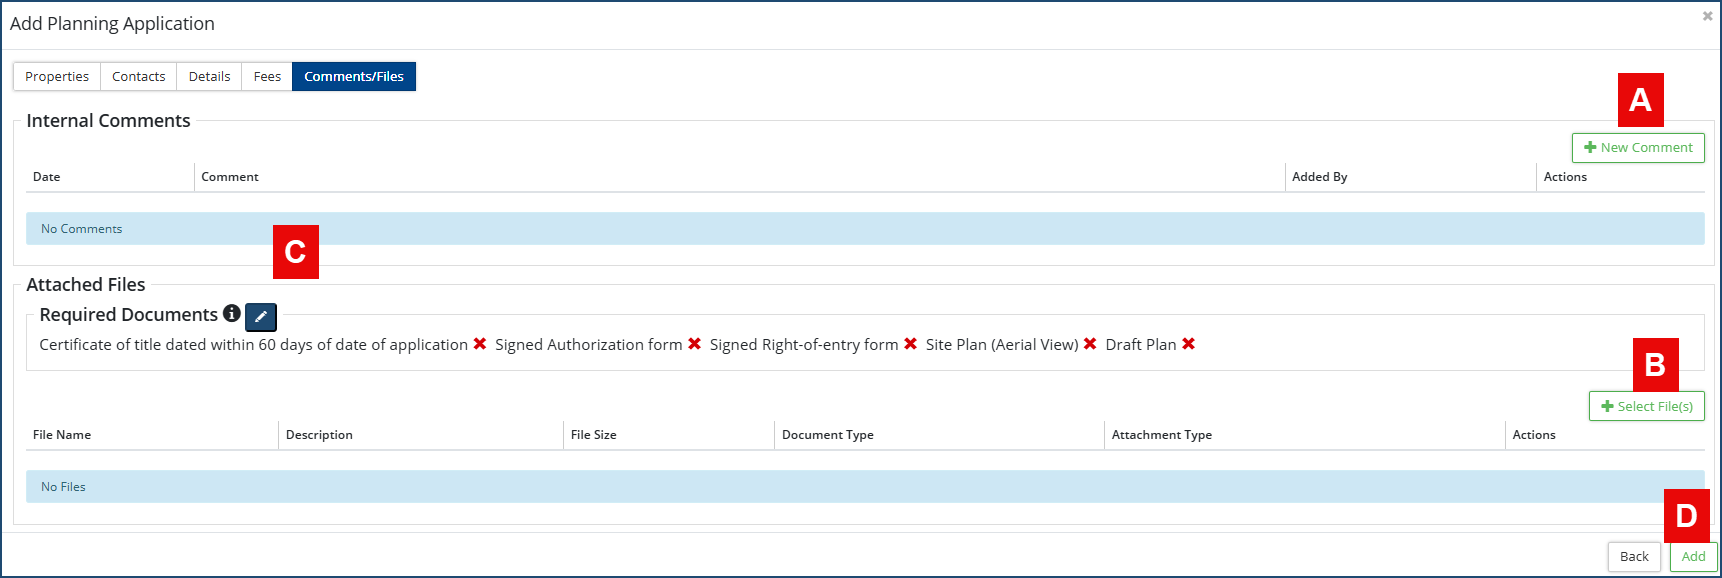
Comments/Files
This is where you can add Internal Comments, which may be helpful or informative for anyone within your office having to review this permit. "Internal" means that it will not be visible to permit applicants and other contacts in the Citywide Portal.
Files refers to the Required Documents and other adjunct support files that must be (or can be) attached to the application. Required Documents will be named in the Attached Files list. Those that have already been attached will have a checkmark ✅next to them; required documents that have not yet been attached will have a red "x" next to them ![]() .
. 
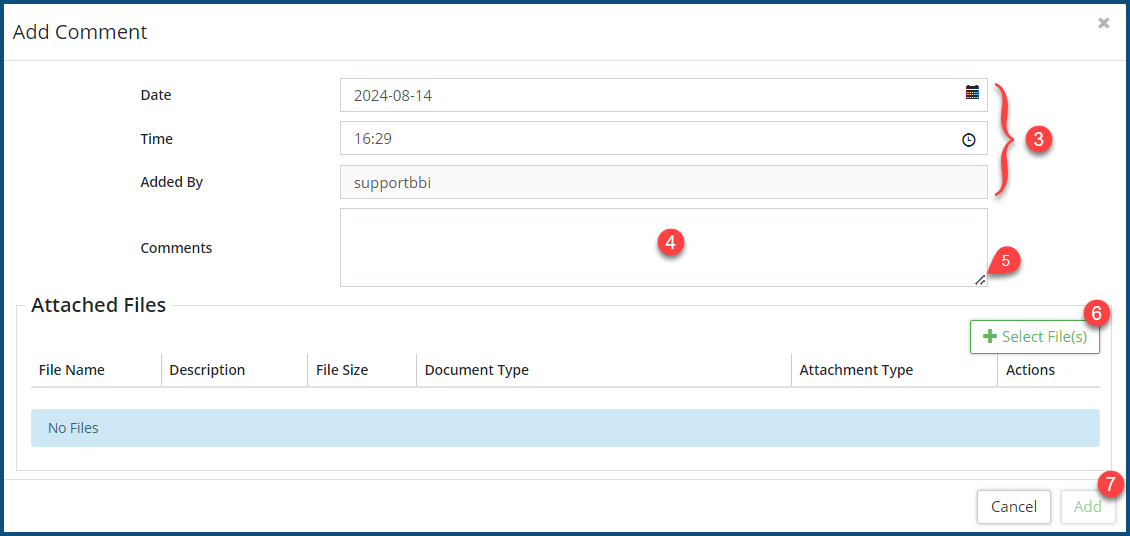
To add an Internal Comment, click on + New Comment 🅰. The Add Comment dialog box appears:

- Enter a Date and Time ❶ in their respective fields, or leave the current time in place. Clicking on the icons at the ends of the two fields ❷ allow you to select a date and the time.
- Your Citywide username will appear in the Added By ❸ field. It cannot be altered.
- Enter Comments ❹. The text box can be expanded to facilitate the full scope of your comments.
- Click Add ❺.
To attach Required Documents and other files, click on the + Select File(s) 🅱. The Add Files dialog box appears:
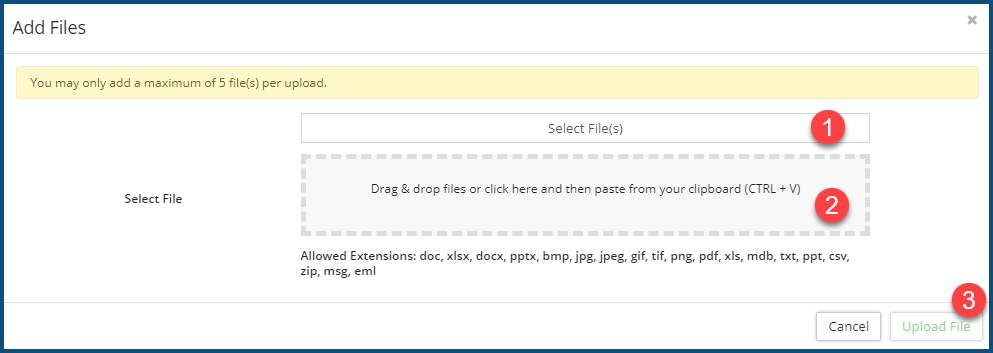
- Click on Select File(s) ❶ to select files from your system file manager, or
- Drag and drop ❷ files in the provided box.
To add any ancillary or missing Required Documents from the repository, click on the large Edit icon ![]() 🅲. The Manage Required Documents dialog box appears:
🅲. The Manage Required Documents dialog box appears:
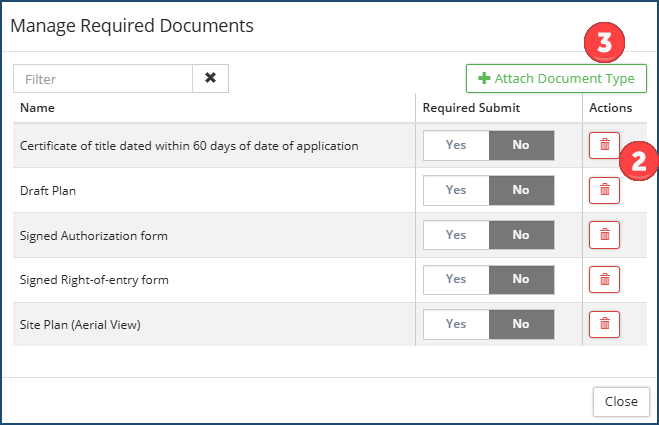
All the current documents will appear in the list
- Click on the Delete icon ❷ to delete a document from the list.
- Click on + Attach Document Type ❸ to add an additional document. The Select Document Type dialog box appears:
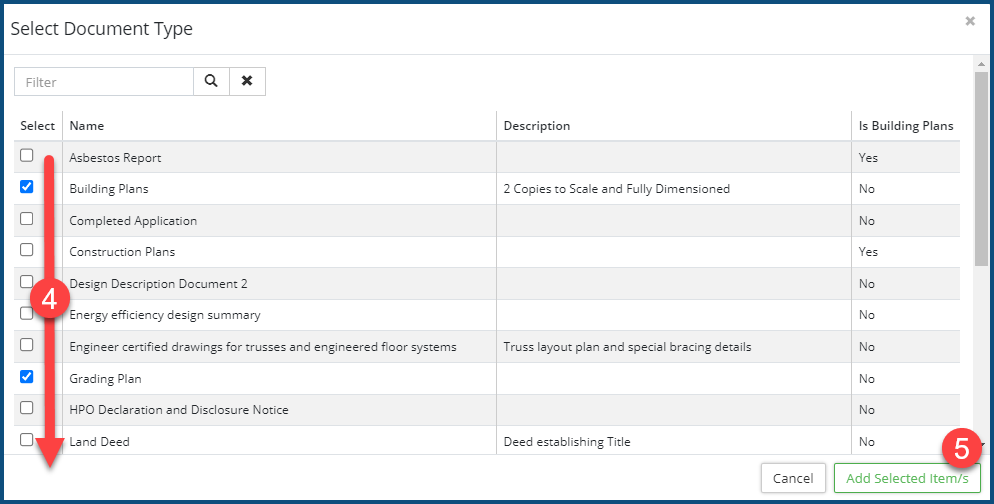
- Check ✅ all the additional documents to be added to the list.
- Click Add Selected Item(s) ❺.
- Then, select the required document option if it is Required Submit.
Click Add 🅳 when all Comments and Files have been added.
Open an Individual Application
Individual applications are accessible by clicking on the link ❶ in the Application # column that corresponds to the permit to be accessed.

Applications can be edited and updated from within the side affiliate panel. All the operations that are affiliated with the individual application—reviews, support documents, fees, etc.
The individual application opens, automatically displaying Application Details and Summary ❷ and all the related information pertaining to the application.
Changes made throughout the application must be saved by clicking on the Save icon ![]() at the top of the affiliate Panel.
at the top of the affiliate Panel.
Summary and Application Information
The Summary sections display pertinent details concerning the individual application and all of which can be edited.
- Details ❸shows the summary of the application details
- Status ❹ shows the current status, days since last activity days in current status and days remaining based on the settings in the application type
- Application History shows the log of the user and date/time when the application status changed
- The location of the property in indicated on the Map ❺ with a red star ★. Clicking on the image will open up the GIS Viewer, once again indicating the location of the property. See GIS Viewer for details.
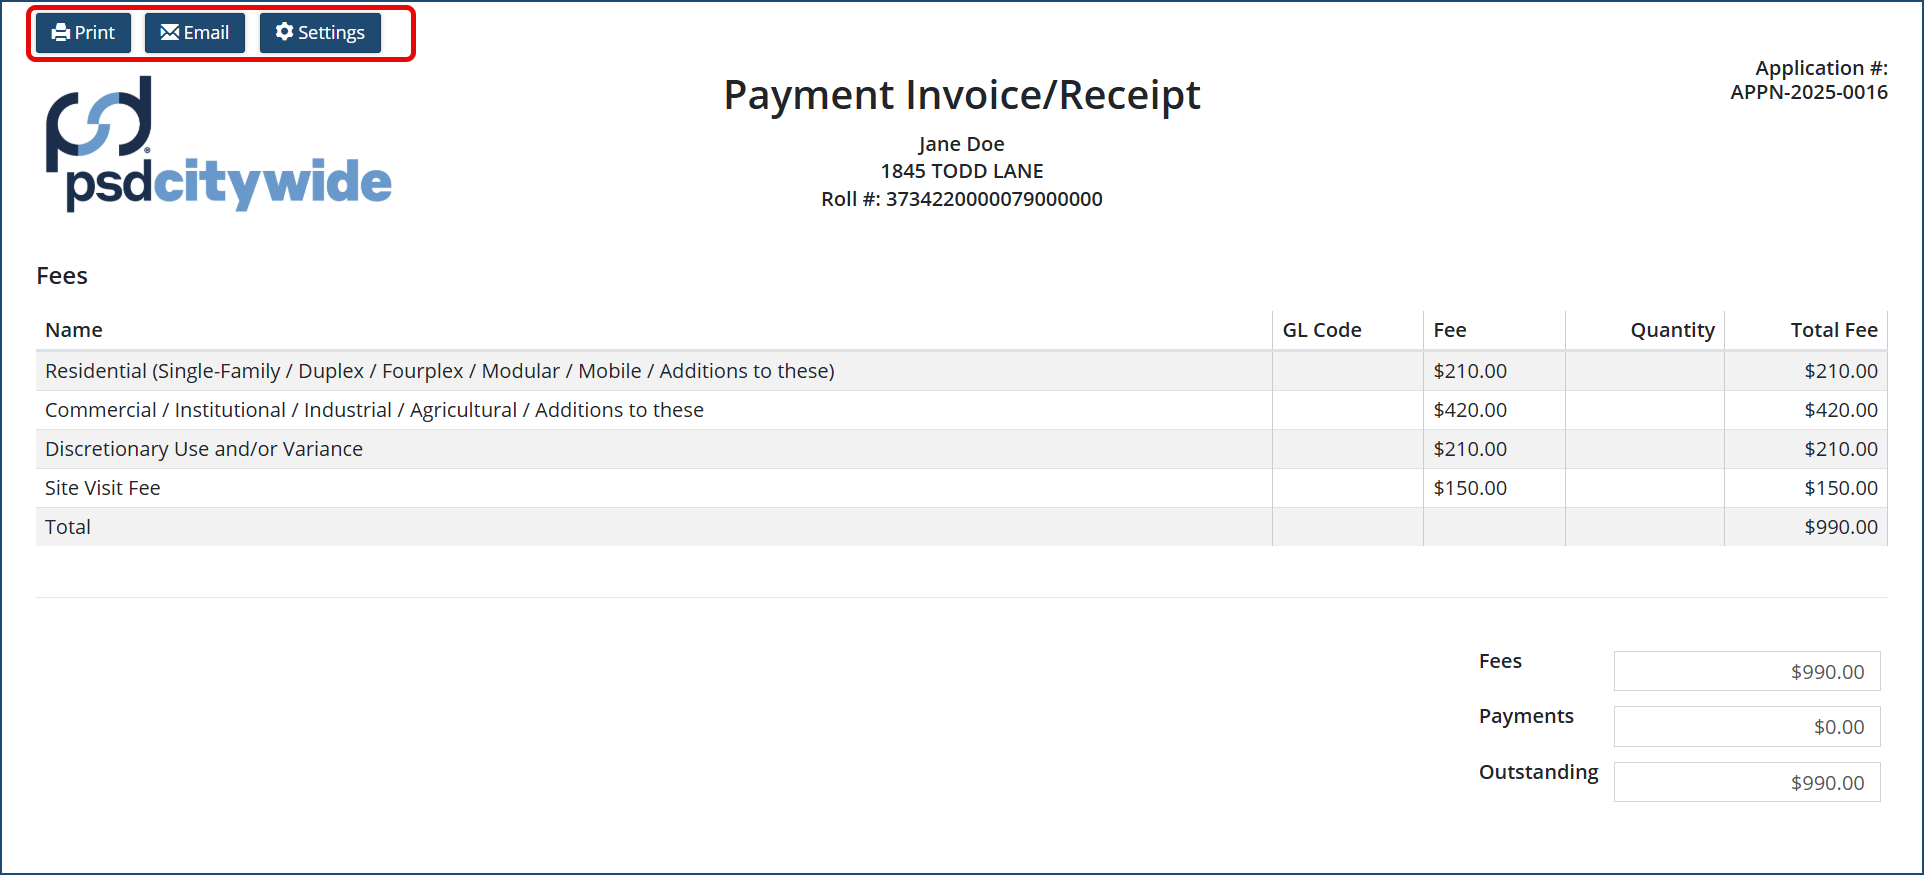
- Printouts provides access to PDF files for a printout of the application summary and receipt. This is what an invoice/receipt looks like from Citywide:
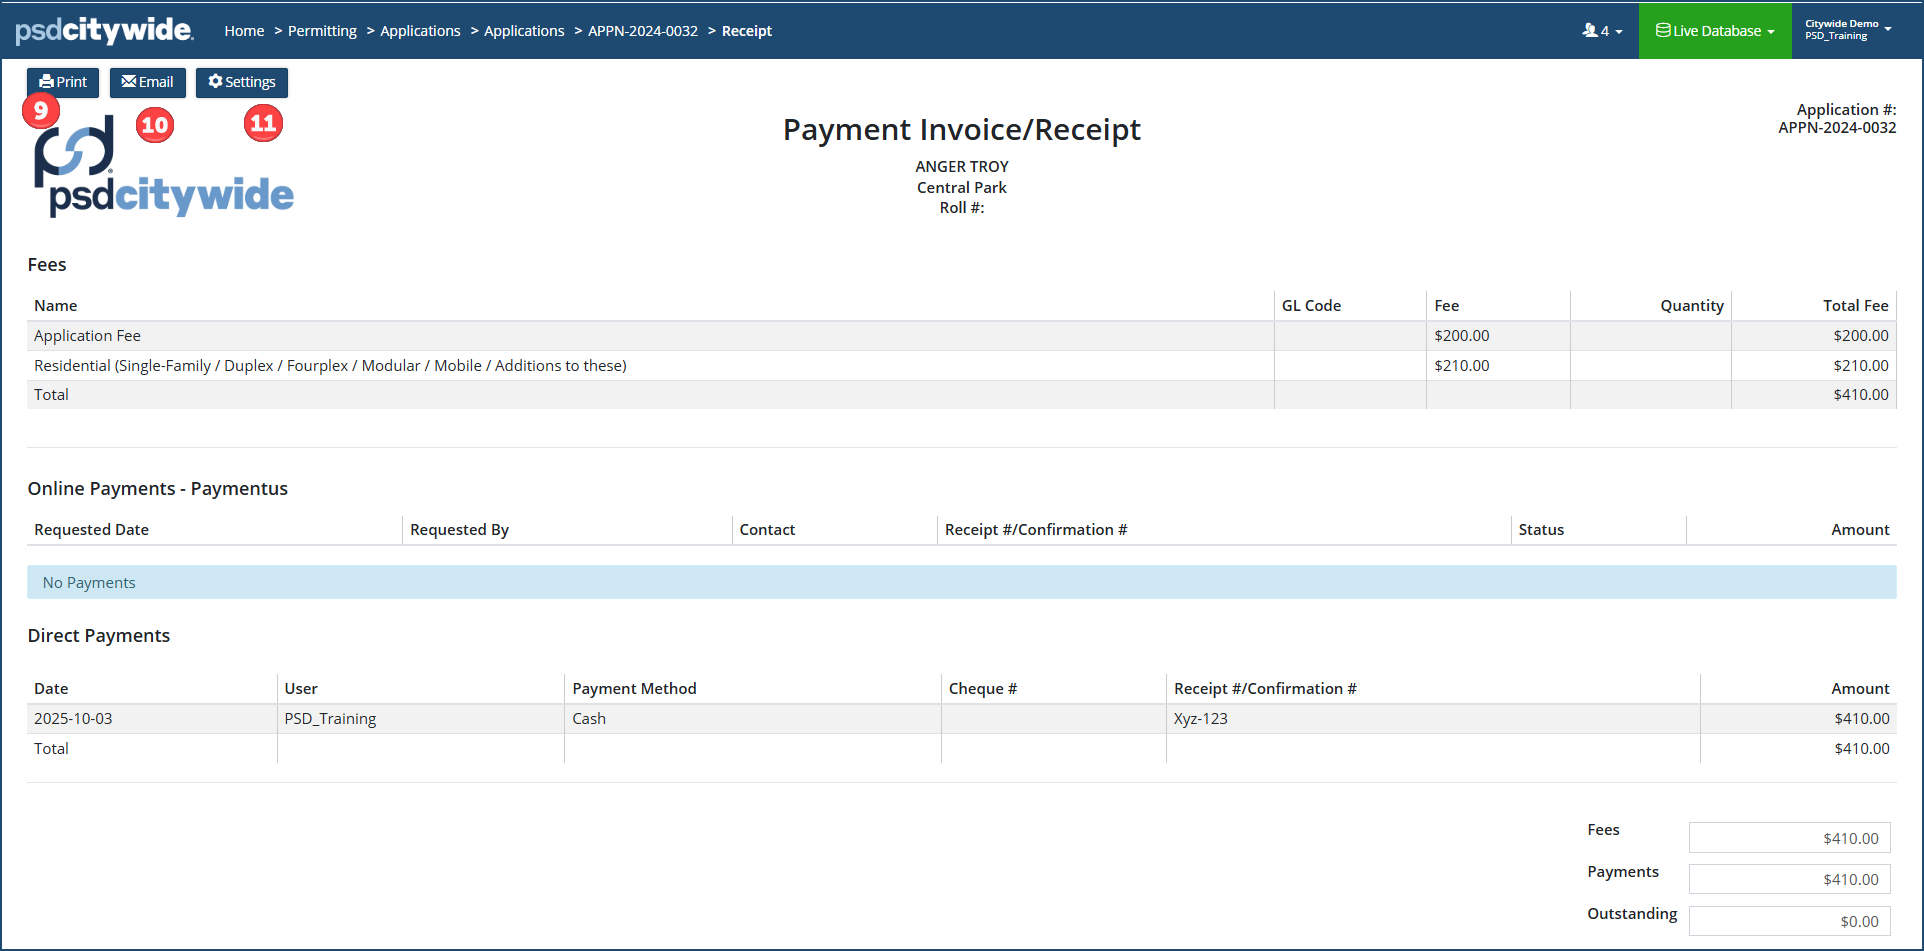
It displays not only the fee amounts, but the payments and payment history.
- The receipt can be Printed to a printer or to a PDF file ❾
- Or it can be Emailed ❿ to the applicant or contact
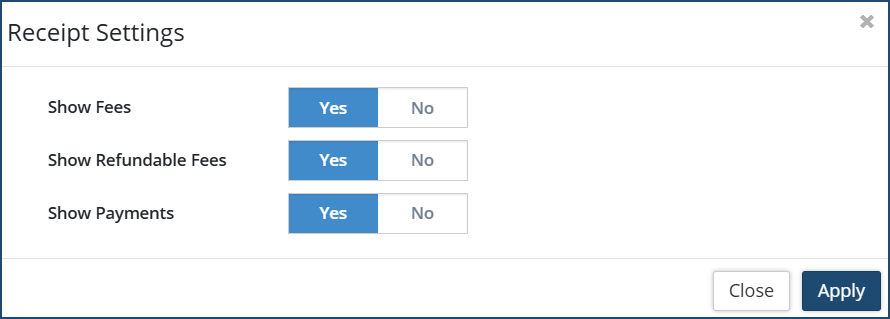
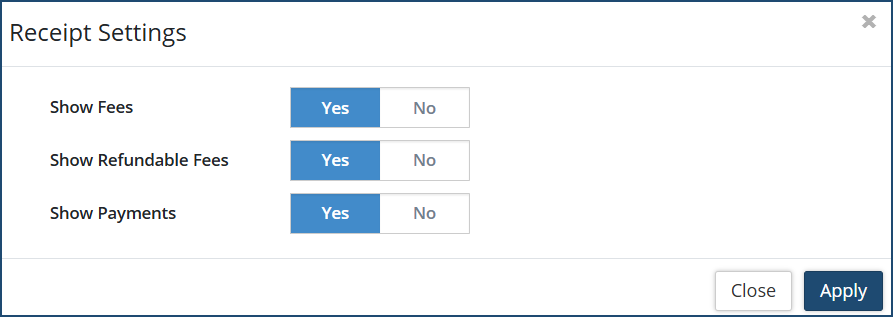
- ⓫ Settings: This allows the user to select which fees are visible on the receipt before printing or emailing. Toggle Yes or No on the desired option. Then click Apply.
You can add or edit work fields and work field groups here as needed, as well as make any other required edits.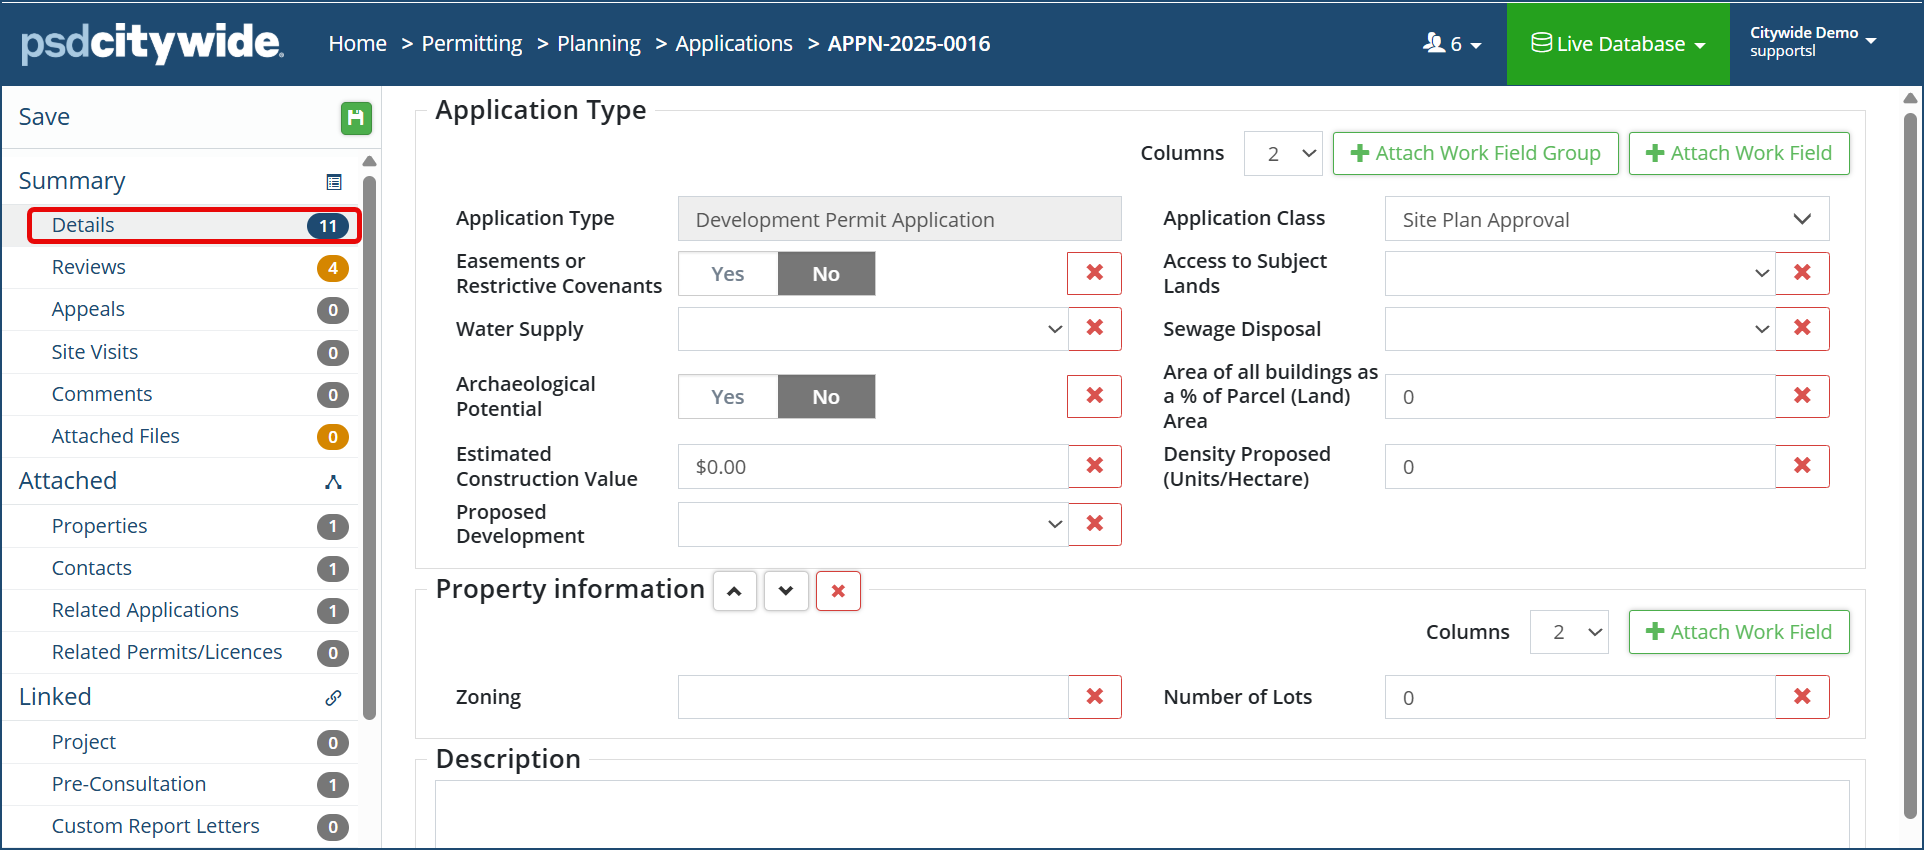
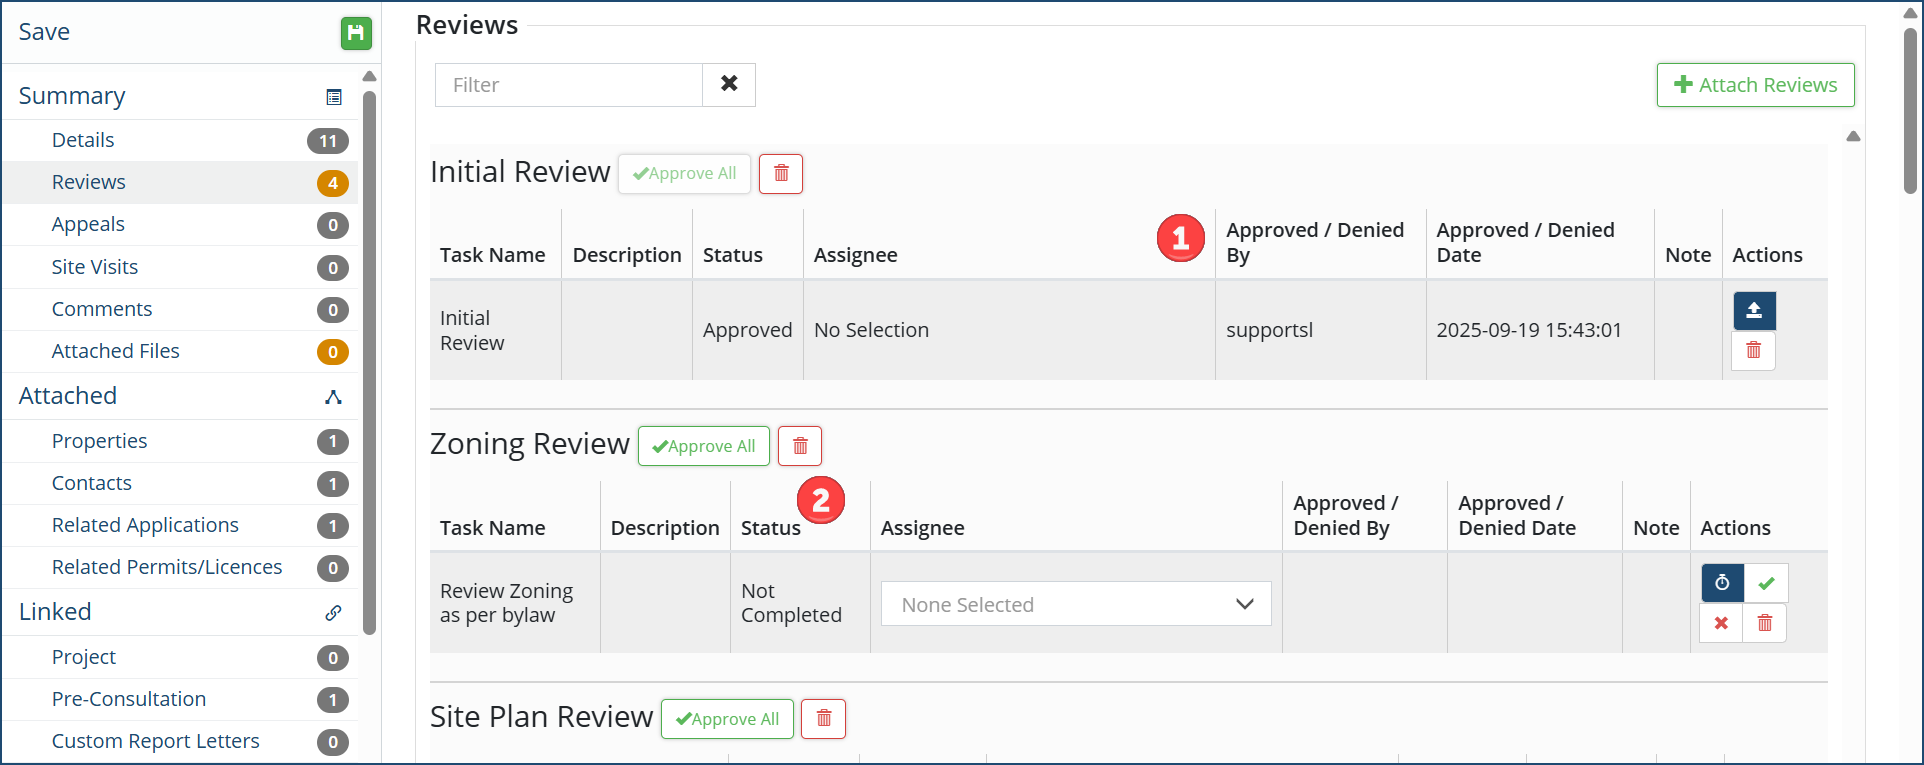
The reviews and the tasks within them are arranged in a logical sequence in which their execution proceeds from top to bottom. The reviews will show the user who is assigned or approved it, the date, notes ❶ and Action buttons. The example above shows some review tasks have yet to be completed ❷.
Approved tasks can be reopened by clicking on the Reopen icon ![]() or Delete icon
or Delete icon ![]() in the Actions column.
in the Actions column.
Clicking on the Stopwatch icon ![]() records the time that the task is being altered.
records the time that the task is being altered.
Clicking on the Checkmark icon ✅ marks the task as Approved.
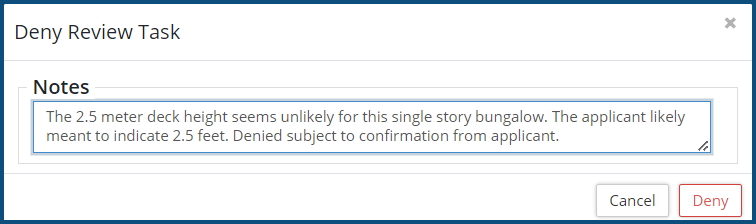
Clicking on the X icon marks the task as Denied.
Each time you click on one of the review task Action icons, a dialog box with a Notes text box appears. This is where you can record notes concerning the altered task status.
A denied task can be reopened as needed by clicking the re-open icon ![]() and approving if resolved.
and approving if resolved.
- If user notifications are required for this type of application status, see the Permitting Notifications article for steps on setting up notifications.
Comments
There are two types of comments: Internal Comments, involving internal comments and notes, and External Comments. External comments can be seen by external contacts if the application type is enabled for an external website like Citywide Portal.
To add a new (Internal or External) Comment:
- Click on + New Comment. The Add Comment dialog box appears:
- The Date, Time, and Added By fields ❸ are prefilled with the current date and time, as well as your username. The date and time can be edited directly or by clicking on the calendar or clock in their respective fields. The Added By field cannot be edited.
- Add your comment in the Comments ❹ field. Use the drag handle ❺ in the bottom right corner to resize the text box.
- Click on + Select File(s) ❻ to attach any files that are relevant to the comments being made. You can either select files from your file manager or drag and drop them into the system.
- The Attached Files here should not be mistaken for the Attached Files (many of which are mandatory for the select permit) that are discussed in the next section. These attachments should be strictly related to the comments. Any mandatory documents should be attached in the next section.
- Click Add ❼.
To edit a comment, click on the Edit icon ![]() .
.
To delete a comment, click on the Delete icon ![]() .
.
Attached Files
Attached Files is where all the documents required for the current application are uploaded. However, it can also include other documents, drawings, worksheets, or other type of file that provides informational, instructional, or in some other manner helpful information or resources pertaining to the current application.
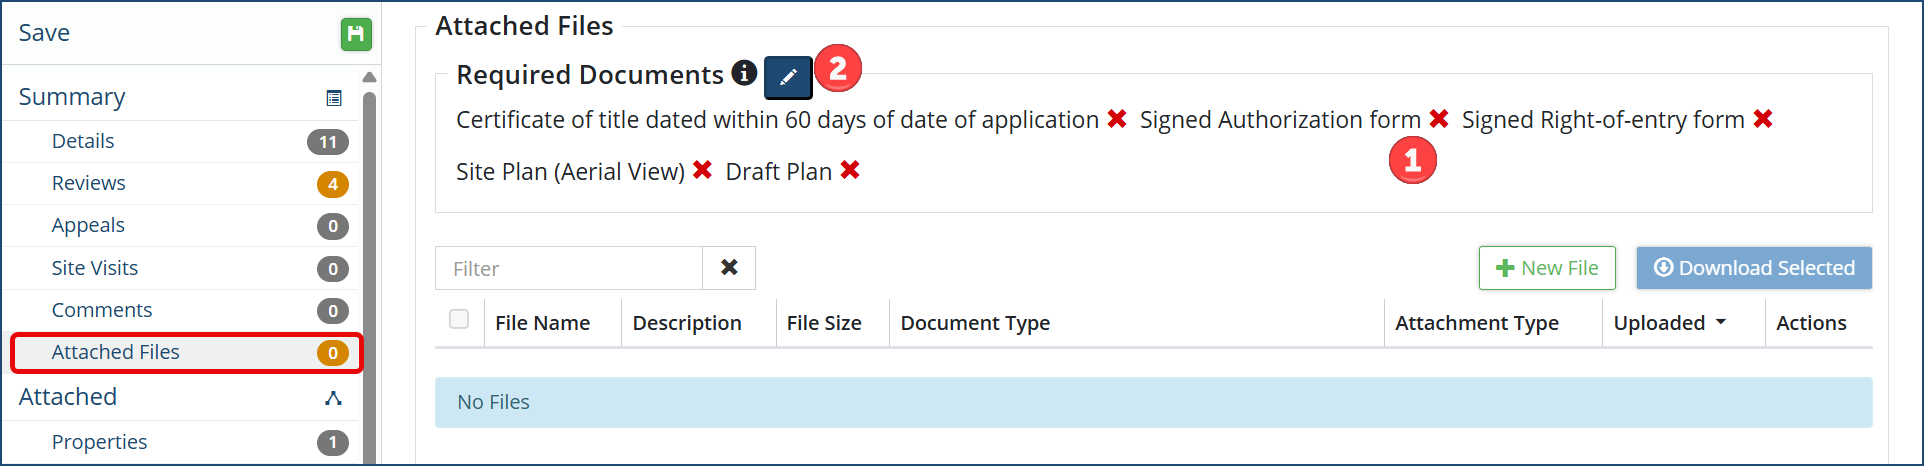
The Required Documents ❶ section lists of the required documents. Those that have already been submitted are checked ✅, which those that have yet to be submitted have an X next to them.
Clicking on the Manage Documents ![]() ❷ icon allows you to select additional required documents or to remove existing ones (if you have Admin privileges):
❷ icon allows you to select additional required documents or to remove existing ones (if you have Admin privileges):
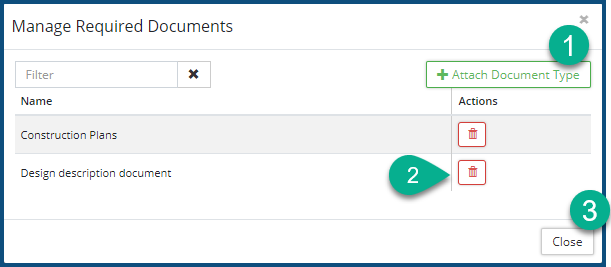
- Click on + Attach Document Type ❶ to select from a list of documents in the Document repository set up by your Planning administrator.
- Click on the Delete icon
 ❷ to remove a document from the required list.
 - Click Close ❸.
To download (an) existing file(s):
- Check ✅❸ the file(s) to be downloaded.
- Click Download Select ❹ and then select the folder to which the selected files are to be written.
To add a new file:
- Click on +New File . The Add Files dialog box appears:
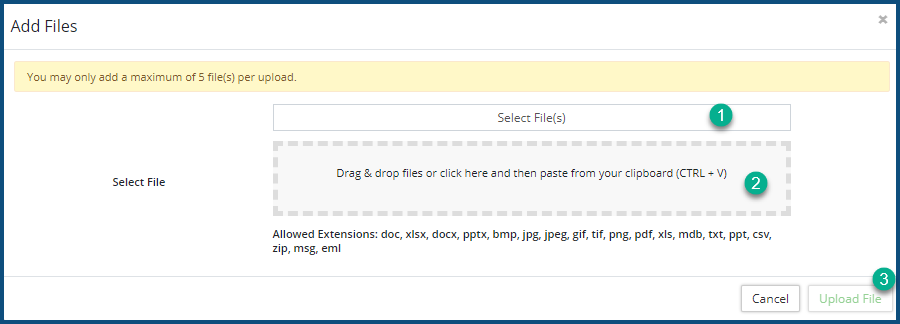
- Click on Select Files(s) ❶ to locate and select files using your File Manager, or drag and drop the files into the perforated box ❷.
- Click Upload File(s) ❸.
To edit a the file Description, click on the Edit icon ![]() .
.
To prevent a file from being overwritten or edited via the Citywide Portal, click on the lock icon ![]() in the list of attached documents. This icon will assume a dark shaded background
in the list of attached documents. This icon will assume a dark shaded background ![]() when the file is locked, which, when clicked, will revert the file back to the unlocked state.
when the file is locked, which, when clicked, will revert the file back to the unlocked state.
To remove a file, click on the Delete icon ![]() .
.
Contacts
The Contacts screen shows all existing contacts associated with the current application. These can be property owners, applicants, builders, etc. Contacts can have more than a single type classification.
To add or remove a type classification to an existing contact:
- Click on the Edit
 button in the Actions column of the contact. The Select Contact dialog box appears:
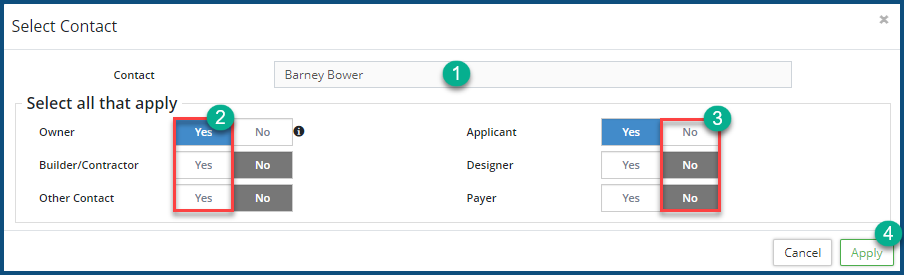
- The Contact Name ❶ cannot be edited. If it has been misspelled and is otherwise in need of editing, you will have to do so from Permitting: Manage 🢡 Customers page to make that change. (See Customers for details.)
- Select Yes ❷ to apply a classification type; No ❸ to stop/prevent its application.
- Click Apply ❹.
To Delete a contact row on the application, click on the Delete icon ![]() .
.
To Select an existing contact (one that has already been entered into the system):
Click + Select Contact . The Select Contact dialog box appears:
- Click on a contact row
- The Contact Name ❶ cannot be edited. If it has been misspelled and is otherwise in need of editing, you will have to do so from Permitting: Manage 🢡 Customers page to make that change. (See Customers for details.)
- Select Yes ❷ to apply a classification type; No ❸ to stop/prevent its application.
- Click Apply ❹.
To add a New Contact on the fly (one that does not as yet exist in the system)—which will be available to you only if you have Admin privileges:
- Click on + New Contact ❺. The New Contact dialog box will appear:
- Staff ❶: Select Yes or No concerning whether this is a staff person.
- CASL Approved ❷: Select Yes if this customer has provided consent to receive unsolicited emails from your organization.; No, if not. (CASL, which stands for "Canadian Anti-Spam Legislation," involves passage of nation-wide legislation in Canada.)
- Is Builder ❸: Select Yes if this customer is a Builder; No, if not.
- Is Designer ❹: Select Yes if this customer is a Designer; No, if not.
- Click Add ❺.
Properties
The Properties screen provides read-only information about the property associated with this application.
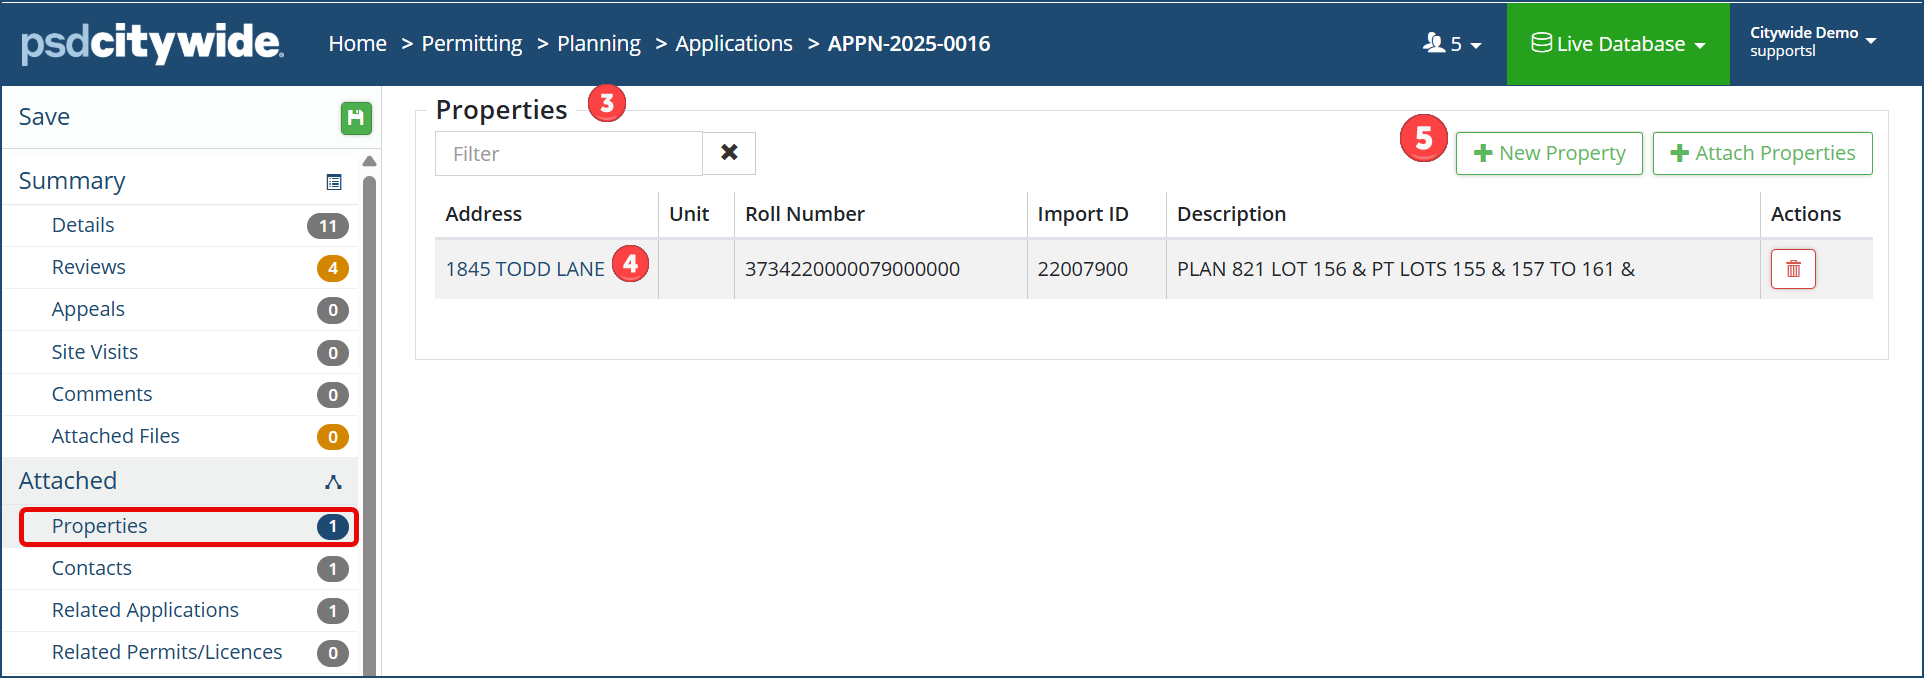
- (If applicable) Submitted Property refers to the property that was entered and submitted by a user via the Citywide Customer Portal which is an online customer-facing application used to submit online applications. See the PSDCitywide Portal User's Guide for details. If an exact match is found for the submitted property in the CW database (see Properties), the details of the submitted/matched property will appear in the Properties box ❸.
- Suggested Properties lists the properties in the CW database that are the closest (non-exact) matches to the Submitted Property. Clicking on the correct match will convey data from the Properties page to the Properties box.
- The Properties box ❸ always appears on this screen and will display pertinent information concerning the property or properties.
Click on the property link ❹ to further view and—if your account permissions allow it—edit the Property record.
Click on + New Property ❺ (if your permissions allow it) to add a new property. When you do so, the New Property box appears: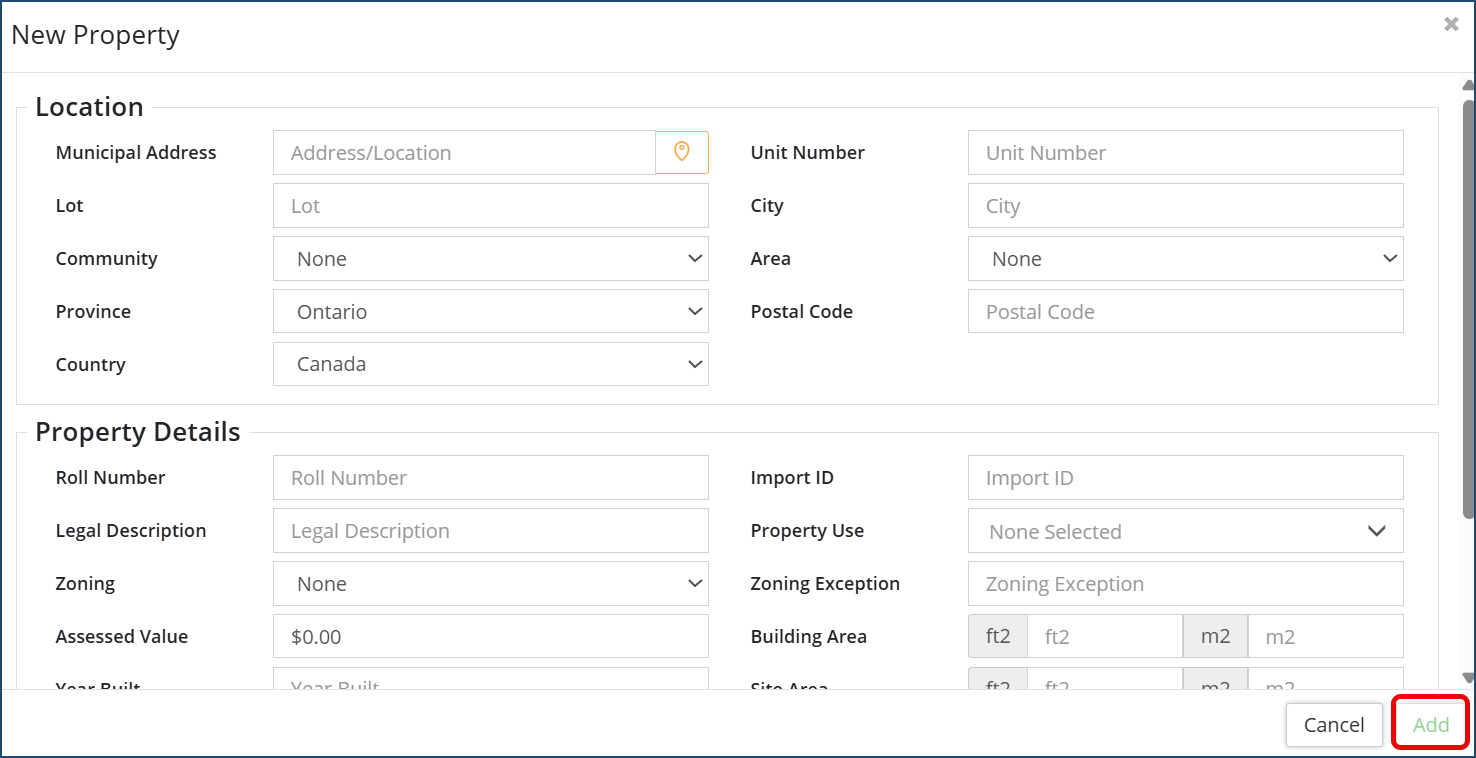
- Enter the property details, then click Add.
Related Permits/Licenses
Other Permits and/or Licences associated with the current property appear here: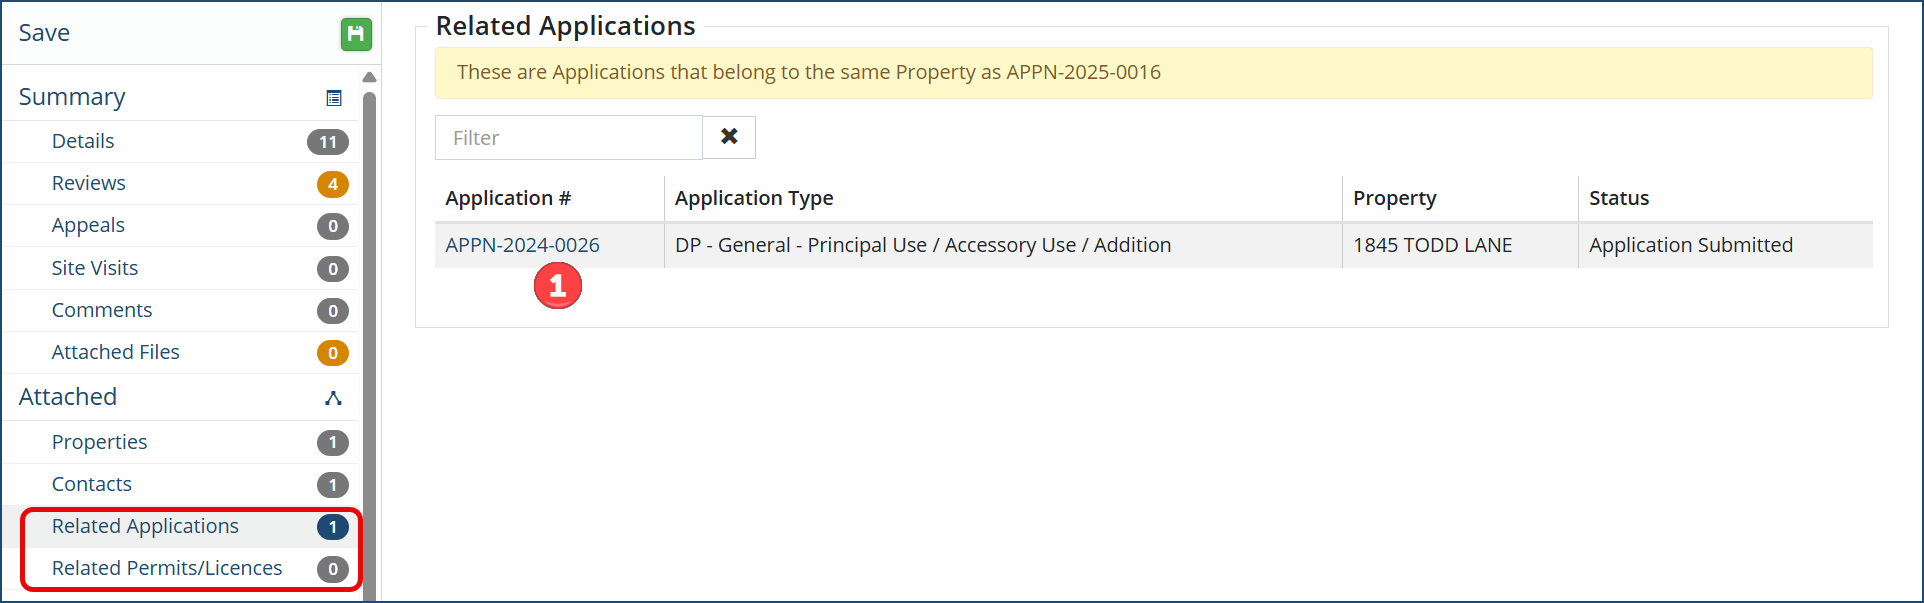
Click on the link ❶ in the Permit/Licence # column to open the application or licence.
Related Applications
Related Applications lists all the applications associated with the current application's property. 
Click on the link ❶ in the Application # to open the application.
Custom Report Letters
Customer Report Letters display a list of all letters that have been generated and either sent or printed and presented to the relevant application contacts. These are letters that have been generated on the basis of templates that are stored in the Letters repository.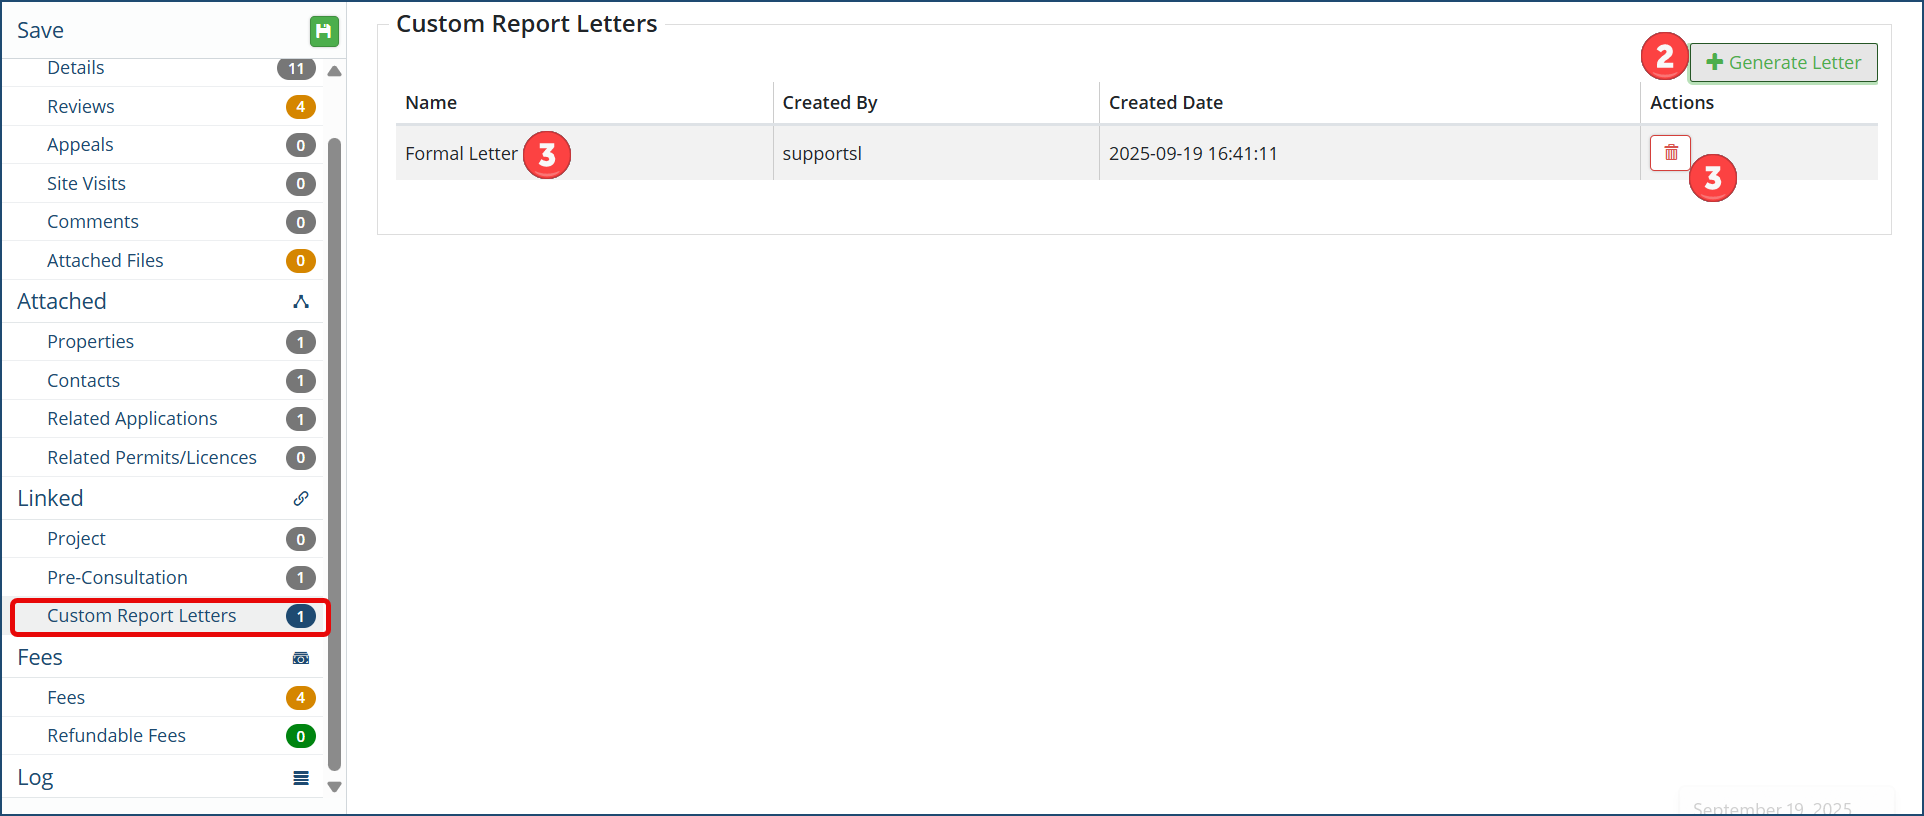
To view/print the Letter:
- Click on the Name ❶ of the letter to view its contents on the screen.
- Scroll to review the letter.
To print or email the letter:
- Click on Print. The default destination is "Save as PDF," which allows you to save the letter in a PDF file format and then email it to the appropriate contact(s).
- Alternatively, you can print a hard copy version of the letter to any one of your pre-configured printers.
To Generate a new letter (on the basis of an existing template):
- Click + Generate Letter ❷. The Select Letter dialog box appears:
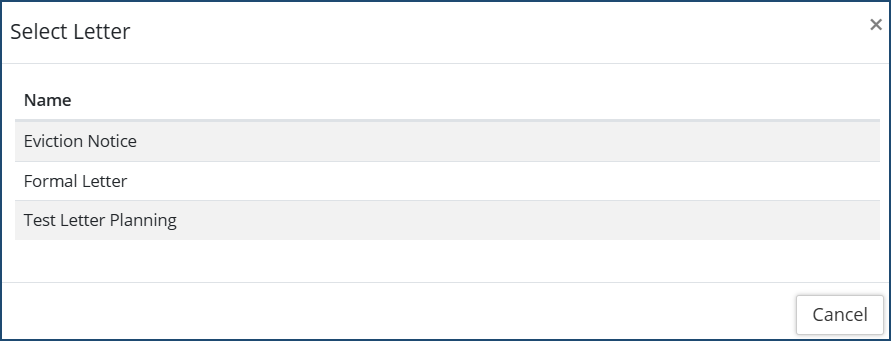
- Click on the desired letter template. The selected letter will appear, its fields and other data contents filled with the appropriate data.
- Click Save
To delete a letter, click on the Delete icon ![]() ❸.
❸.
Fee Summary
The Fee Summary screen summarizes all fees, payments and refunds associated with the current application and it provides you with the ability to issue receipts ❶, process online ❷ and direct payments ❸, and view ❹ and issue refunds. All of fees and refunds are entered in the respective sections below Fee Summary.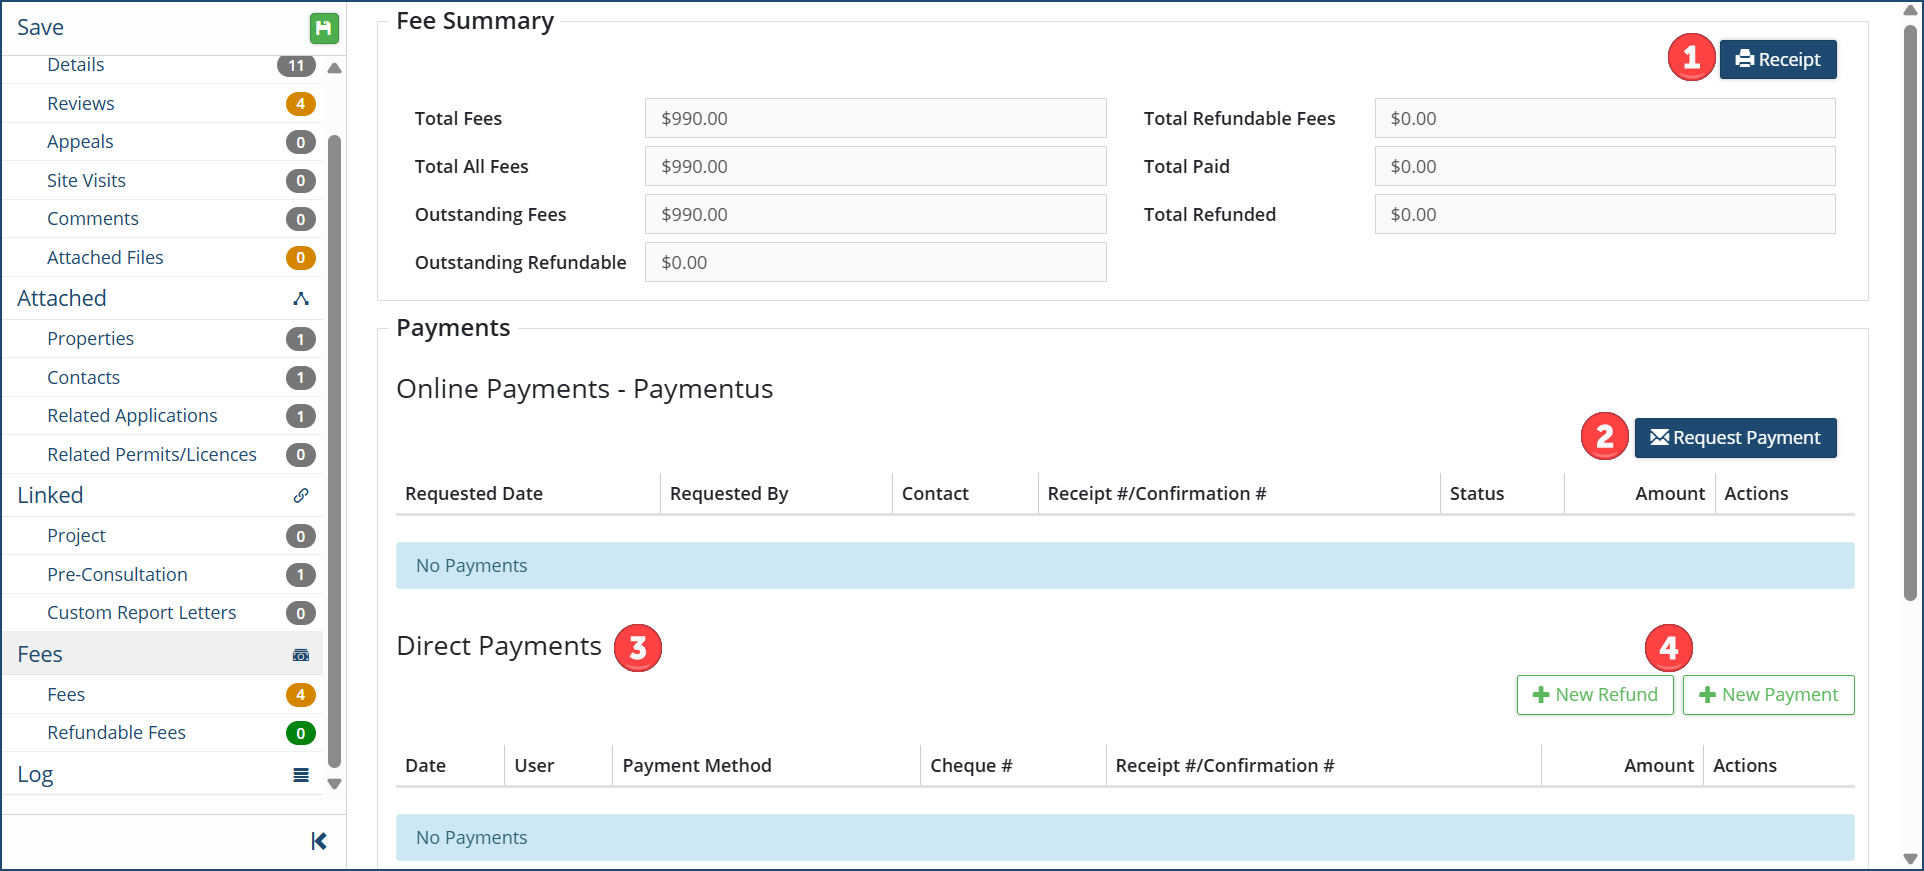
To generate a Receipt:
- Click on Receipt ❶. The receipt appears on the screen:
- Click Print or Email to process the receipt accordingly.
- Click Settings to view/set up receipt settings
Payments
Payments can be processed either online or directly. Online payment processing must be set up and activated on your system by a Citywide implementation specialist before it can be used.
To initiate an Online payment:
- Click on Request Payment ❷. All the contacts associated with the current permit will appear on the Request Payment page:
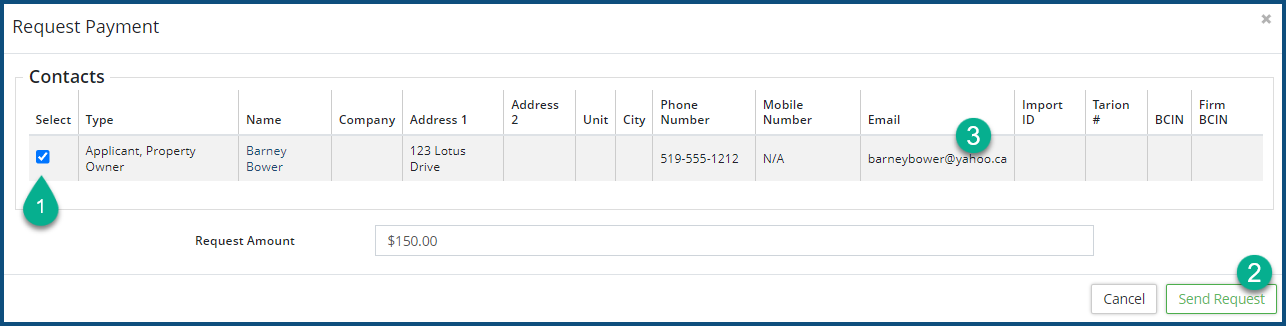
- Check the Applicant record ❶.
- Click Send Request ❷. The Payment Request will be sent to the email address ❸ in the checked record. Click here to see what happens after this . . .
-
Payment Requests can only be successfully sent to Canadian customers if they have provided CASL Approval CASL (which stands for Canadian Anti-span Legislation) is a Canada-wide law that stipulates that all electronic messages (i.e. email, texts) organizations send in connection with a “commercial activity” must have been pre-approved by the prospective message receiver. (CASL Approval is set to Yes in the Customer record.) An attempt to send a Payment Request to a customer who has not provided approval will be blocked.
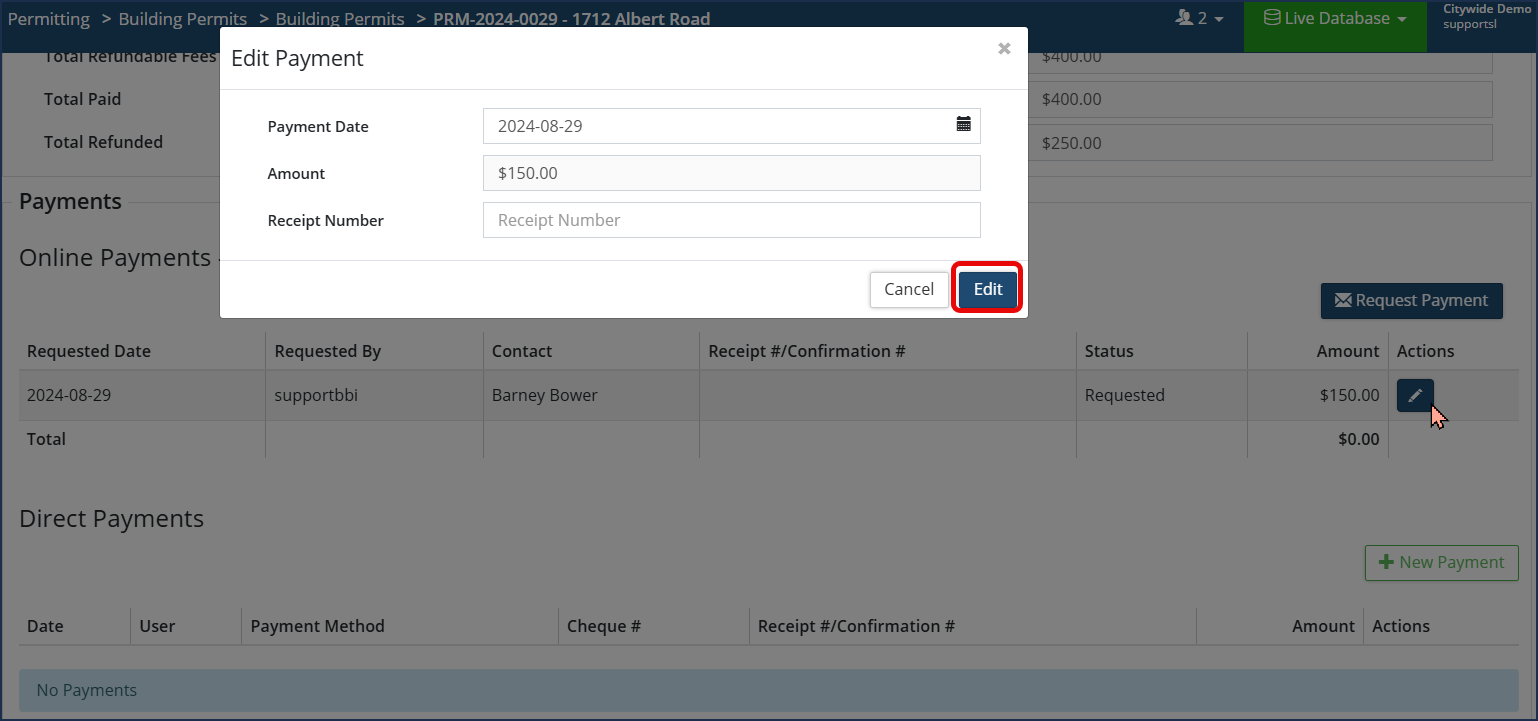
- Click on + New Payment ❸. The Add Payment dialog box appears, showing the full amount of unpaid fees:
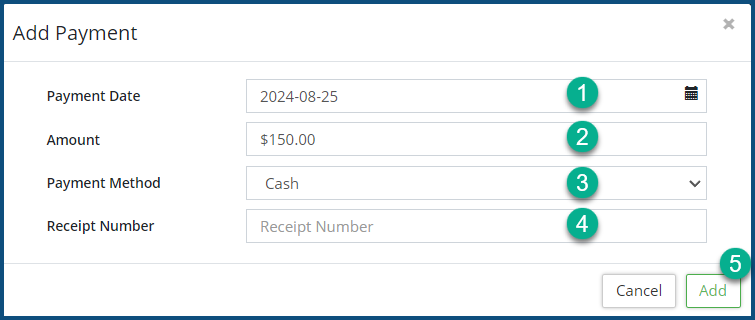
- Enter the Payment Date ❶ (or select it by clicking on the calendar icon).
- Bypass Amount ❷ to leave the full unpaid amount in this field, or enter a partial amount.
- Select the Payment Method ❸.
- Enter a Receipt Number ❹.
- Click Add ❺.
Once a completed payment is processed, the payment date or receipt number can be edited if required.
- Click the pencil icon
 in the Actions column on the desired fee
 - Make necessary edits
- Click 'Edit'
- Click 'Save' at the top of the affiliate panel
- Click + New Refund . The Add Refund dialog box appears:
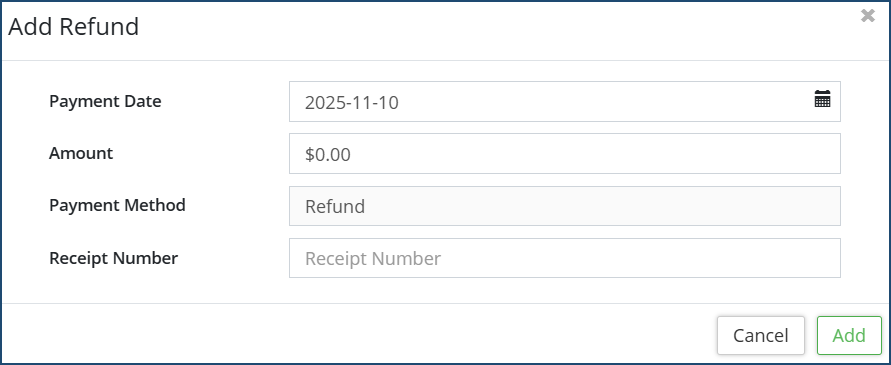
- Fill in the details of the Refund (Receipt Number is optional)
- Click Add
Fees
Fees is where 1) fees that are already linked with the Application type are found, 2) additional Fees can be added, and/or 3) existing fees can be edited or deleted (if your permissions allow this). 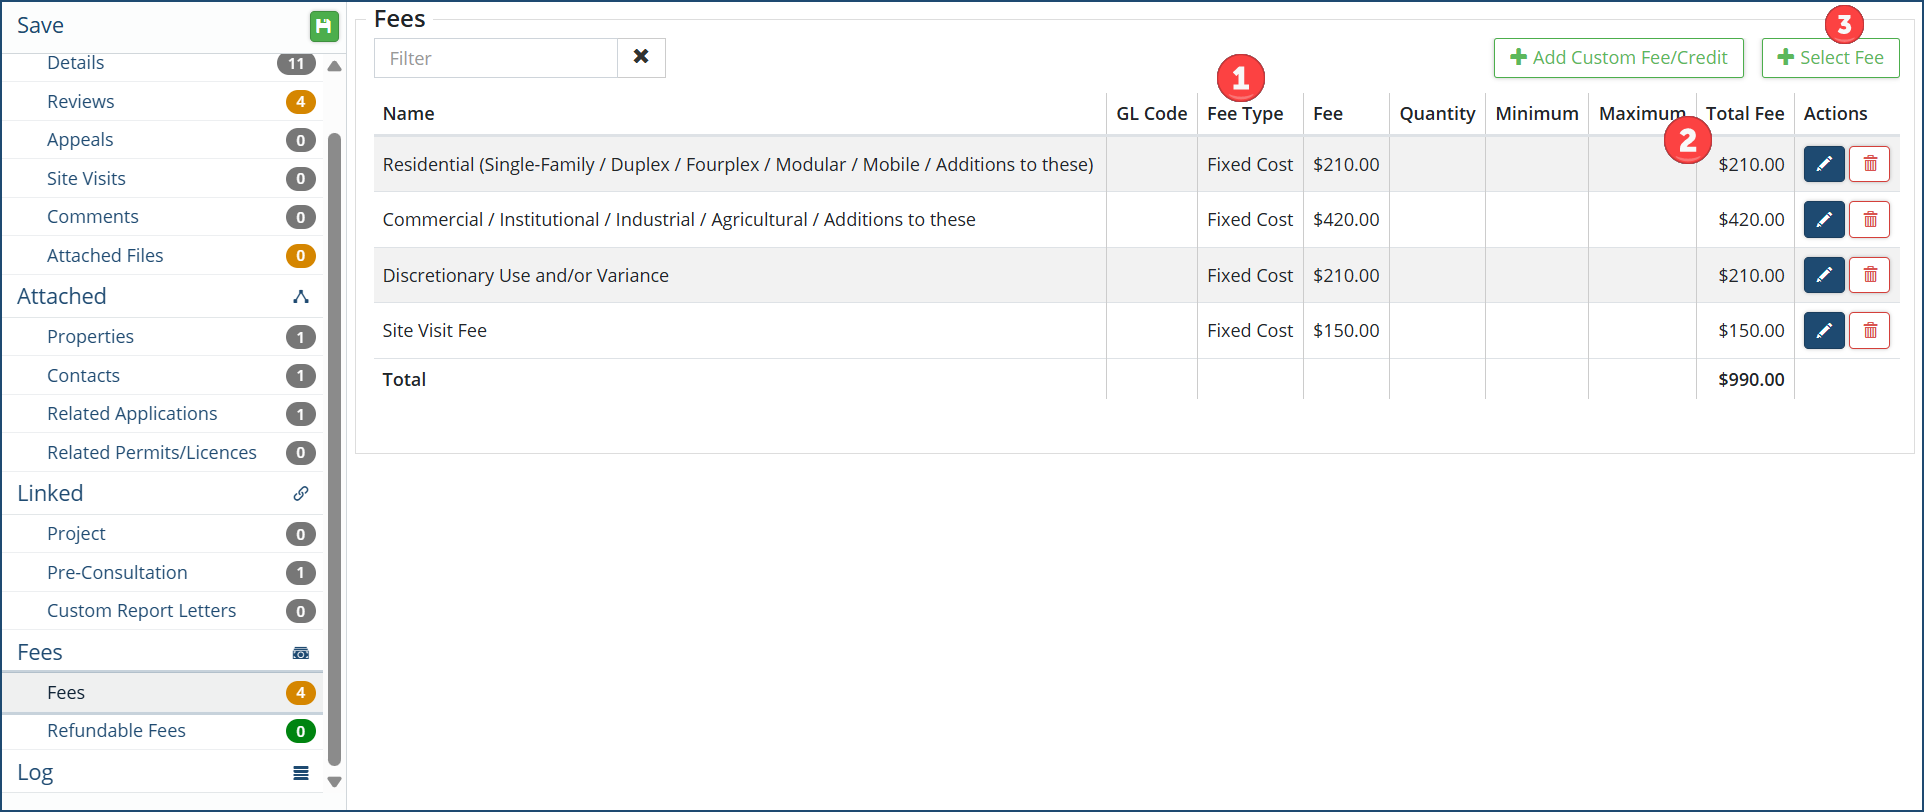
The Fee Type ❶ column describes the fee type, each of which is different in the above example.
The Total Fee ❷ column describes the calculational logic of the fee (ie. fixed cost). The fees, fee types, and calculational logic are all pre-defined in Fees and then associated with Application type.
To add an existing, pre-defined Fee:
- Click on + Select Fee ❸. The Select Fee dialog box appears:
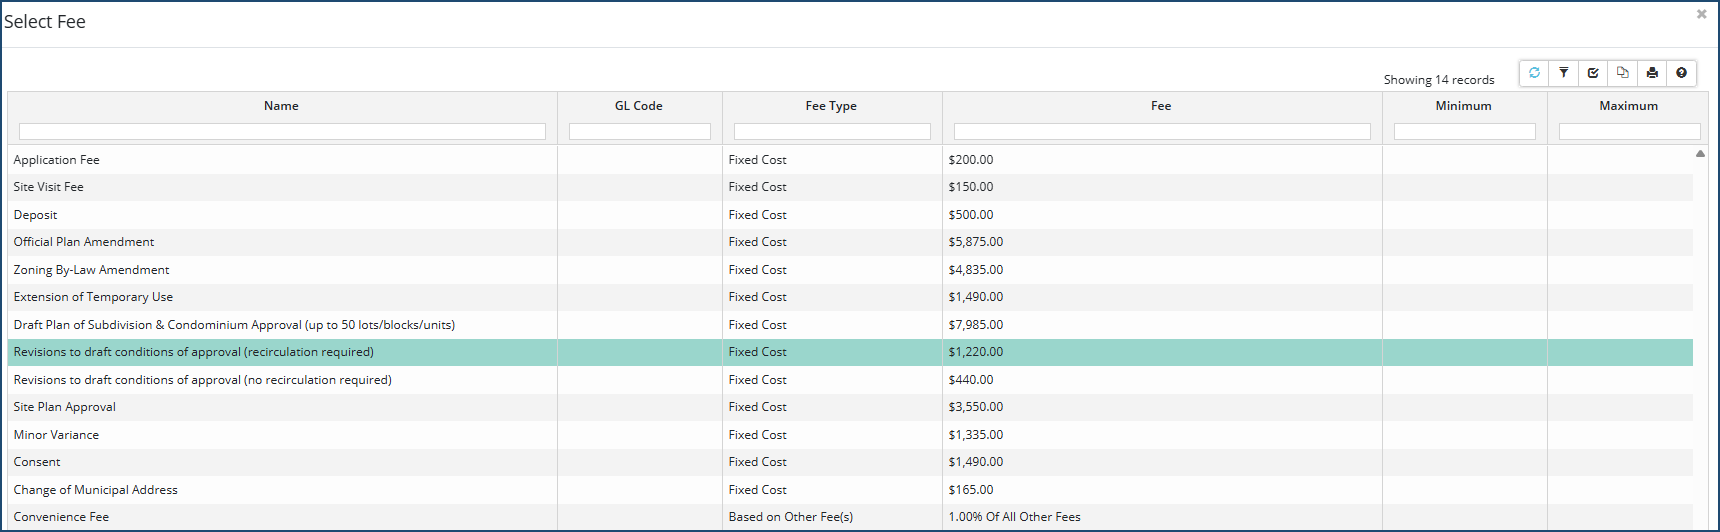
- Click on a fee.
- Repeat the above steps to add an additional fee. (Fees can only be added one at a time.)
Custom (non-existing, non-standardized Fees and Refunds can also be added to a building permit.
To add a Custom Fee or Credit:
- Click on + Add Custom Fee/Credit . The Add Custom Fee/Credit dialog box appears:
- For Fee Type, select either Custom Fee or Credit.
- Provide a Name. Try to be as succinct as possible, since a non-standardized fee/refund is the only place in which the its issuance is described.
- Select the GL Code. The GL account will be credited or debited accordingly. Make sure this information is accurate, in that it may be exported from CW into your accounting system.
- Enter the Fee/Credit amount.
- Click Add.
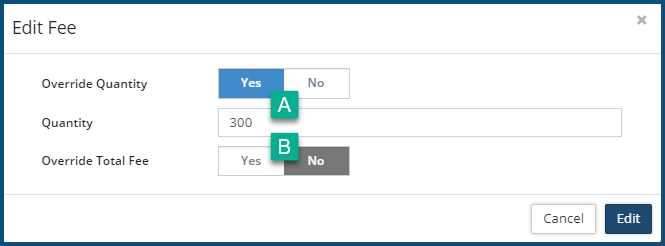
To edit (overwrite) a Fee:
- Click on edit icon
 . The Edit Fee dialog box appears:
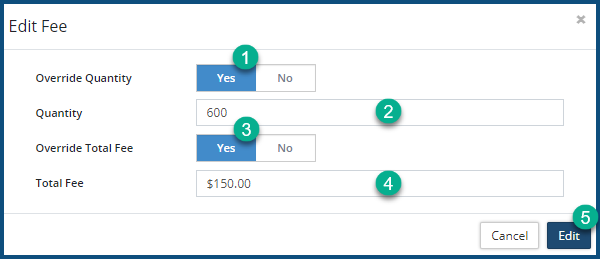
- Click Yes for Override Quantity ❶ to overwrite a quantity used to calculate the fee (e.g. sq/ft.), and then enter the new value ❷. If you do not override the Total Fee, the Total Fee will be recalculated by using the new quantity value.
- Click Yes for Override Total Fee ❸ to enter a new fee ❹. The new fee will overwrite the Total Fee, even if the quantity ❷ was changed.
- Click Edit ❺.
To remove a fee:
- Click on the delete icon
 . The Remove Fee dialog box appears:
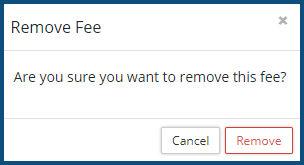
- Click Remove .
Refundable Fees
Refundable Fees can involve deposits, overcharges, and the like. All existing refundable fees will appear on this page, both those that have been fully or partially refunded and those that are slated to be refunded. If applicable, the value of the refund, the refunded amount, and the outstanding amount appear in their respective columns:
To add a Refundable Fee:
- Click on + Select Refundable Fee ❶. The Select Refundable Fee dialog box appears:
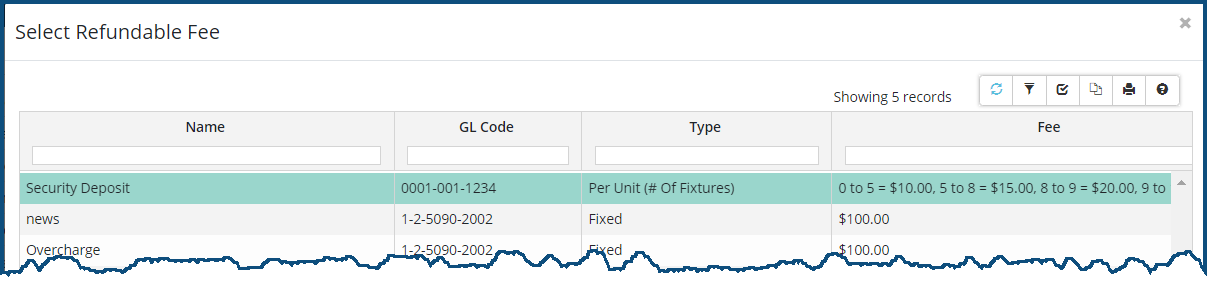
- Click on the refundable fee to be added.
- Repeat the above steps to add an refundable fee charge.
To edit (overwrite) a Refundable Fee:
- Click on edit icon . The Edit Refundable Fee dialog box appears:
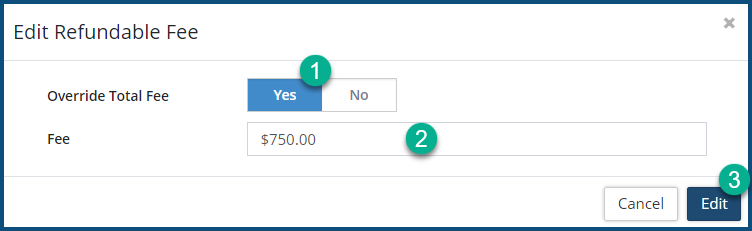
- Click Yes for Override Total Fee ❶ to overwrite the existing fee amount.
- Enter a new Fee amount ❷.
- Click Edit ❸.
To remove a Refundable Fee:
- Click on the delete icon . The Remove Refundable Fee dialog box appears:
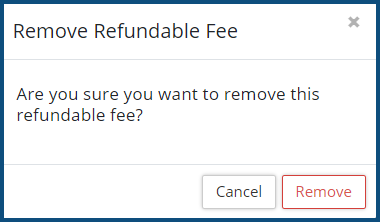
- Click Remove .
Log
The log displays all activity and changes made to a Planning Application. Its events appear in reverse chronological order, displaying the event time, user who initiated the event, as well as specific description of the event.
- Enter the text in the Filter box ❶ to filter the list down to the its matches.
- Click Refresh ❷ to see any entries that have been logged since this screen has been opened.


