
Overview
All Permit applications have a field in which the Permit Type must be specified. This is the page in which you define the various Building Permit types. When a building permit application is being created, either internally (by municipal or regional staff) or externally (by customers and other types of clients using the PSDCitywide PortalThe PSDCitywide Portal is an online customer-facing application used to submit Permitting applications. See the PSDCitywide Portal User's Guide for details.), the permit types created here will appear in a drop-down list attached to the Permit Type field.
Permit Types can be quite complex and varied, depending on the specifications, requirements and variability mandated by codes and bylaws within jurisdictions. Consequently, the Permit Types you create here can not only include all the required data, but each permit type's data can be segmented and organized into a flowing and logical structure in which related fields can be grouped together.
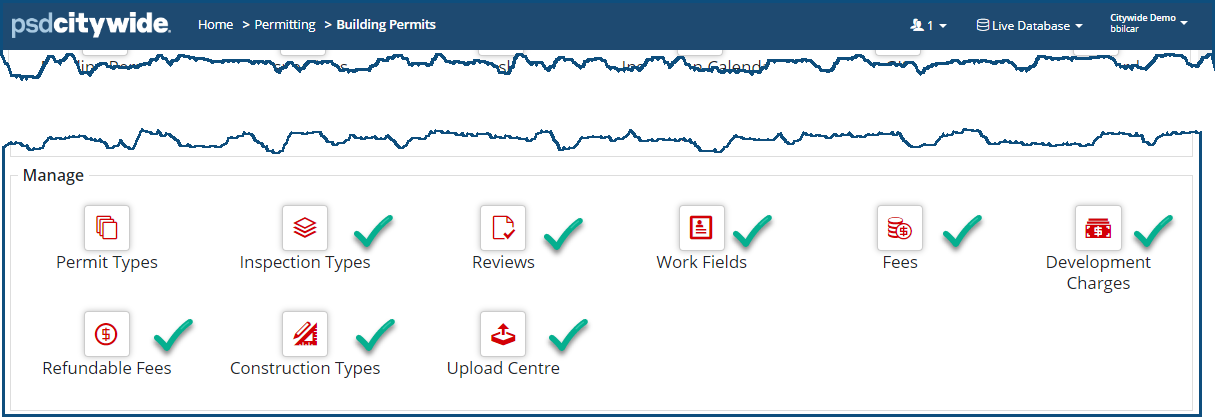
Setting up Building Permit Types should be done after a number of other options (e.g., Work Fields, Construction Types, Inspection Types, Notifications, etc.) in the system are set up. This is because Building Permit Types can be pre-populated with options from those affiliated fields. In fact, it is a good idea to fully set up all the other options in the Building Permit 🢡 Manage section before setting up Building Permit Types:
This is the Building Permit Types screen, which lists all the existing Building Permit Types by Name ❶ in the first column, along with a pre-configuredSee Grid Customization for instructions on configuring your grid. set of columns and column properties in the remaining columns:
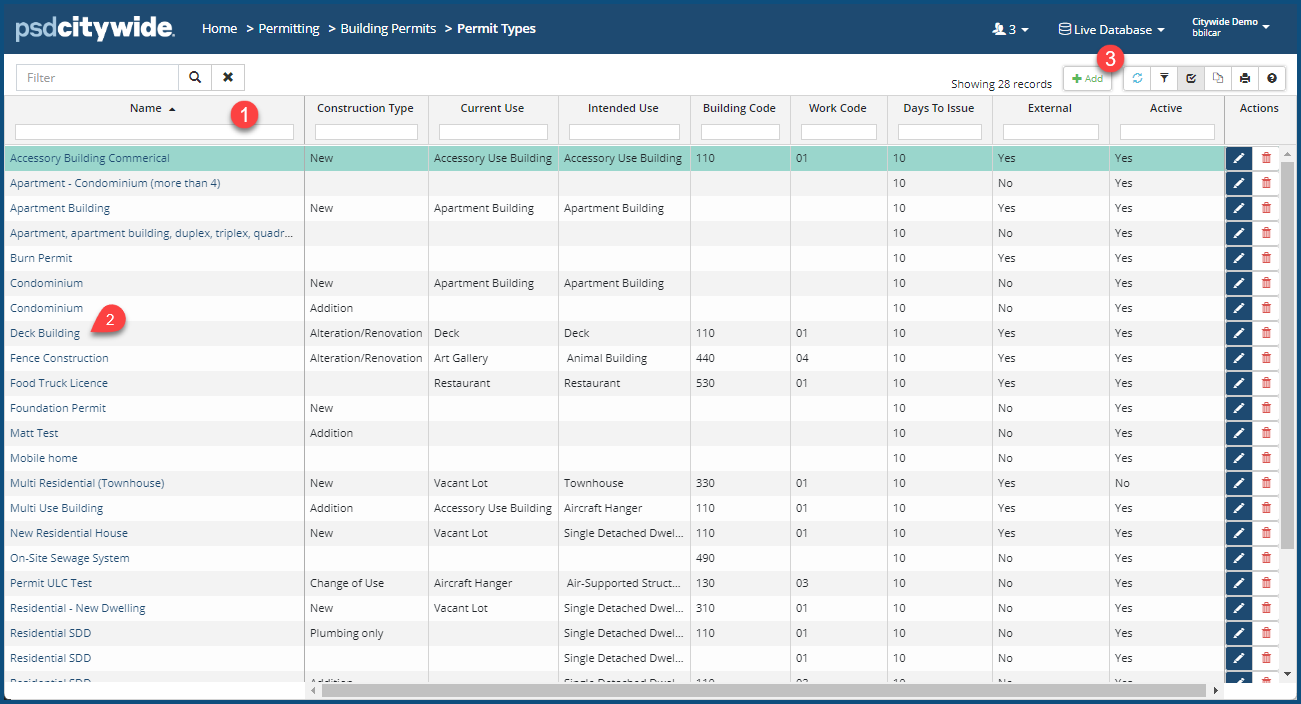
Clicking on any one of the links in the first column ❷ will open up a screen in which the corresponding permit type can be fully edited and reconfigured, and all the actual Building Permits and other associated data can be accessed (which is discussed below).
- Click on +Add ❸. The New Permit Type dialog box appears:
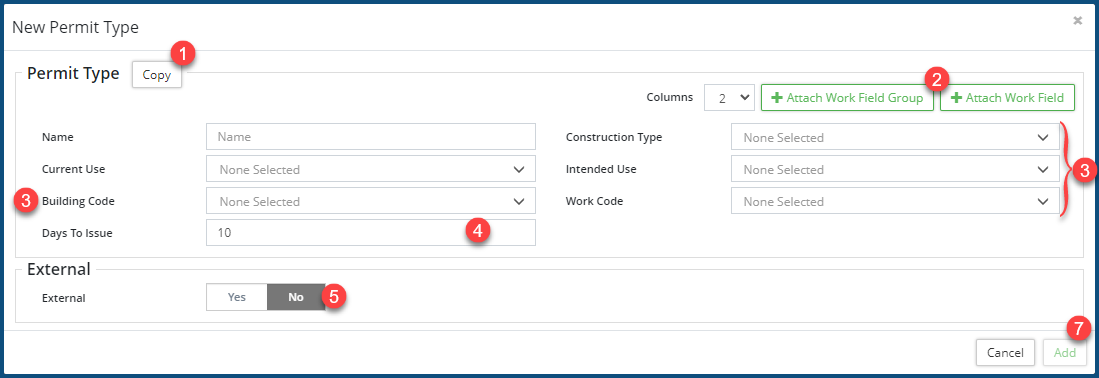
- If there is an existing Permit Type that has data that substantially overlaps with the data in the Building Permit Type you wish to create here, then you can click on Copy ❶ to select and copy the contents of that existing Permit Type template. The fields on the screen will fill in with the data from that source template, and your dialog box may expand to include the Work Fields and Work Field Groups ❷ that belong to that template (Work Fields and Work Field Groups are discussed below). You can then edit the fields in your new template as required.
- Give your new Permit Type a Name.
- The next five fields (Construction Type, Current Use, Intended UseThe options for both of these fields are defined in Property Uses., Building Code, and Work Code) ❸ in most cases will be left blank at this point, in that their values will, in most cases, vary from one Permit to another. However, setting one or more of them in this template will act as a default value.
- Construction Type: refers to the type of construction the Permit involves.
- Current Use: refers to how the item/object the Permit is being sought for is currently being used, if at all.
- Intended Use; refers to the proposed use for the item/object the Permit is being sought for.
- Building Code: cites the jurisdictional Building Code. Building Codes are hard-coded into the system. They constitute a fixed set that cannot be expanded or edited.
- Work Code: cites the jurisdictional Work Code. Work Codes Building are hard-coded into the system. They constitute a fixed set that cannot be expanded or edited.
- Days to Issue ❹: the number of days after which the Permit Application has been approved that the Permit itself should/must be issued. ("Should" is a policy matter; "must be" is a statutory matter.)
- External ❺: Select Yes if you wish to have this permit type appear in external systems, including the Citywide Portal; No if you do not wish to have it appear in an external system. Selecting Yes provides you with the option of setting an external label ❻ for this permit type (one, for example, that might resonate and be more familiar to the public at large than the Name assigned to it here); otherwise, the Name assigned to it here will appear externally as well.

- Click Add ❼.
Edit a Permit Type
- Click on the Edit tool
 ❶.
❶.
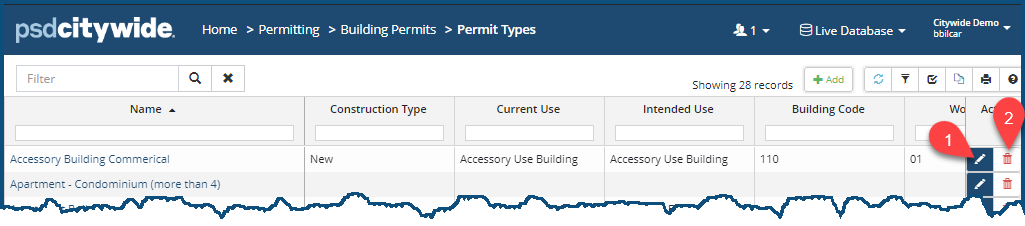
The Edit Permit Type dialog box (which contains all the same fields as the above New Permit Type dialog box) will appear. - Make the required changes.
- Click on Edit.
Delete a Permit Type
- Click on the Delete tool
 ❷. When prompted, click Remove.
Full Permit Type Access (Further Setup and Status)
Clicking on a Permit Type ❶ link in the first column of the Permit Types screen will open a new screen ❷ in which: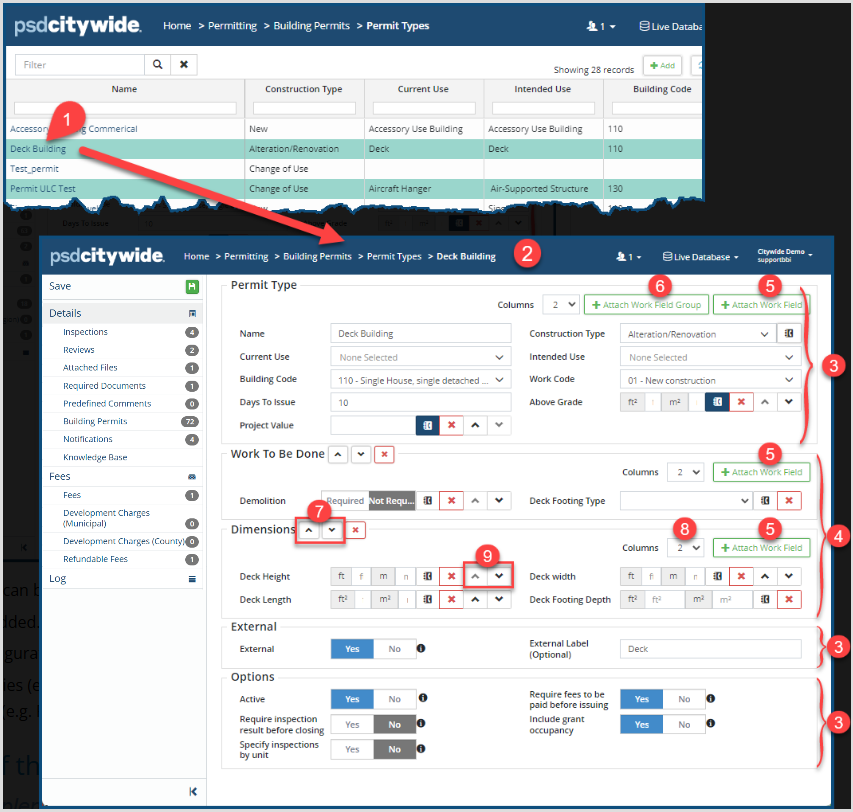
- All the fields can be edited.
- New fields added.
- Various configuration setting refined.
- All the activities (e.g. Inspections and Reviews) and records and associated with the Permit Type (e.g. Fees and other Charges) can be accessed.
Structure of the Individual Building Permit Type
Core and Supplemental Groupings
The Permit Type screen in the above example is divided into groupings ❸ & ❹. The top group contains the core fields (e.g. Name) already seen above in the New Permit Type dialog box when the Permit Type was being added, but there are also some additional fields in the group ("Project Value" and "Above Grade"). Those fields may have been added in the New Permit Type dialog box when the permit type was being created, or they could have been added on this screen by clicking on +Attach Work Field ❺. Any division on the screen that has the +Attach Work Field option within it can be used to add any of the Permit Work Fields defined for Building Permits.
To add a Work Field:
- Click on +Attach Work Field ❺. The Select Work Field dialogue box appears:
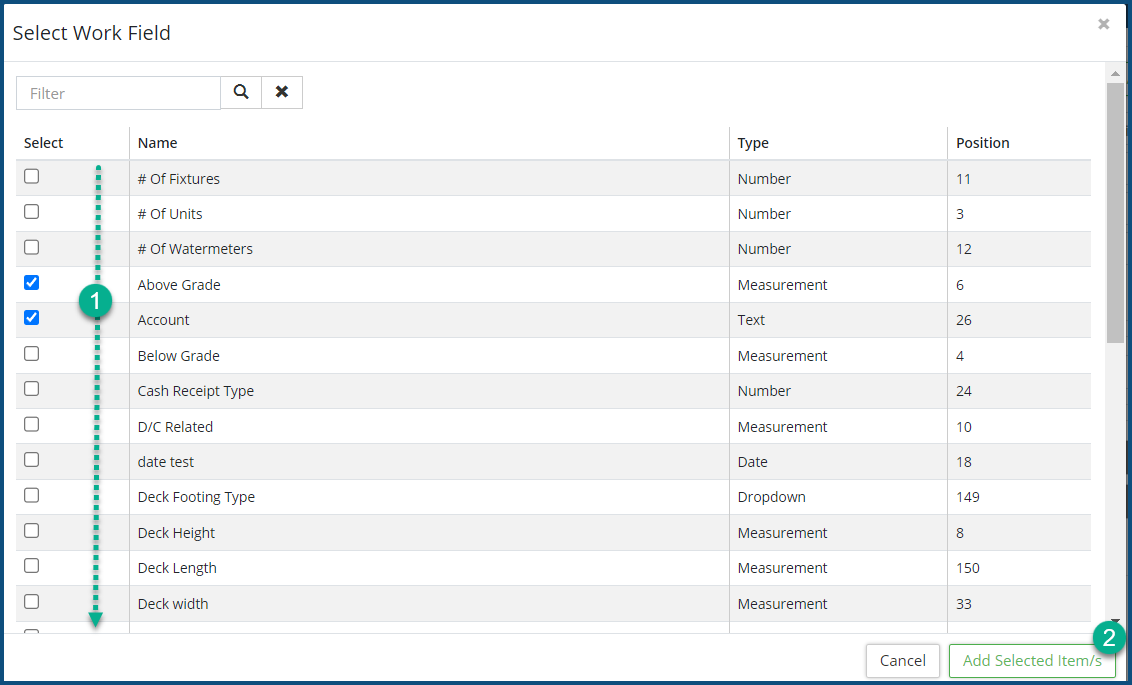
- Check ✅ the fields to be added ❶.
- Click Add Selected Item/s ❷.
The "Work To Be Done" ❹ and "Dimensions" ❹ groups, unlike the other (core) groups on the screen ❸, are supplementary groups that have been added to this permit type. They were added by clicking on +Attach Work Field Group ❻. The names of either of these two groups are not unique names dedicated to only this permit type. Most building permits will have fields in them involving dimensions, for example; so, any number of different building permits could have a "Dimensions" group within them. What is unique within each of these supplementary permit groups is the set of fields that have been added to them. In the above example, "Deck Height," "Deck Width," "Deck Length," and "Deck Footing Depth" are appropriate fields within the Deck Building permit's Dimensions group, whereas e.g. "Perimeter" would be an appropriate field in the Dimensions group of the Fence Construction permit type.
The "Work To Be Done" and "Dimensions" groups were added to this Permit Types template. That was done by clicking on +Attach Work Field Group ❻. Any number of additional pre-defined Work Groups (in Work Fields) can be added here and be populated with the relevant fields, and each group can be positioned either above or below other groups by using the up/down arrows ❼ to position them.
The fields in each of the groups can be set to appear in one-to-four columns by selecting from the Columns ❽ pull-down, and the position of the fields within each group can can be arranged with the up/down arrows ❾ next to each field.
External Settings
Deletions: Individual fields as well as supplemental groupings can be deleted by clicking on the X next to them.
External Availability and Labels: This Building Permit (like all the others) may appear on external systems, such as the Citywide Portal, or it may not, depending whether you click Yes ❶ on the External option:

You also have the option of providing an External Label ❷, which is the field label that will appear only in the external application.
The presence and label can also be set for Individual fields that have the notebook icon ![]() ❸ next to them.
❸ next to them.

Clicking on the notebook icon ![]() will produce the following dialogue box:
will produce the following dialogue box:

- External ❶: Select Yes if you would like this field to appear on external systems, such as Citywide Portal; No, if not.
- Mandatory ❷: Select Yes if this is a field that must be selected or entered; No, if not.
- External Label ❸: Enter a label which will replace the default Citywide label for this field on external systems. Otherwise, the existing (default Citywide) field name will be used.
- External Description ❹: Provide the text that will appear in the tooltip for this field.
- Click Apply ❺.
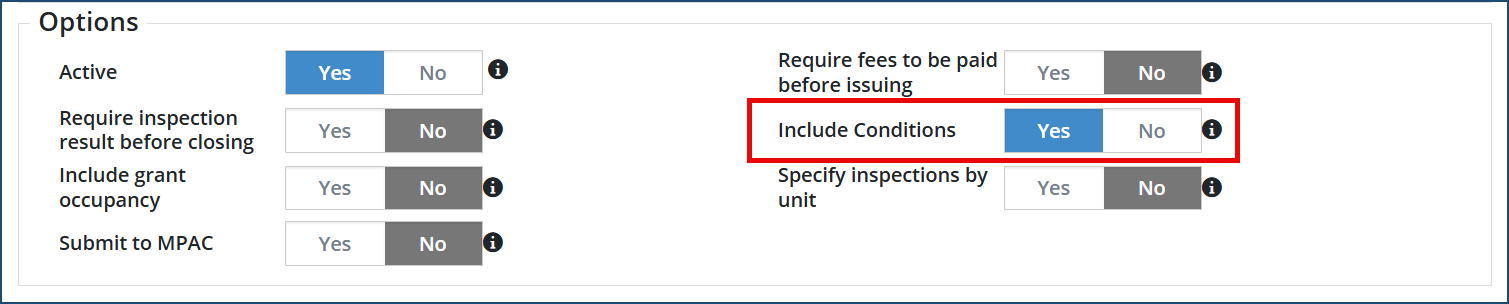
Options Group
All Permits have the Options group, and all the options involve Yes/No toggles:
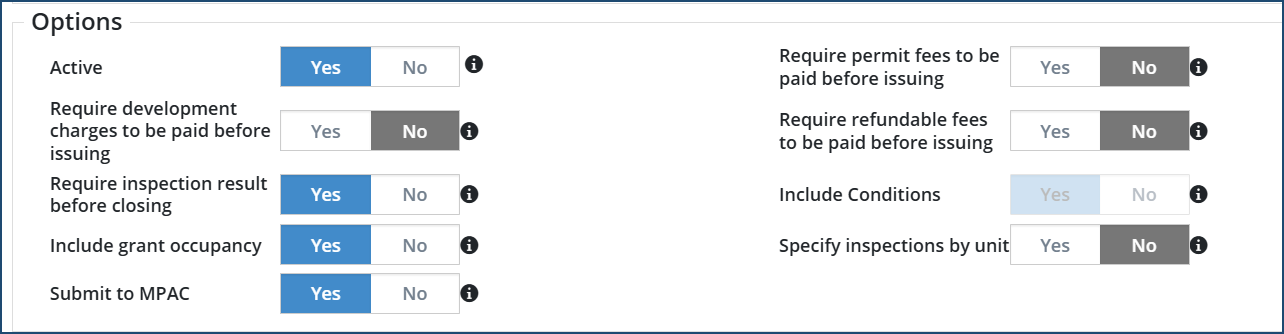
Active
- Yes: the Permit is accessible in the system.
- No: the Permit is unavailable in the system.
Require inspection result before closing
- Yes: All inspections must be completed before the permit can be closed.
- No: Inspections need not be completed before closing the permit.
Specify inspections by unit
- Yes: Inspections will be made independently for each unit in a multi-unit building project. Applies to projects in which multiple units are involved, each of which requires an independent inspection.
- No: Inspections will not involve multiple units. (E.g. Inspection of the singular foundation in a multi-unit building.)
Require fees to be paid before issuing (permit fees, development charges or refundable fees)
- Yes: Fee(s) must be paid before the permit is issued.
- No: Fee(s) need not be paid before the permit is issued.
Include Conditions
- Yes: Predefined Conditions are set up and are to be included on the permit application.
- No: Conditions are not required on the permit application.
Include grant occupancy
- Yes: Include the grant occupancy status in the workflow.
- No: Do not include the grant occupancy status in the workflow.
Affiliate Panel Options
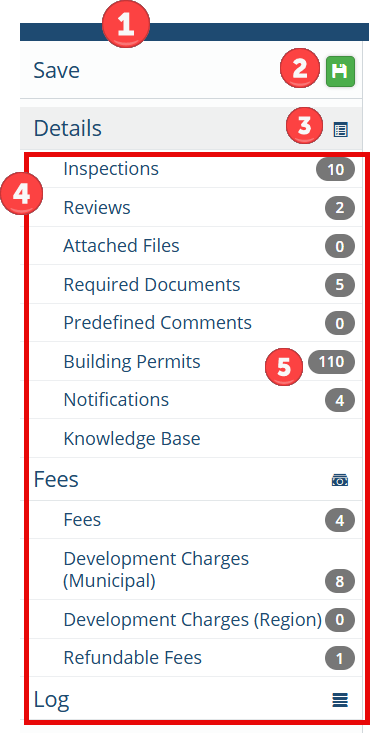
The panel ❶ on the left side of the screen consists of related, affiliate options. The actual permits that are based on the Permit Type are accessible here, as well as collateral documents and procedures, including Inspections, Reviews, Notifications, and various financials.
 |
|
Inspections
The Inspections that you will be selecting for any of the building permits you define will be drawn from the Inspection Types list. You cannot add new inspection types here on the fly; they must already exist, having been created in Inspection Types. If an inspection type is missing, creating it in Inspection Types and then return to this screen and attach it.
Attach an Inspection Type
- Click on Inspections ❶ in the Affiliate Panel. Inspections appears in the right panel, displaying the current (if any) inspections associated with this permit type ❷:
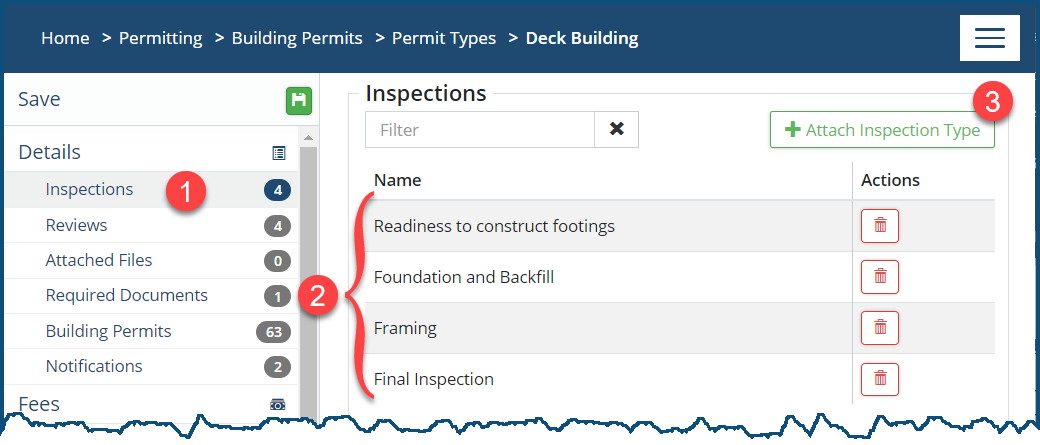
- Click +Attach Inspection Type ❸. The Select Inspection Type dialog box appears:
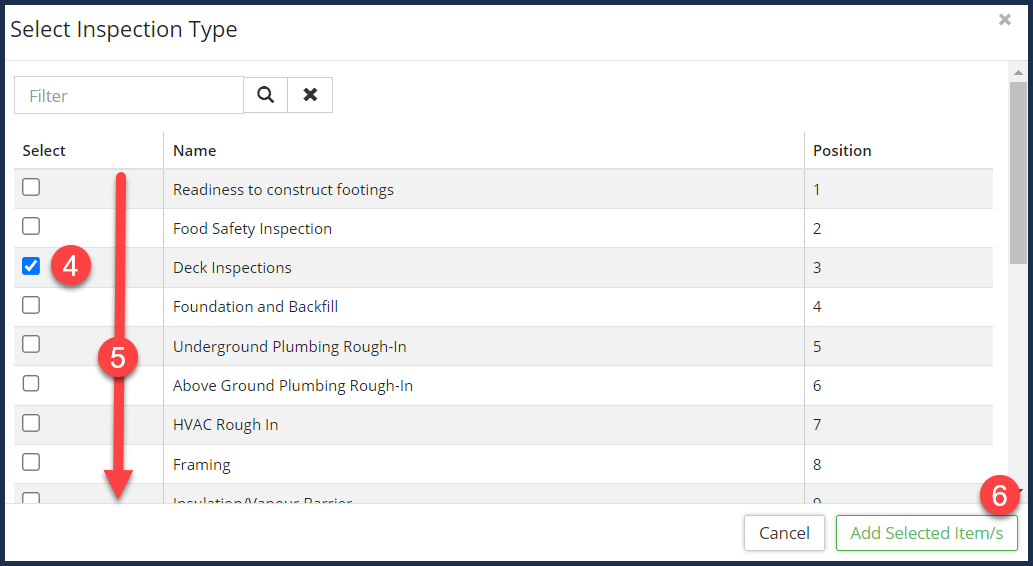
- Check ✅ ❹ all inspection types in the list ❺ that apply to the currently permit type.
- Click Add Selected Item/s ❻. The order in the resultant Inspection list will automatically follow the Position order of the checked items.
Reviews
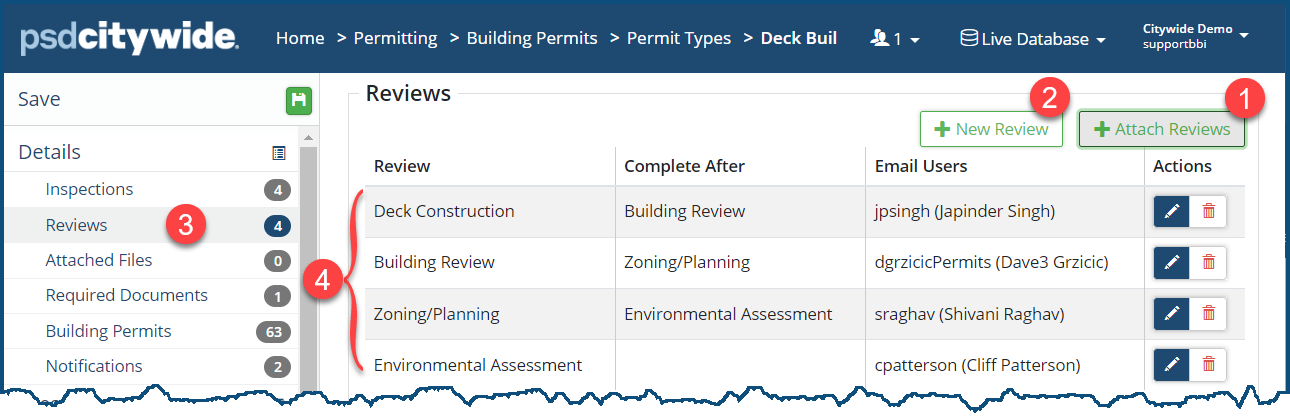
You can attach existing Reviews ❶ and/or add New Review Types ❷ on the fly, if necessary. See Reviews on instructions pertaining to adding a New Review type ❷.
Attach a Review
- Click on Reviews ❸ in the Affiliate Panel. Reviews appears in the right panel, displaying the current (if any) reviews associated with this permit type ❹:
- Click + Attach Reviews ❶. The Select Reviews dialog box appears:
- Check ✅ ❺ the review(s) to be added to this permit type from the list ❻.
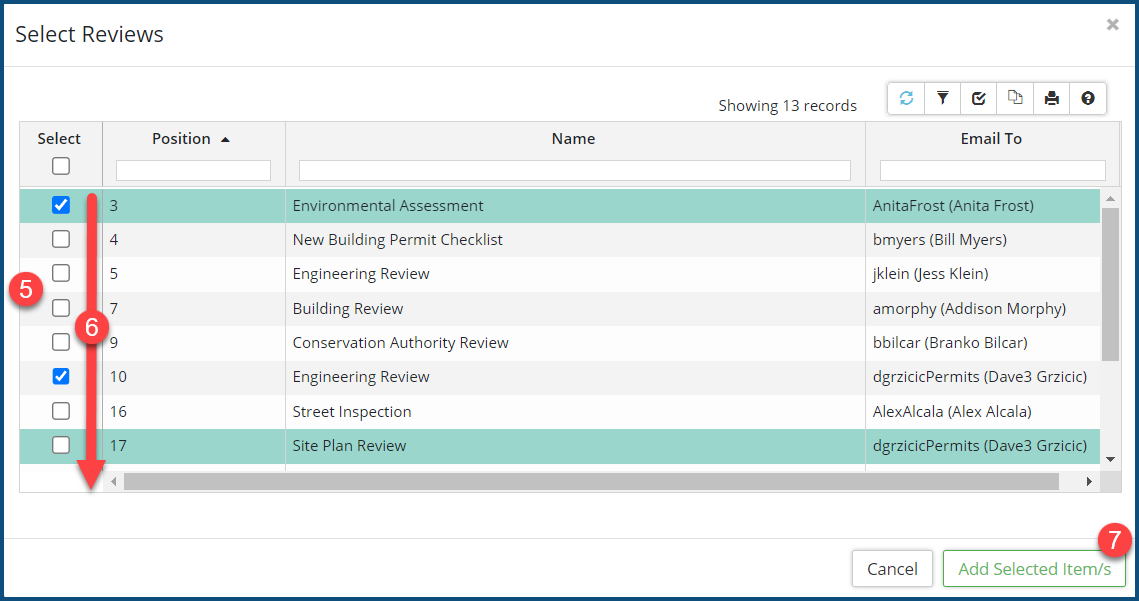
- Click Add Selected Item/s ❼. The order in the resultant Reviews list will automatically follow the Position order of the checked items.
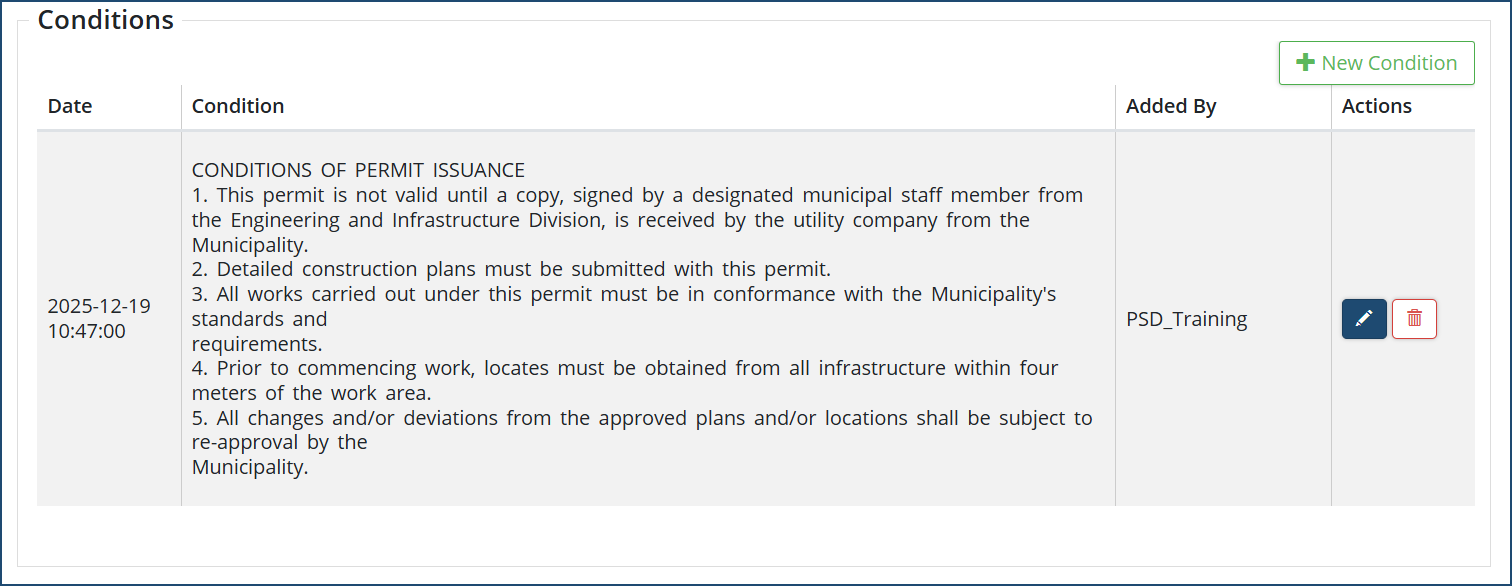
Conditions
To be used when specific predefined conditions are applicable to the permit type. Setting up conditions in the permit type will allow Citywide users to include condition details on the application submitted by the applicant.
To add a predefined condition:
- In the permit type Details, view the Options Group section and toggle the 'Include Conditions' to Yes. This will enable Conditions on the left side affiliate panel.
- Then in Conditions, click + New Condition ❶

- If desired, change the date and time.
- Enter/type the condition details.
- Click Add.
Attached Files
Attached Files comprise adjunct documents, drawings, worksheets, or any other type of file that provides informational, instructional, or in some other manner helpful information or resources pertaining to the current permit type.
Click on Attached Files ❶. Attached Files appears in the right panel, displaying the current (if any) attachments associated with this permit type ❷:
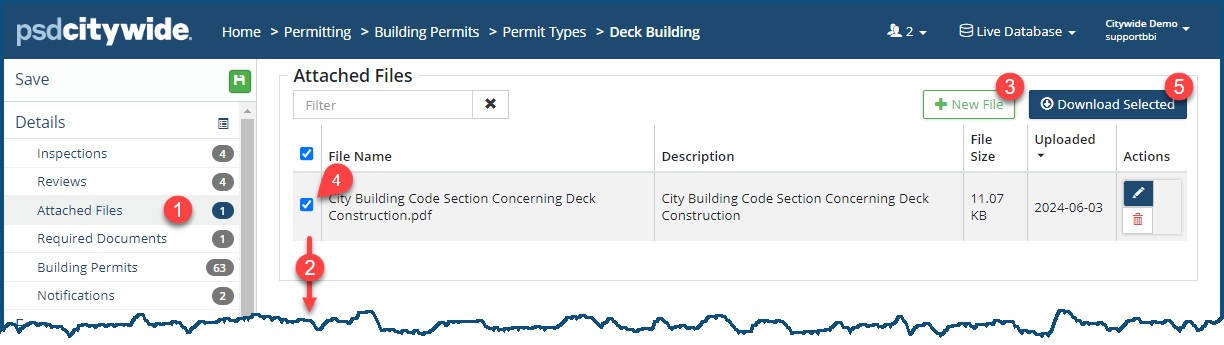
Add an Attachment
- Click on + New File ❸.The Add Files dialog box appears:

- Click on Select File(s) ❶ to select one or more files using your system File Manager, or Drag & Drop ❷ the file(s) you would like to attach to this permit.
- Provide a succinct Description ❸ for each of the added files.
- Click Upload File ❹.
Download an Attached File
Attached files can be downloaded. This may be required periodically to review their contents, to see if they are up to date, or whether they need to be updated, modified, and then re-added here.
- Check✅ ❹ the file(s) you wish to download.
- Click on Download Selected ❺. Your system File Manager will open, providing you with the opportunity to select the location where you would like the file(s) to be downloaded.
Required Documents
Required Documents are all the various documents (e.g. applications, building plans, etc.) that must accompany individual building permits for the permit to be issued.
- Click on Required Documents ❶ in the Affiliate Panel. Required Documents appears in the right panel, displaying the current list (if any) of the required documents associated with this permit type ❷:
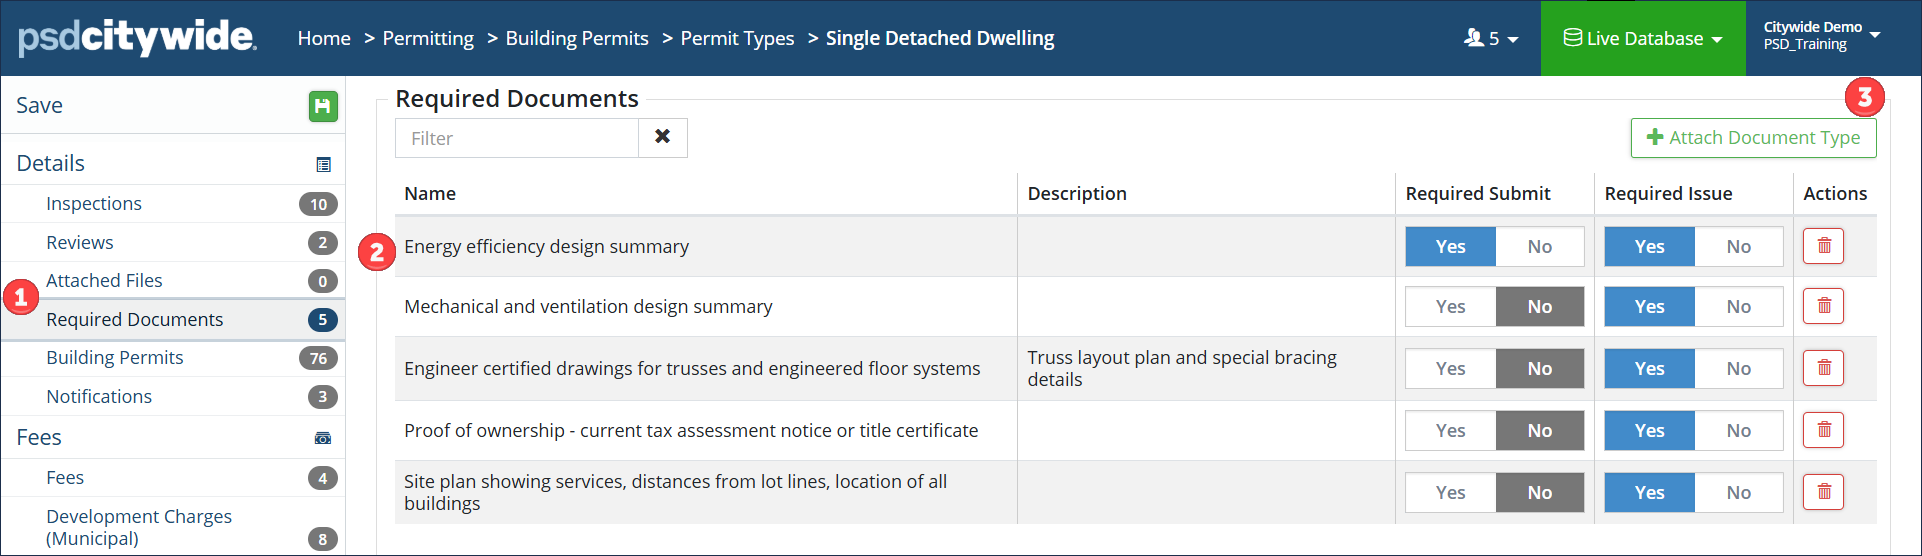
- Click + Attach Document Type ❸. The Select Document Type dialog box appears:
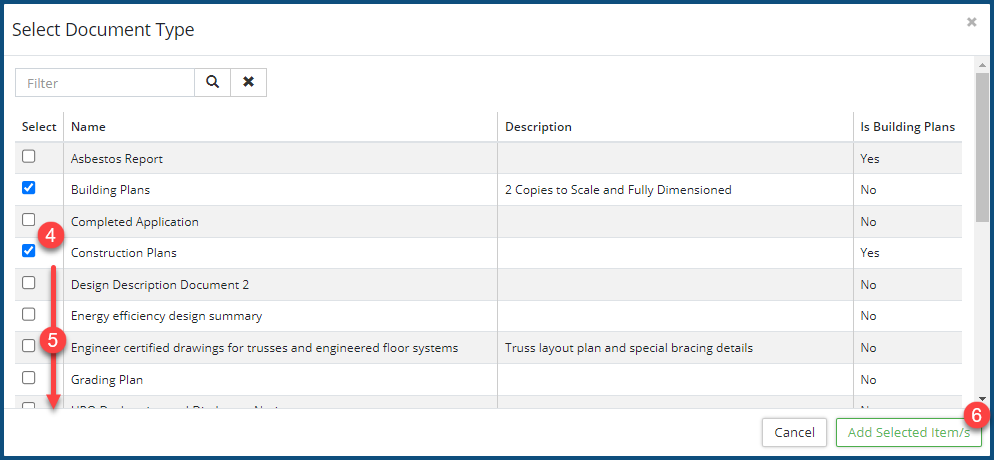
- Check ✅ ❹ all inspection types and other documents in the list ❺ that apply to the current permit type.
- Click Add Selected Item/s ❻. The order in the resultant Inspection list will automatically follow the Position order of the checked items.
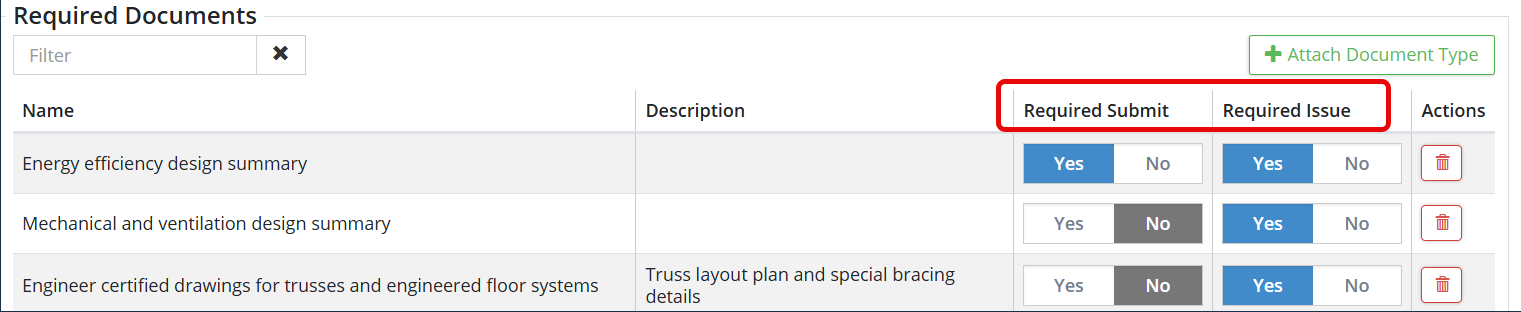
Required Documents for Application Submission option
Once your required document types are selected, you can set which required documents are needed when the application is first submitted vs. the required documents provided anytime before the permit is issued.
- On each required document type, select the toggle to Yes or No for the Required Submit or Required Issue document options.
For efficiency, you can set up a list of predefined comments for users to add to an application based on the application type. This saves time for the user as they will not have to manually type standard-like comments into the application.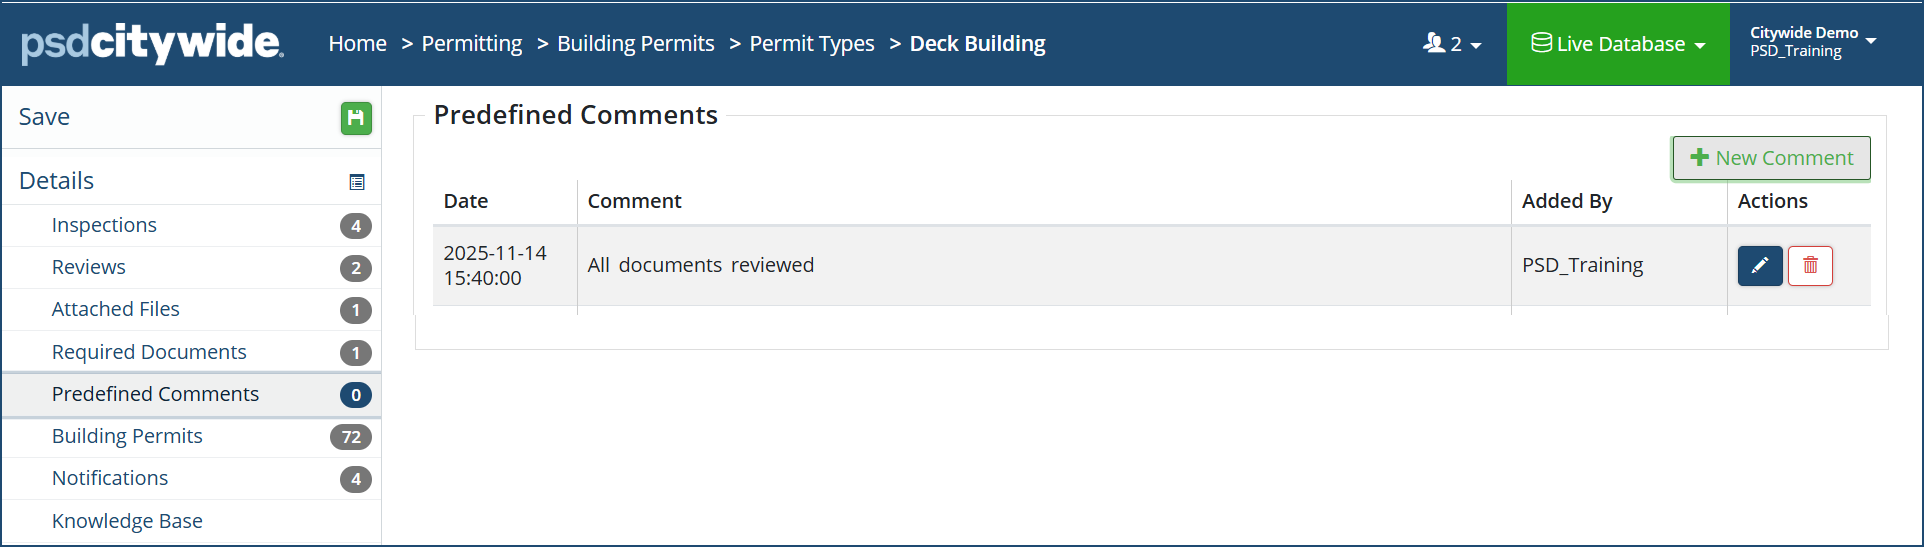
To create a Predefined Comment entry:
- Click +New Comment. Enter a Comment.
- Click Add, then Save
- Repeat steps 1. and 2. for each predefined comment.
The notification set(s) associated with the building permit will appear in this list. There is nothing to be done directly on this page; it is only informational. The building permits that each notification set comprises is defined on the Notifications setup screen. The notification set that appears here will be one in which this building permit type has been associated with it.
- Click on Notifications ❶ in the Affiliate Panel. Notifications appears in the right panel, displaying the current list (if any) of the notifications associated with this permit type ❷:
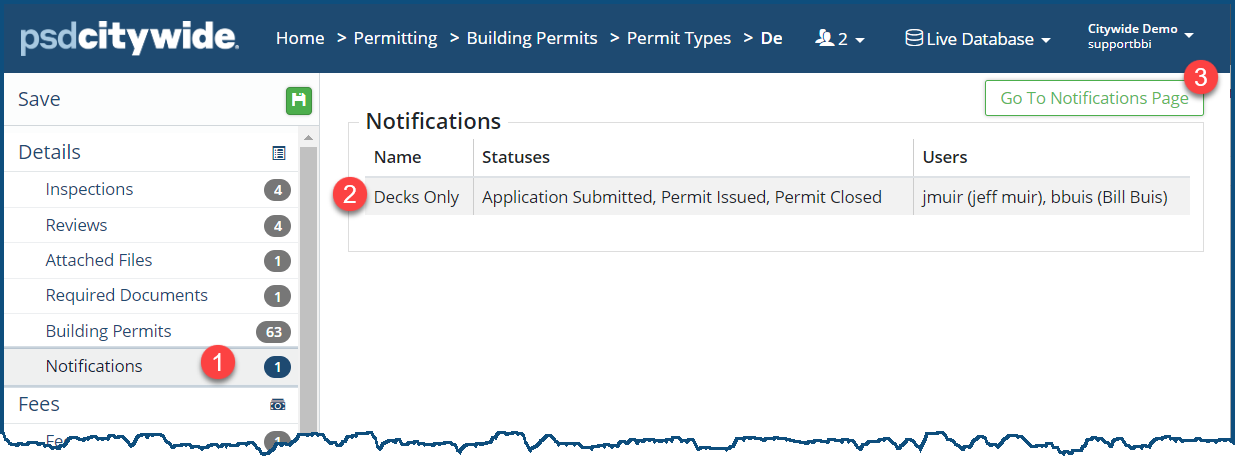
- Click Go To Notifications Page ❸ to choose the notification set that this permit type will be part of. The changes made there will be reflected back on this Notifications list ❷.
Knowledge Base
The Knowledge Base screen is used to include important information, instruction, or standard questions for staff to use when creating individual applications based on the specific Permit, Licence or Application Type.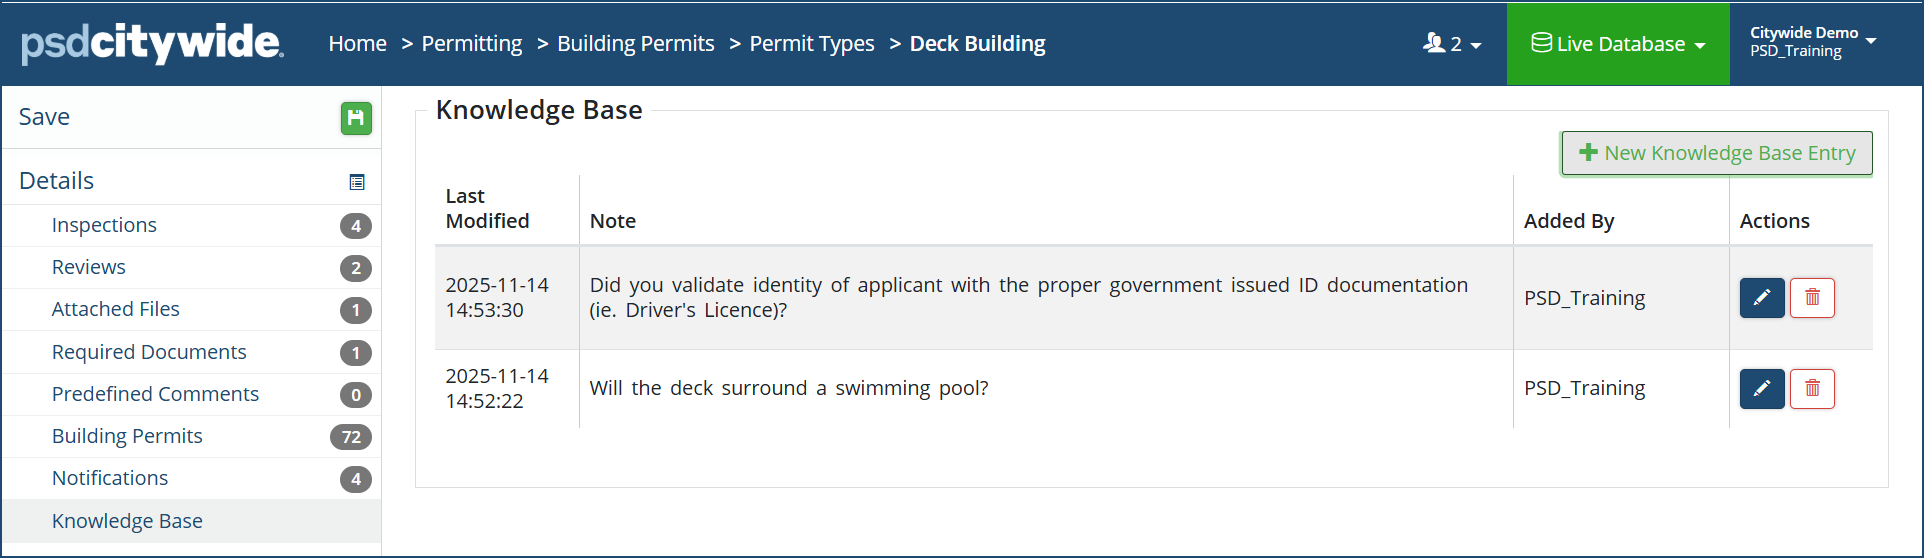
To create a Knowledge Base entry:
- Click +New Knowledge Base Entry. Enter a Note.
- Click Save.
- Repeat steps 1. and 2. for each note.
Fees
Any number of different fees can be associated with a building permit, provided they have first been created in Fees. They can only be applied here; they cannot be created.
- Click on Fees ❶ in the Affiliate Panel. Fees appears in the right panel, displaying the current list (if any) of the fees associated with this permit type ❷:
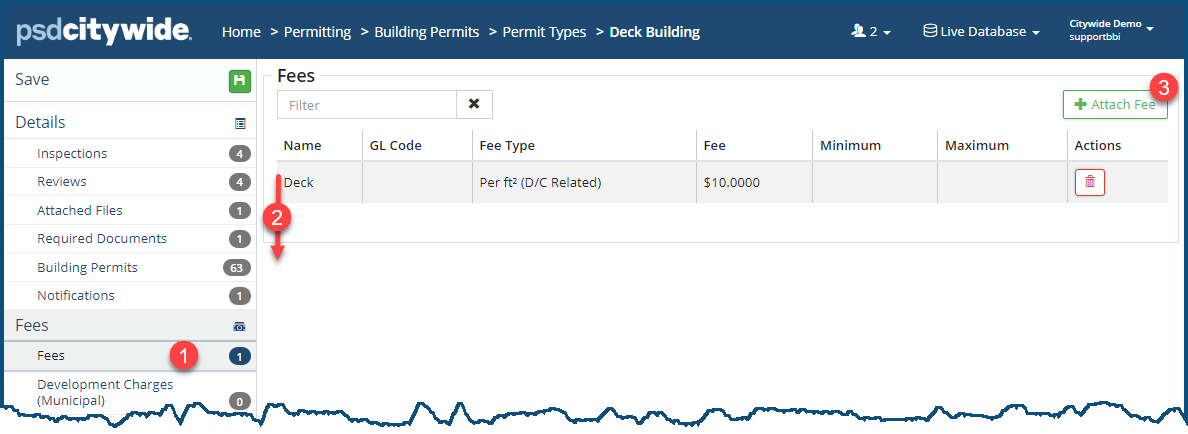
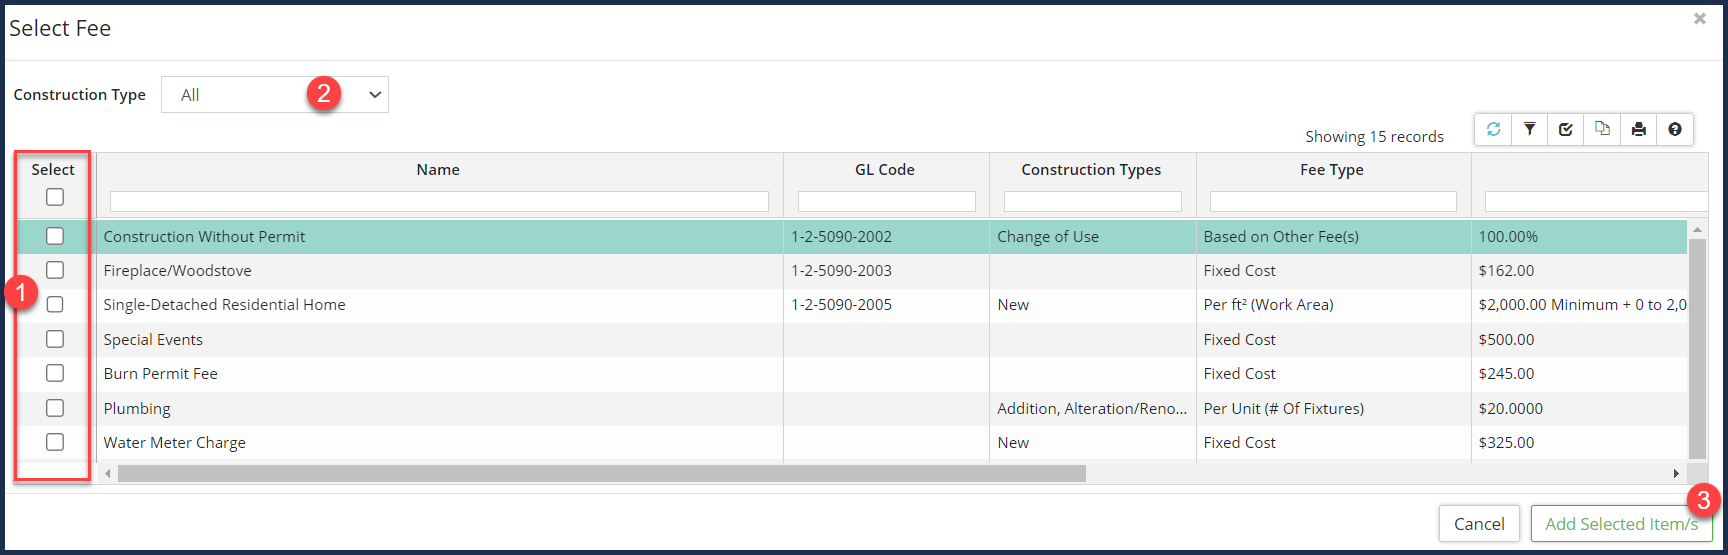
- Click on + Attach Fee ❸. The Select Fee dialog box appears:

- Check ✅ ❹ the fees to be added. You can filter the list down to fees associated with a particular Construction Type ❺ or leave it on the default "All" option.
- Click Add Selected Item/s ❻.
Development Charges
Development charges are associated with larger projects involving interconnections between those projects and municipal and regional services (e.g., water supply, road construction and servicing, etc). The scope and size of development charges is determined by the development class(es) associated with individual projects and the costs of the services specific to those classes. (See Development Charges for a full discussion of development services and classes). Thus, development costs associated with a building permit are determined by the class that the building project falls under, and it could be more than a single class.
The full array of services, classes, and individual dollar amounts is set up in Development Charges. The present task involves simply selecting the class(es) that the current building permit (based on its projects) accords with.
Setting up Development Charges
- Click on Development Charges ❶ in the Affiliate Panel. (There are two on the screenshot below for this Commercial Building. One of the other or both can apply, selected in sequence.) Development Charges appears in the right panel:
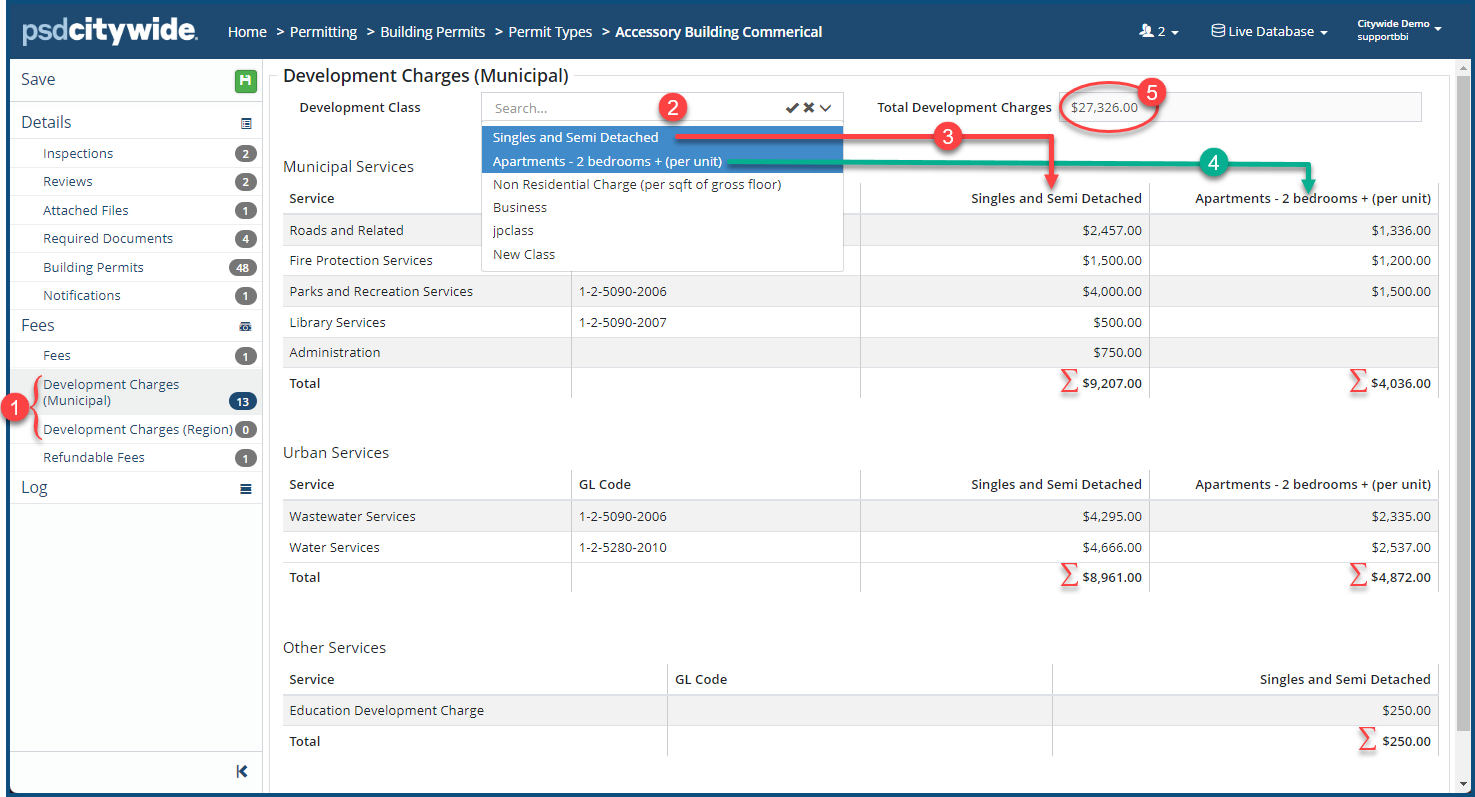
- From the Development Class pull-down ❷, select one of more of the classes that apply for this building permit. In the above example, two were selected (indicated by the blue shading). (Hold down the Ctrl key when wishing to select more than one.) A column of data ❸ and ❹ will appear for each of the selected classes, displaying the services and the costs associated with each across the selected classes, all sub-totalled (∑), ultimately adding up to the Total Development Charges ❺.
Refundable Fees
There are instances in which particular types of fees may be refunded in connection with an individual permit type. This is the place where you set up the applicable types of refunds that have been created and defined in Refundable Fees.
- Click on Refundable Fees ❶ in the Affiliate Panel. Refundable Fees appears in the right panel, displaying the current list (if any) of the refundable fees associated with this permit type ❷:
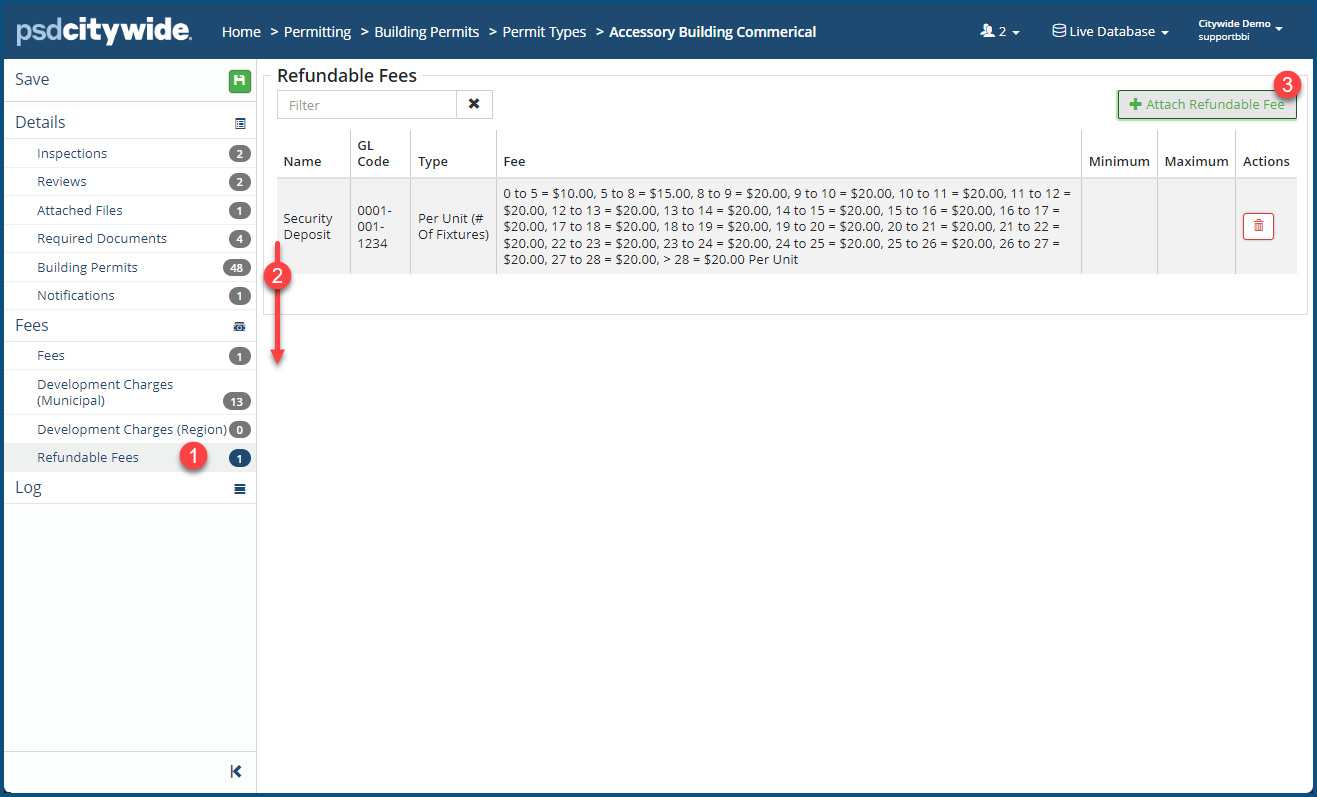
- Click on + Attach Refundable Fee ❸. The Select Refundable Fee dialog box appears:
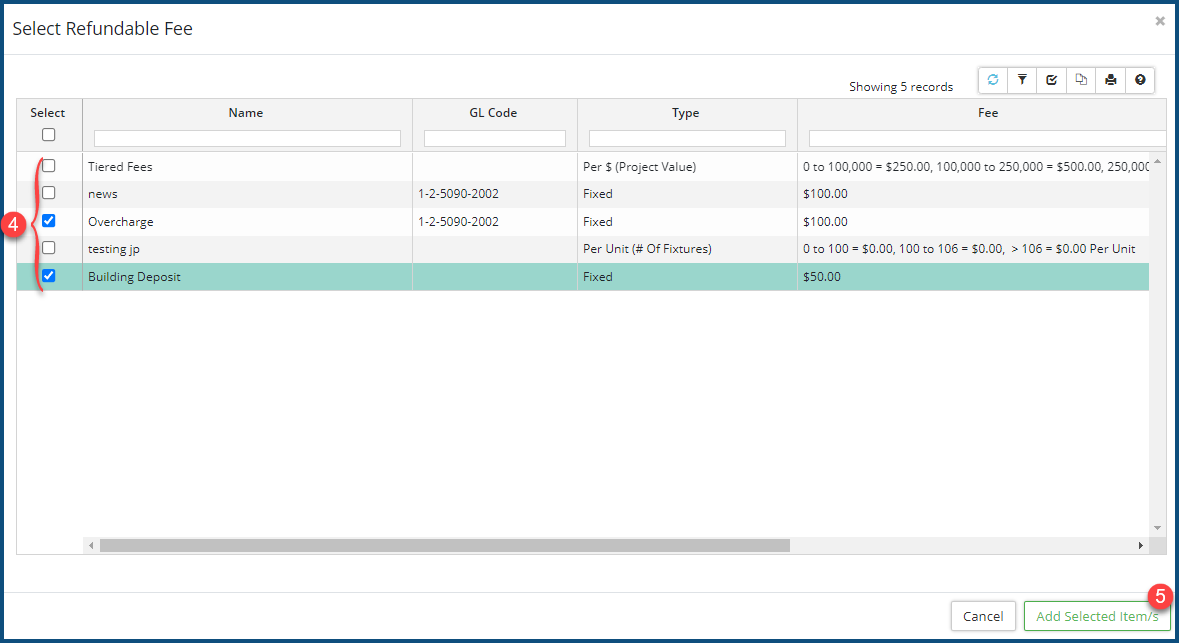
- Check ✅ ❹ the refundable fees to be added.
- Click Add Selected Item/s ❺.
Log
The log displays all activity in the system that relates specifically to Building Permits. (Each of the other Permit sub-modules has its own log). Its events appear in reverse chronological order, displaying the user who initiated the event, as well as specific description of the event.
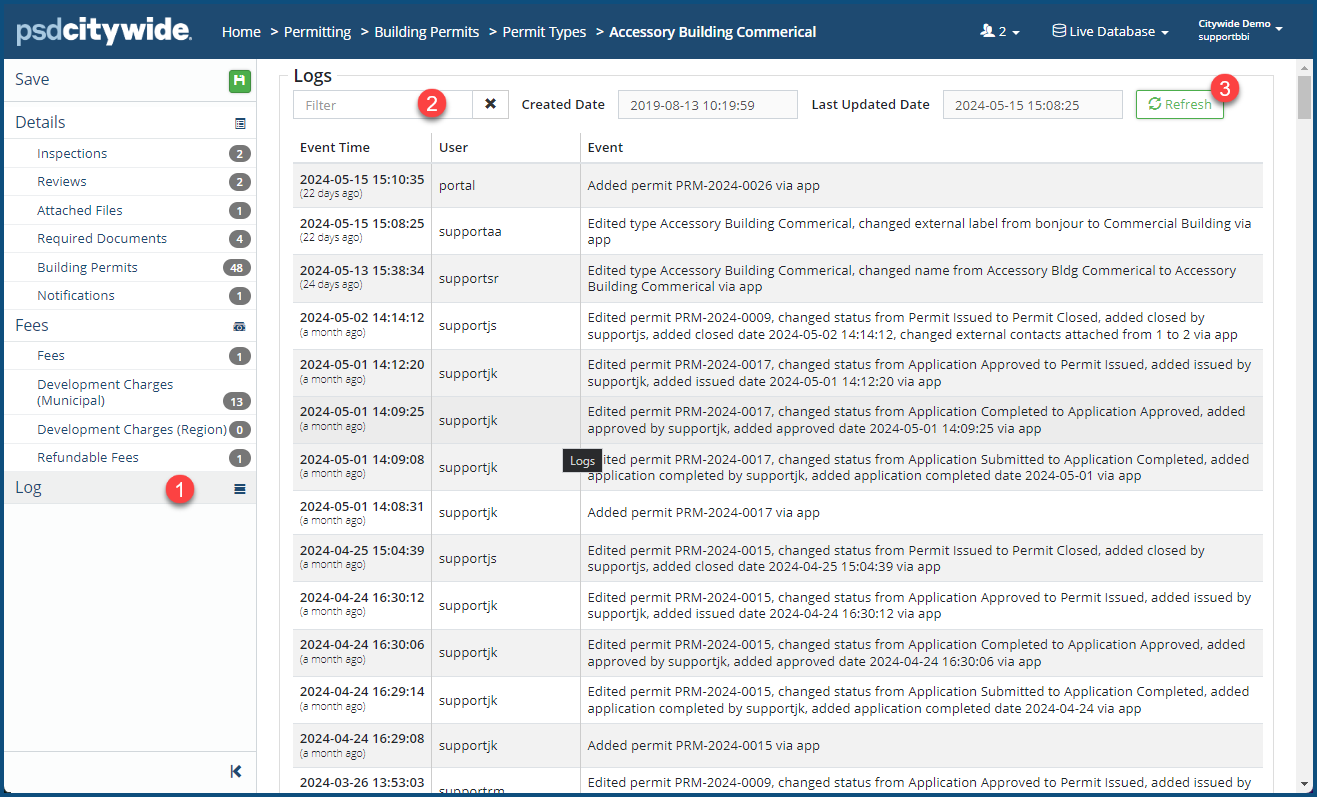
- Click on Log ❶. Logs appears in the right panel.
- Enter the text in the Filter box ❷ to filter the list down to the its matches.
- Click Refresh ❸ to see any entries that have been logged since this screen has been openned.


